Brother International DreamWeaver„ VQ3000 Users Manual - English - Page 129
Sewing Stretch Fabrics
 |
View all Brother International DreamWeaver„ VQ3000 manuals
Add to My Manuals
Save this manual to your list of manuals |
Page 129 highlights
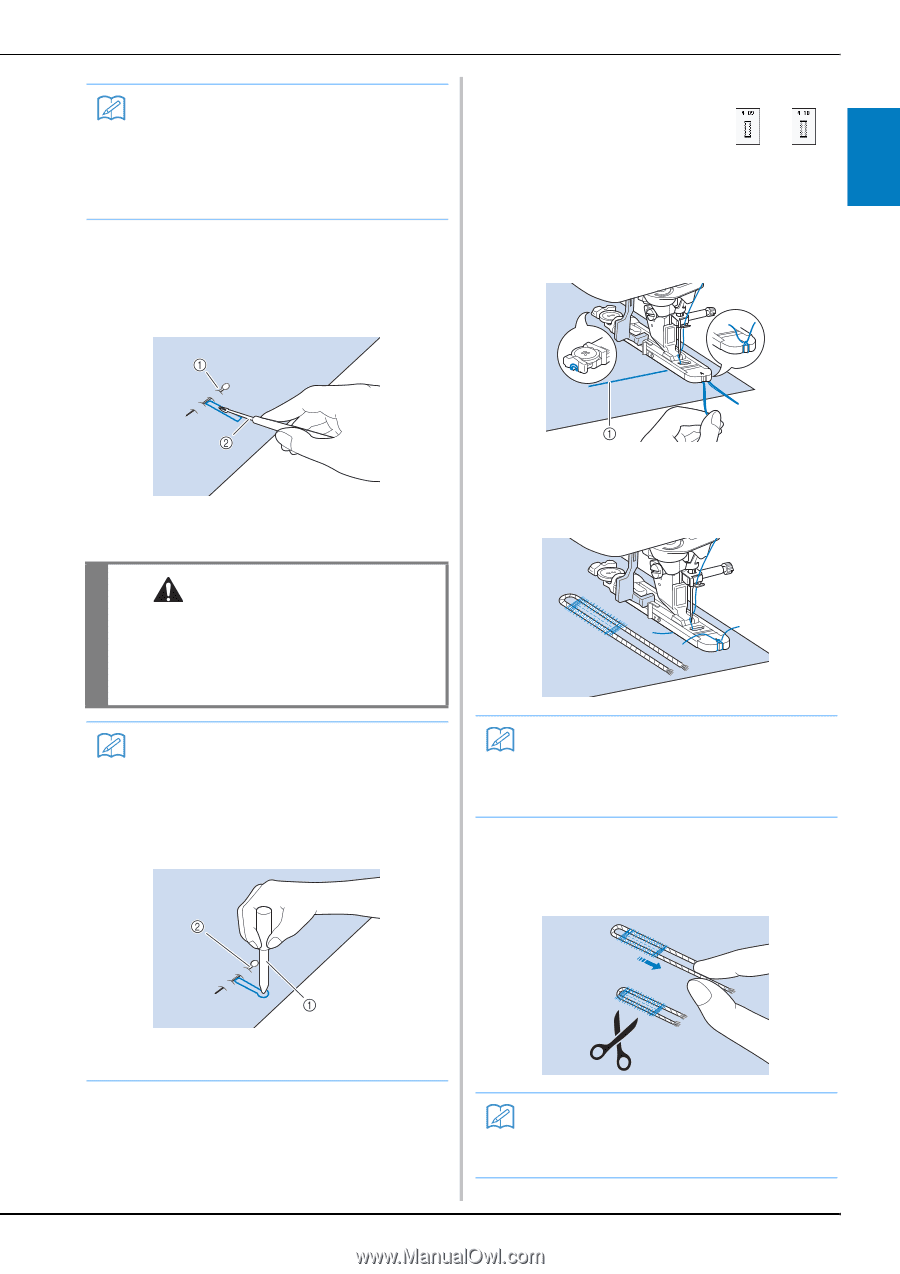
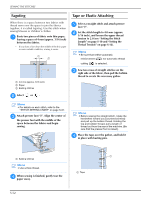
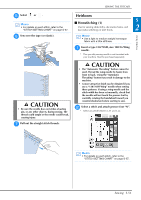
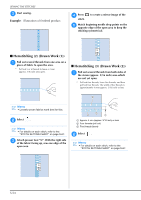
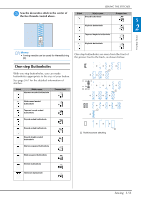
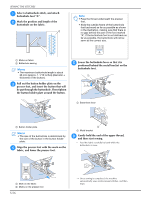
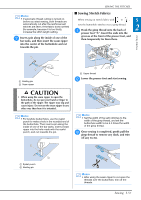
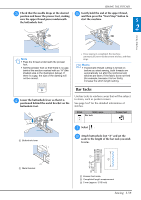
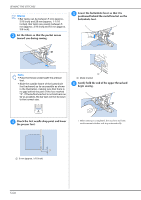
Memo • If automatic thread cutting is turned on before you start sewing, both threads are automatically cut after the reinforcement stitches are sewn. If the fabric does not feed (for example, because it is too thick), increase the stitch length setting. g Insert a pin along the inside of one bar tacks, and then insert the seam of the ripper into the center of the buttonhole and cut towards the pin. SEWING THE STITCHES ■ Sewing Stretch Fabrics When sewing on stretch fabric with or , S sew the buttonhole stitches over a gimp thread. 2 a Hook the gimp thread onto the back of presser foot "A". Insert the ends into the grooves at the front of the presser foot, and then temporarily tie them there. Utility Stitches a Basting pin b Seam ripper a Upper thread b Lower the presser foot and start sewing. CAUTION • When using the seam ripper to open the buttonhole, do not put your hand or finger in the path of the ripper. The ripper may slip and cause injury. Do not use the seam ripper in any other way than how it is intended. Memo • For keyhole buttonholes, use the eyelet punch to make a hole in the rounded end of the buttonhole. Then insert a pin along the inside of one of the bar tacks, insert a seam ripper into the hole made with the eyelet punch, and cut towards the pin. Memo • Set the width of the satin stitches to the width of the gimp thread, and set the buttonhole width to be 2-3 times the width of the gimp thread. c Once sewing is completed, gimp thread to remove any gently pull the slack, and trim off any excess. a Eyelet punch b Basting pin Memo • After using the seam ripper to cut open the threads over the buttonhole, trim off the threads. Sewing S-57
-
 1
1 -
2
-
3
-
4
-
5
-
6
-
7
-
8
-
9
-
10
-
11
-
12
-
13
-
14
-
15
-
16
-
17
-
18
-
19
-
20
-
21
-
22
-
23
-
24
-
25
-
26
-
27
-
28
-
29
-
30
-
31
-
32
-
33
-
34
-
35
-
36
-
37
-
38
-
39
-
40
-
41
-
42
-
43
-
44
-
45
-
46
-
47
-
48
-
49
-
50
-
51
-
52
-
53
-
54
-
55
-
56
-
57
-
58
-
59
-
60
-
61
-
62
-
63
-
64
-
65
-
66
-
67
-
68
-
69
-
70
-
71
-
72
-
73
-
74
-
75
-
76
-
77
-
78
-
79
-
80
-
81
-
82
-
83
-
84
-
85
-
86
-
87
-
88
-
89
-
90
-
91
-
92
-
93
-
94
-
95
-
96
-
97
-
98
-
99
-
100
-
101
-
102
-
103
-
104
-
105
-
106
-
107
-
108
-
109
-
110
-
111
-
112
-
113
-
114
-
115
-
116
-
117
-
118
-
119
-
120
-
121
-
122
-
123
-
 124
124 -
 125
125 -
 126
126 -
 127
127 -
 128
128 -
 129
129 -
 130
130 -
 131
131 -
 132
132 -
 133
133 -
 134
134 -
135
-
136
-
137
-
138
-
139
-
140
-
141
-
142
-
143
-
144
-
145
-
146
-
147
-
148
-
149
-
150
-
151
-
152
-
153
-
154
-
155
-
156
-
157
-
158
-
159
-
160
-
161
-
162
-
163
-
164
-
165
-
166
-
167
-
168
-
169
-
170
-
171
-
172
-
173
-
174
-
175
-
176
-
177
-
178
-
179
-
180
-
181
-
182
-
183
-
184
-
185
-
186
-
187
-
188
-
189
-
190
-
191
-
192
-
193
-
194
-
195
-
196
-
197
-
198
-
199
-
200
-
201
-
202
-
203
-
204
-
205
-
206
-
207
-
208
-
209
-
210
-
211
-
212
-
213
-
214
-
215
-
216
-
217
-
218
-
219
-
220
-
221
-
222
-
223
-
224
 |
 |