Brother International DreamWeaver„ VQ3000 Users Manual - English - Page 94
Saving Your Stitch Settings
 |
View all Brother International DreamWeaver„ VQ3000 manuals
Add to My Manuals
Save this manual to your list of manuals |
Page 94 highlights
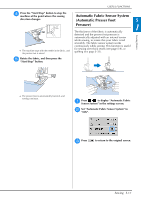
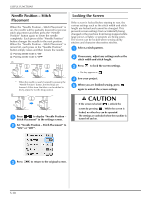
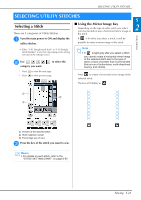
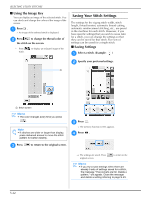
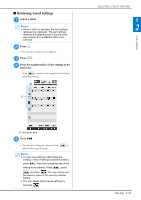
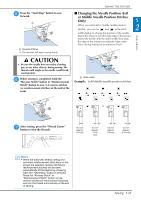
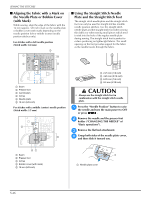
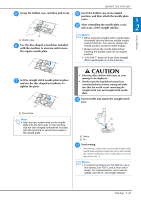
SELECTING UTILITY STITCHES ■ Using the Image Key You can display an image of the selected stitch. You can check and change the colors of the image of the screen. a Press . → An image of the selected stitch is displayed. b Press to change the thread color of the stitch on the screen. * Press stitch. to display an enlarged image of the Saving Your Stitch Settings The settings for the zigzag stitch width, stitch length, thread tension, automatic thread cutting, automatic reinforcement stitching, etc., are preset in the machine for each stitch. However, if you have specific settings that you wish to reuse later for a stitch, you can change the settings so that they can be saved for that stitch. Five sets of settings can be saved for a single stitch. ■ Saving Settings a Select a stitch. (Example: ) b Specify your preferred settings. a a Stitch screen Memo • The color changes every time you press . Note • If stitches are wider or larger than display, press darkened arrows to move the stitch pattern for better visibility. c Press . → The memory function screen appears. d Press . c Press to return to the original screen. → The settings are saved. Press original screen. to return to the Memo • If you try to save settings when there are already 5 sets of settings saved for a stitch, the message "The pockets are full. Delete a pattern." will appear. Close the message and delete a setting referring to page S-23. S-22
-
 1
1 -
2
-
3
-
4
-
5
-
6
-
7
-
8
-
9
-
10
-
11
-
12
-
13
-
14
-
15
-
16
-
17
-
18
-
19
-
20
-
21
-
22
-
23
-
24
-
25
-
26
-
27
-
28
-
29
-
30
-
31
-
32
-
33
-
34
-
35
-
36
-
37
-
38
-
39
-
40
-
41
-
42
-
43
-
44
-
45
-
46
-
47
-
48
-
49
-
50
-
51
-
52
-
53
-
54
-
55
-
56
-
57
-
58
-
59
-
60
-
61
-
62
-
63
-
64
-
65
-
66
-
67
-
68
-
69
-
70
-
71
-
72
-
73
-
74
-
75
-
76
-
77
-
78
-
79
-
80
-
81
-
82
-
83
-
84
-
85
-
86
-
87
-
88
-
 89
89 -
 90
90 -
 91
91 -
 92
92 -
 93
93 -
 94
94 -
 95
95 -
 96
96 -
 97
97 -
 98
98 -
 99
99 -
100
-
101
-
102
-
103
-
104
-
105
-
106
-
107
-
108
-
109
-
110
-
111
-
112
-
113
-
114
-
115
-
116
-
117
-
118
-
119
-
120
-
121
-
122
-
123
-
124
-
125
-
126
-
127
-
128
-
129
-
130
-
131
-
132
-
133
-
134
-
135
-
136
-
137
-
138
-
139
-
140
-
141
-
142
-
143
-
144
-
145
-
146
-
147
-
148
-
149
-
150
-
151
-
152
-
153
-
154
-
155
-
156
-
157
-
158
-
159
-
160
-
161
-
162
-
163
-
164
-
165
-
166
-
167
-
168
-
169
-
170
-
171
-
172
-
173
-
174
-
175
-
176
-
177
-
178
-
179
-
180
-
181
-
182
-
183
-
184
-
185
-
186
-
187
-
188
-
189
-
190
-
191
-
192
-
193
-
194
-
195
-
196
-
197
-
198
-
199
-
200
-
201
-
202
-
203
-
204
-
205
-
206
-
207
-
208
-
209
-
210
-
211
-
212
-
213
-
214
-
215
-
216
-
217
-
218
-
219
-
220
-
221
-
222
-
223
-
224
 |
 |
