Cisco 7965G Administration Guide - Page 173
Performing a Factory Reset, Operation, Performing, Explanation
 |
UPC - 882658140464
View all Cisco 7965G manuals
Add to My Manuals
Save this manual to your list of manuals |
Page 173 highlights
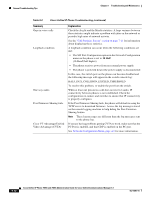
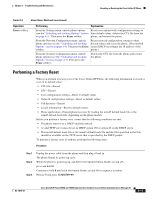
Chapter 9 Troubleshooting and Maintenance Resetting or Restoring the Cisco Unified IP Phone Table 9-4 Basic Reset Methods (continued) Operation Erase softkey Performing Explanation From the Settings menu, unlock phone options Resets user and network configuration settings to (see the "Unlocking and Locking Options" section their default values, deletes the CTL file from the on page 4-3). Then press the Erase softkey. phone, and restarts the phone. From the Network Configuration menu, unlock phone options (see the "Unlocking and Locking Options" section on page 4-3). The press the Erase softkey. Resets network configuration settings to their default values and resets the phone. (This method causes DHCP reconfigure the IP address of the phone.) From the Security Configuration menu, unlock phone options (see the "Unlocking and Locking Options" section on page 4-3). Then press the Erase softkey. Deletes the CTL file from the phone and restarts the phone. Performing a Factory Reset When you perform a factory reset of the Cisco Unified IP Phone, the following information is erased or reset to its default value: • CTL file-Erased • LSC-Erased • User configuration settings-Reset to default values • Network configuration settings-Reset to default values • Call histories-Erased • Locale information-Reset to default values • Phone application-Erased (phone recovers by loading the term45.default.loads file or the term65.default.loads file, depending on the phone model) Before you perform a factory reset, ensure that the following conditions are met: • The phone must be on a DHCP-enabled network. • A valid TFTP server must be set in DHCP option 150 or option 66 on the DHCP server. • The term45.default.loads file or the term65.default.loads file and the files specified in that file should be available on the TFTP server that is specified by the DHCP packet. To perform a factory reset of a phone, perform the following steps: Procedure Step 1 Step 2 Step 3 Unplug the power cable from the phone and then plug it back in. The phone begins its power-up cycle. While the phone is powering up, and before the Speaker button flashes on and off, press and hold #. Continue to hold # until each line button flashes on and off in sequence in amber. Release # and press 123456789*0#. OL-14641-01 Cisco Unified IP Phone 7965G and 7945G Administration Guide for Cisco Unified Communications Manager 6.1 9-15
-
 1
1 -
2
-
3
-
4
-
5
-
6
-
7
-
8
-
9
-
10
-
11
-
12
-
13
-
14
-
15
-
16
-
17
-
18
-
19
-
20
-
21
-
22
-
23
-
24
-
25
-
26
-
27
-
28
-
29
-
30
-
31
-
32
-
33
-
34
-
35
-
36
-
37
-
38
-
39
-
40
-
41
-
42
-
43
-
44
-
45
-
46
-
47
-
48
-
49
-
50
-
51
-
52
-
53
-
54
-
55
-
56
-
57
-
58
-
59
-
60
-
61
-
62
-
63
-
64
-
65
-
66
-
67
-
68
-
69
-
70
-
71
-
72
-
73
-
74
-
75
-
76
-
77
-
78
-
79
-
80
-
81
-
82
-
83
-
84
-
85
-
86
-
87
-
88
-
89
-
90
-
91
-
92
-
93
-
94
-
95
-
96
-
97
-
98
-
99
-
100
-
101
-
102
-
103
-
104
-
105
-
106
-
107
-
108
-
109
-
110
-
111
-
112
-
113
-
114
-
115
-
116
-
117
-
118
-
119
-
120
-
121
-
122
-
123
-
124
-
125
-
126
-
127
-
128
-
129
-
130
-
131
-
132
-
133
-
134
-
135
-
136
-
137
-
138
-
139
-
140
-
141
-
142
-
143
-
144
-
145
-
146
-
147
-
148
-
149
-
150
-
151
-
152
-
153
-
154
-
155
-
156
-
157
-
158
-
159
-
160
-
161
-
162
-
163
-
164
-
165
-
166
-
167
-
 168
168 -
 169
169 -
 170
170 -
 171
171 -
 172
172 -
 173
173 -
 174
174 -
 175
175 -
 176
176 -
 177
177 -
 178
178 -
179
-
180
-
181
-
182
-
183
-
184
-
185
-
186
-
187
-
188
-
189
-
190
-
191
-
192
-
193
-
194
-
195
-
196
-
197
-
198
-
199
-
200
-
201
-
202
-
203
-
204
-
205
 |
 |