Cisco 7965G Administration Guide - Page 34
Configuration Step and Purpose, For More Information, Table 1-6 - speed dial
 |
UPC - 882658140464
View all Cisco 7965G manuals
Add to My Manuals
Save this manual to your list of manuals |
Page 34 highlights
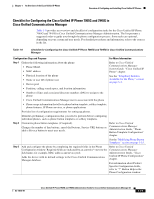
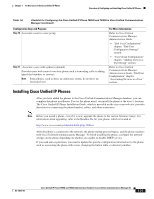
Overview of Configuring and Installing Cisco Unified IP Phones Chapter 1 An Overview of the Cisco Unified IP Phone Table 1-6 Checklist for Configuring the Cisco Unified IP Phone 7965G and 7945G in Cisco Unified Communications Manager (continued) Configuration Step and Purpose For More Information Step 4 Add and configure directory numbers (lines) on the phone by completing the required fields in the Directory Number Configuration window. Required fields are indicated by an asterisk (*) next to the field name; for example, directory number and presence group. Adds primary and secondary directory numbers and features associated with directory numbers to the phone. Refer to the Cisco Unified Communications Manager Administration Guide, Directory Number Configuration chapter, "Creating a Cisco Unity Voice Mailbox" section See the "Telephony Features Available for the Phone" section on page 5-2. Step 5 Customize softkey templates. Adds, deletes, or changes order of softkey features that display on the user's phone to meet feature usage needs. Refer to Cisco Unified Communications Manager Administration Guide, "Softkey Template Configuration" chapter. See the "Configuring Softkey Templates" section on page 5-15. Step 6 Configure speed-dial buttons and assign speed-dial numbers (optional). Adds speed-dial buttons and numbers. Users can change speed-dial settings on their phones by using Cisco Unified CM User Options. Refer to Cisco Unified Communications Manager Administration Guide, "Cisco Unified IP Phone Configuration" chapter, "Configuring Speed-Dial Buttons" section. Step 7 Configure Cisco Unified IP Phone services and assign services (optional). Provides IP Phone services. Users can add or change services on their phones by using the Cisco Unified CM User Options. Refer to Cisco Unified Communications Manager Administration Guide, "Cisco Unified IP Phone Services Configuration" chapter. See the "Setting Up Services" section on page 5-16. Step 8 Assign services to phone buttons (optional). Provides single button access to an IP phone service or URL. Refer to Cisco Unified Communications Manager Administration Guide, "Cisco Unified IP Phone Configuration" chapter, "Adding a Cisco Unified IP Phone Service to a Phone Button" section. Step 9 Add user information by configuring required fields. Required fields are indicated by an asterisk (*); for example, User ID and last name. Note Assign a password (for User Options web pages) and PIN (for Extension Mobility and Personal Directory) Adds user information to the global directory for Cisco Unified Communications Manager. Refer to Cisco Unified Communications Manager Administration Guide, "End User Configuration" chapter. See the "Adding Users to Cisco Unified Communications Manager" section on page 5-16 1-20 Cisco Unified IP Phone 7965G and 7945G Administration Guide for Cisco Unified Communications Manager 6.1 OL-14641-01
-
 1
1 -
2
-
3
-
4
-
5
-
6
-
7
-
8
-
9
-
10
-
11
-
12
-
13
-
14
-
15
-
16
-
17
-
18
-
19
-
20
-
21
-
22
-
23
-
24
-
25
-
26
-
27
-
28
-
 29
29 -
 30
30 -
 31
31 -
 32
32 -
 33
33 -
 34
34 -
 35
35 -
 36
36 -
 37
37 -
 38
38 -
 39
39 -
40
-
41
-
42
-
43
-
44
-
45
-
46
-
47
-
48
-
49
-
50
-
51
-
52
-
53
-
54
-
55
-
56
-
57
-
58
-
59
-
60
-
61
-
62
-
63
-
64
-
65
-
66
-
67
-
68
-
69
-
70
-
71
-
72
-
73
-
74
-
75
-
76
-
77
-
78
-
79
-
80
-
81
-
82
-
83
-
84
-
85
-
86
-
87
-
88
-
89
-
90
-
91
-
92
-
93
-
94
-
95
-
96
-
97
-
98
-
99
-
100
-
101
-
102
-
103
-
104
-
105
-
106
-
107
-
108
-
109
-
110
-
111
-
112
-
113
-
114
-
115
-
116
-
117
-
118
-
119
-
120
-
121
-
122
-
123
-
124
-
125
-
126
-
127
-
128
-
129
-
130
-
131
-
132
-
133
-
134
-
135
-
136
-
137
-
138
-
139
-
140
-
141
-
142
-
143
-
144
-
145
-
146
-
147
-
148
-
149
-
150
-
151
-
152
-
153
-
154
-
155
-
156
-
157
-
158
-
159
-
160
-
161
-
162
-
163
-
164
-
165
-
166
-
167
-
168
-
169
-
170
-
171
-
172
-
173
-
174
-
175
-
176
-
177
-
178
-
179
-
180
-
181
-
182
-
183
-
184
-
185
-
186
-
187
-
188
-
189
-
190
-
191
-
192
-
193
-
194
-
195
-
196
-
197
-
198
-
199
-
200
-
201
-
202
-
203
-
204
-
205
 |
 |