HP 2605dn HP Color LaserJet 2605/2605dn/2605dtn - User Guide - Page 85
Changing memory card settings for the current job, photos are numbered
 |
View all HP 2605dn manuals
Add to My Manuals
Save this manual to your list of manuals |
Page 85 highlights
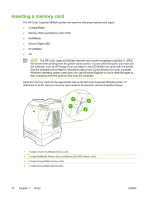
Changing memory card settings for the current job 1. Insert the memory card into the printer. The Photo functions menu displays. 2. Press (Select) to select Print photos and then press (Select). 3. Use the (Left arrow) or (Right arrow) button to select Job settings and then press (Select). 4. Use the (Left arrow) or (Right arrow) button to make selections for each of the following menu items, and then press (Select). ● Image Size: Change the size of the image that you are printing. ● Paper size: Change the media size that you are using. ● Paper type: Change the media type that you are using. ● Def. # of copies: Change the number of copies that you want to print. ● Output color: Set whether you are printing in color or black-and-white. 5. Press (Select). ● All (1-X): X represents the number of JPEG files the printer detects on the card. Selecting this option prints all of the JPEG files on the memory card. Press (Select) again to confirm the print job. ● Individual: Selecting this option allows you to select an individual photo to print. The photos are numbered, starting with number 1. Use the (Left arrow) or (Right arrow) button to increase or decrease the photo number and then press the (Select) button to select the photo to print. ● From a range: Selecting this option allows you to select a range of photos to print. The printer prompts you for the first photo number and the last photo number. Use the (Left arrow) or (Right arrow) button to increase or decrease the photo numbers and then press the (Select) button to select the range of photos to print. When you have finished changing the job settings, you can print your photos. See Printing photos directly from the memory card. NOTE The settings return to their default value after the memory card has been removed. If you want to change the settings permanently, see Changing memory card default settings. ENWW Changing memory card settings for the current job 73
-
 1
1 -
2
-
3
-
4
-
5
-
6
-
7
-
8
-
9
-
10
-
11
-
12
-
13
-
14
-
15
-
16
-
17
-
18
-
19
-
20
-
21
-
22
-
23
-
24
-
25
-
26
-
27
-
28
-
29
-
30
-
31
-
32
-
33
-
34
-
35
-
36
-
37
-
38
-
39
-
40
-
41
-
42
-
43
-
44
-
45
-
46
-
47
-
48
-
49
-
50
-
51
-
52
-
53
-
54
-
55
-
56
-
57
-
58
-
59
-
60
-
61
-
62
-
63
-
64
-
65
-
66
-
67
-
68
-
69
-
70
-
71
-
72
-
73
-
74
-
75
-
76
-
77
-
78
-
79
-
 80
80 -
 81
81 -
 82
82 -
 83
83 -
 84
84 -
 85
85 -
 86
86 -
 87
87 -
 88
88 -
 89
89 -
 90
90 -
91
-
92
-
93
-
94
-
95
-
96
-
97
-
98
-
99
-
100
-
101
-
102
-
103
-
104
-
105
-
106
-
107
-
108
-
109
-
110
-
111
-
112
-
113
-
114
-
115
-
116
-
117
-
118
-
119
-
120
-
121
-
122
-
123
-
124
-
125
-
126
-
127
-
128
-
129
-
130
-
131
-
132
-
133
-
134
-
135
-
136
-
137
-
138
-
139
-
140
-
141
-
142
-
143
-
144
-
145
-
146
-
147
-
148
-
149
-
150
-
151
-
152
-
153
-
154
-
155
-
156
-
157
-
158
-
159
-
160
-
161
-
162
-
163
-
164
-
165
-
166
-
167
-
168
-
169
-
170
-
171
-
172
-
173
-
174
-
175
-
176
-
177
-
178
-
179
-
180
-
181
-
182
-
183
-
184
-
185
-
186
-
187
-
188
-
189
-
190
-
191
-
192
-
193
-
194
-
195
-
196
-
197
-
198
-
199
-
200
-
201
-
202
-
203
-
204
-
205
-
206
-
207
-
208
-
209
-
210
-
211
-
212
-
213
-
214
-
215
-
216
-
217
-
218
-
219
-
220
-
221
-
222
-
223
-
224
-
225
-
226
-
227
-
228
 |
 |
