HP 5550dn HP Color LaserJet 5550 series - User Guide - Page 107
Configuring trays using the Paper Handling menu, Configuring the paper size
 |
UPC - 829160126913
View all HP 5550dn manuals
Add to My Manuals
Save this manual to your list of manuals |
Page 107 highlights
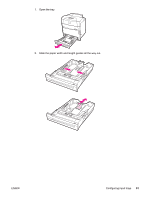
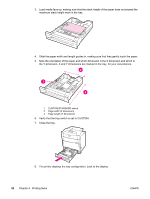
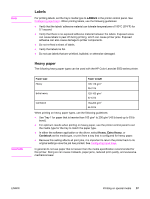
Note Note 9. If the size and type are correct, press to accept the settings and exit the message. If the settings are not correct, continue with this procedure. If the size is listed as CUSTOM, it means the tray size is set to ANY CUSTOM meaning that it will match any custom job even if the dimensions are different. The size can be changed to CUSTOM with exact dimensions if desired. When set to CUSTOM, the dimensions will show instead of the word CUSTOM on the tray configuration message. 10. To change the size or type, press when the tray configuration is displayed. (If the tray configuration is no longer displayed, open and close the tray again). The TRAY X SIZE= * menu appears. 11. Press to select CUSTOM. The UNIT OF MEASURE menu appears. Depending on the size selected, the printer might prompt you to move the CUSTOM/ STANDARD switch in the tray to another position or to move the length/width guides. Follow the instructions in the prompt, close the tray, and follow these steps from the beginning. 12. Press or arrows to highlight the correct unit (either millimeters or inches). 13. Press to select the X value. The X DIMENSION menu appears. 14. Press or to change the X dimension value until it is correct. 15. Press to select the value. The Y DIMENSION menu appears. 16. Press or to change the Y dimension value until it is correct. 17. Press to select the value. A Setting saved message appears, and then the Tray X TYPE menu appears. 18. To change the type, press or to highlight the correct paper type. 19. Press to select the paper type. A Setting saved message appears, and then the current type and size settings are displayed again. 20. If size and type are now correct, press to accept the settings and exit the message. The tray is ready for use. Configuring trays using the Paper Handling menu You can also configure the trays for type and size without a prompt from the printer. Use the paper handling menu to configure the trays as follows. Configuring the paper size 1. Press MENU to enter the MENUS. 2. Press to highlight PAPER HANDLING. 3. Press to select PAPER HANDLING. 4. Press to highlight TRAY SIZE. (N represents the number of the tray you are configuring.) 5. Press to select TRAY SIZE. 6. Press or to highlight the correct size. ENWW Configuring input trays 93
-
 1
1 -
2
-
3
-
4
-
5
-
6
-
7
-
8
-
9
-
10
-
11
-
12
-
13
-
14
-
15
-
16
-
17
-
18
-
19
-
20
-
21
-
22
-
23
-
24
-
25
-
26
-
27
-
28
-
29
-
30
-
31
-
32
-
33
-
34
-
35
-
36
-
37
-
38
-
39
-
40
-
41
-
42
-
43
-
44
-
45
-
46
-
47
-
48
-
49
-
50
-
51
-
52
-
53
-
54
-
55
-
56
-
57
-
58
-
59
-
60
-
61
-
62
-
63
-
64
-
65
-
66
-
67
-
68
-
69
-
70
-
71
-
72
-
73
-
74
-
75
-
76
-
77
-
78
-
79
-
80
-
81
-
82
-
83
-
84
-
85
-
86
-
87
-
88
-
89
-
90
-
91
-
92
-
93
-
94
-
95
-
96
-
97
-
98
-
99
-
100
-
101
-
 102
102 -
 103
103 -
 104
104 -
 105
105 -
 106
106 -
 107
107 -
 108
108 -
 109
109 -
 110
110 -
 111
111 -
 112
112 -
113
-
114
-
115
-
116
-
117
-
118
-
119
-
120
-
121
-
122
-
123
-
124
-
125
-
126
-
127
-
128
-
129
-
130
-
131
-
132
-
133
-
134
-
135
-
136
-
137
-
138
-
139
-
140
-
141
-
142
-
143
-
144
-
145
-
146
-
147
-
148
-
149
-
150
-
151
-
152
-
153
-
154
-
155
-
156
-
157
-
158
-
159
-
160
-
161
-
162
-
163
-
164
-
165
-
166
-
167
-
168
-
169
-
170
-
171
-
172
-
173
-
174
-
175
-
176
-
177
-
178
-
179
-
180
-
181
-
182
-
183
-
184
-
185
-
186
-
187
-
188
-
189
-
190
-
191
-
192
-
193
-
194
-
195
-
196
-
197
-
198
-
199
-
200
-
201
-
202
-
203
-
204
-
205
-
206
-
207
-
208
-
209
-
210
-
211
-
212
-
213
-
214
-
215
-
216
-
217
-
218
-
219
-
220
-
221
-
222
-
223
-
224
-
225
-
226
-
227
-
228
-
229
-
230
-
231
-
232
-
233
-
234
-
235
-
236
-
237
-
238
-
239
-
240
-
241
-
242
-
243
-
244
-
245
-
246
-
247
-
248
-
249
-
250
-
251
-
252
-
253
-
254
-
255
-
256
-
257
-
258
-
259
-
260
-
261
-
262
-
263
-
264
-
265
-
266
-
267
-
268
-
269
-
270
-
271
-
272
-
273
-
274
-
275
-
276
-
277
-
278
-
279
-
280
-
281
-
282
-
283
-
284
-
285
-
286
-
287
-
288
-
289
-
290
-
291
-
292
-
293
-
294
 |
 |