HP 5550dn HP Color LaserJet 5550 series - User Guide - Page 116
Printing booklets, Adjusting the registration, ADJUST TRAY <N>
 |
UPC - 829160126913
View all HP 5550dn manuals
Add to My Manuals
Save this manual to your list of manuals |
Page 116 highlights
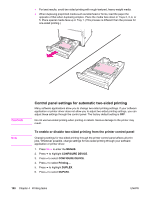
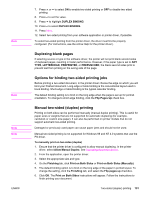
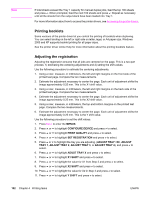
Note If total sheets exceed the Tray 1 capacity for manual duplex jobs, feed the top 100 sheets and press . When prompted, feed the next 100 sheets and press . Repeat as necessary until all the sheets from the output stack have been loaded into Tray 1. For more information about how to access the printer drivers, see Accessing the printer drivers. Printing booklets Some versions of the printer driver let you control the printing of booklets when duplexing. You can select binding on the left or right side on letter, legal, or A4 paper size. Windows 2000 and XP supports booklet printing for all paper sizes. See the printer driver online Help for more information about the printing booklets feature. Adjusting the registration Adjusting the registration ensures that all jobs are centered on the page. This is a two-part process: 1) estimating the centering adjustments and 2) setting the shift values. Use the following procedure to estimate the centering adjustments. 1. Using a ruler, measure, in millimeters, the left and right margins on the front side of the printed test page. Compare the two measurements. 2. Estimate the adjustment necessary to center the page. Each unit of adjustment shifts the image approximately 0.25 mm. This is the X1 shift value. 3. Using a ruler, measure, in millimeters, the left and right margins on the back side of the printed test page. Compare the two measurements. 4. Estimate the adjustment necessary to center the page. Each unit of adjustment shifts the image approximately 0.25 mm. This is the X2 shift value. 5. Using a ruler, measure, in millimeters, the top and bottom margins on the printed test page. Compare the two measurements. 6. Estimate the adjustment necessary to center the page. Each unit of adjustment shifts the image approximately 0.25 mm. This is the Y shift value. Use the following procedure to set the shift values. 1. Press MENU to enter the MENUS. 2. Press or to highlight CONFIGURE DEVICE and press to select. 3. Press or to highlight PRINT QUALITY and press to select. 4. Press or to highlight SET REGISTRATION and press to select. 5. Press or to highlight the tray you are adjusting. (ADJUST TRAY , ADJUST TRAY 1, ADJUST TRAY 2, ADJUST TRAY 3, or ADJUST TRAY 4), and press to select. 6. Press or to highlight ADUST TRAY X and press to select. 7. Press or to highlight X1 SHIFT and press to select. 8. Press or to highlight the value for X1 from Step 2 and press to select. 9. Press or to highlight X2 SHIFT and press to select. 10. Press or to highlight the value for X2 in Step 4 and press to select. 11. Press or to highlight Y SHIFT and press to select. 102 Chapter 4 Printing tasks ENWW
-
 1
1 -
2
-
3
-
4
-
5
-
6
-
7
-
8
-
9
-
10
-
11
-
12
-
13
-
14
-
15
-
16
-
17
-
18
-
19
-
20
-
21
-
22
-
23
-
24
-
25
-
26
-
27
-
28
-
29
-
30
-
31
-
32
-
33
-
34
-
35
-
36
-
37
-
38
-
39
-
40
-
41
-
42
-
43
-
44
-
45
-
46
-
47
-
48
-
49
-
50
-
51
-
52
-
53
-
54
-
55
-
56
-
57
-
58
-
59
-
60
-
61
-
62
-
63
-
64
-
65
-
66
-
67
-
68
-
69
-
70
-
71
-
72
-
73
-
74
-
75
-
76
-
77
-
78
-
79
-
80
-
81
-
82
-
83
-
84
-
85
-
86
-
87
-
88
-
89
-
90
-
91
-
92
-
93
-
94
-
95
-
96
-
97
-
98
-
99
-
100
-
101
-
102
-
103
-
104
-
105
-
106
-
107
-
108
-
109
-
110
-
 111
111 -
 112
112 -
 113
113 -
 114
114 -
 115
115 -
 116
116 -
 117
117 -
 118
118 -
 119
119 -
 120
120 -
 121
121 -
122
-
123
-
124
-
125
-
126
-
127
-
128
-
129
-
130
-
131
-
132
-
133
-
134
-
135
-
136
-
137
-
138
-
139
-
140
-
141
-
142
-
143
-
144
-
145
-
146
-
147
-
148
-
149
-
150
-
151
-
152
-
153
-
154
-
155
-
156
-
157
-
158
-
159
-
160
-
161
-
162
-
163
-
164
-
165
-
166
-
167
-
168
-
169
-
170
-
171
-
172
-
173
-
174
-
175
-
176
-
177
-
178
-
179
-
180
-
181
-
182
-
183
-
184
-
185
-
186
-
187
-
188
-
189
-
190
-
191
-
192
-
193
-
194
-
195
-
196
-
197
-
198
-
199
-
200
-
201
-
202
-
203
-
204
-
205
-
206
-
207
-
208
-
209
-
210
-
211
-
212
-
213
-
214
-
215
-
216
-
217
-
218
-
219
-
220
-
221
-
222
-
223
-
224
-
225
-
226
-
227
-
228
-
229
-
230
-
231
-
232
-
233
-
234
-
235
-
236
-
237
-
238
-
239
-
240
-
241
-
242
-
243
-
244
-
245
-
246
-
247
-
248
-
249
-
250
-
251
-
252
-
253
-
254
-
255
-
256
-
257
-
258
-
259
-
260
-
261
-
262
-
263
-
264
-
265
-
266
-
267
-
268
-
269
-
270
-
271
-
272
-
273
-
274
-
275
-
276
-
277
-
278
-
279
-
280
-
281
-
282
-
283
-
284
-
285
-
286
-
287
-
288
-
289
-
290
-
291
-
292
-
293
-
294
 |
 |