HP 5550dn HP Color LaserJet 5550 series - User Guide - Page 224
°C 374°F.Wait 10 minutes to allow the fuser to cool before touching it.
 |
UPC - 829160126913
View all HP 5550dn manuals
Add to My Manuals
Save this manual to your list of manuals |
Page 224 highlights
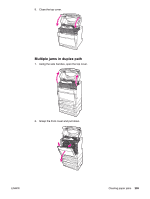
3. Grasp the paper by both corners and pull down. Note If the paper tears, make sure that all paper fragments are removed from the paper path before resuming printing. 4. Firmly pull forward on the two green levers to disengage the fuser rollers. WARNING! Do not touch the fuser. It is hot and could cause burns! The fuser's operating temperature is 190°C (374°F).Wait 10 minutes to allow the fuser to cool before touching it. 5. Open the fuser cover. WARNING! Note 6. Inspect the fuser and remove any paper that is crumpled in the fuser. Do not reach into the fuser until it has cooled. If the media tears, make sure that all media fragments are removed from the paper path before resuming printing. 210 Chapter 8 Problemsolving ENWW
-
 1
1 -
2
-
3
-
4
-
5
-
6
-
7
-
8
-
9
-
10
-
11
-
12
-
13
-
14
-
15
-
16
-
17
-
18
-
19
-
20
-
21
-
22
-
23
-
24
-
25
-
26
-
27
-
28
-
29
-
30
-
31
-
32
-
33
-
34
-
35
-
36
-
37
-
38
-
39
-
40
-
41
-
42
-
43
-
44
-
45
-
46
-
47
-
48
-
49
-
50
-
51
-
52
-
53
-
54
-
55
-
56
-
57
-
58
-
59
-
60
-
61
-
62
-
63
-
64
-
65
-
66
-
67
-
68
-
69
-
70
-
71
-
72
-
73
-
74
-
75
-
76
-
77
-
78
-
79
-
80
-
81
-
82
-
83
-
84
-
85
-
86
-
87
-
88
-
89
-
90
-
91
-
92
-
93
-
94
-
95
-
96
-
97
-
98
-
99
-
100
-
101
-
102
-
103
-
104
-
105
-
106
-
107
-
108
-
109
-
110
-
111
-
112
-
113
-
114
-
115
-
116
-
117
-
118
-
119
-
120
-
121
-
122
-
123
-
124
-
125
-
126
-
127
-
128
-
129
-
130
-
131
-
132
-
133
-
134
-
135
-
136
-
137
-
138
-
139
-
140
-
141
-
142
-
143
-
144
-
145
-
146
-
147
-
148
-
149
-
150
-
151
-
152
-
153
-
154
-
155
-
156
-
157
-
158
-
159
-
160
-
161
-
162
-
163
-
164
-
165
-
166
-
167
-
168
-
169
-
170
-
171
-
172
-
173
-
174
-
175
-
176
-
177
-
178
-
179
-
180
-
181
-
182
-
183
-
184
-
185
-
186
-
187
-
188
-
189
-
190
-
191
-
192
-
193
-
194
-
195
-
196
-
197
-
198
-
199
-
200
-
201
-
202
-
203
-
204
-
205
-
206
-
207
-
208
-
209
-
210
-
211
-
212
-
213
-
214
-
215
-
216
-
217
-
218
-
 219
219 -
 220
220 -
 221
221 -
 222
222 -
 223
223 -
 224
224 -
 225
225 -
 226
226 -
 227
227 -
 228
228 -
 229
229 -
230
-
231
-
232
-
233
-
234
-
235
-
236
-
237
-
238
-
239
-
240
-
241
-
242
-
243
-
244
-
245
-
246
-
247
-
248
-
249
-
250
-
251
-
252
-
253
-
254
-
255
-
256
-
257
-
258
-
259
-
260
-
261
-
262
-
263
-
264
-
265
-
266
-
267
-
268
-
269
-
270
-
271
-
272
-
273
-
274
-
275
-
276
-
277
-
278
-
279
-
280
-
281
-
282
-
283
-
284
-
285
-
286
-
287
-
288
-
289
-
290
-
291
-
292
-
293
-
294
 |
 |

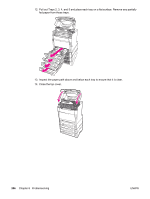
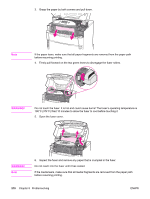
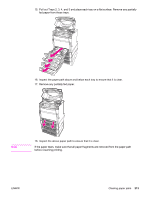
3.
Grasp the paper by both corners and pull down.
Note
If the paper tears, make sure that all paper fragments are removed from the paper path
before resuming printing.
4.
Firmly pull forward on the two green levers to disengage the fuser rollers.
WARNING!
Do not touch the fuser. It is hot and could cause burns! The fuser’s operating temperature is
190°C (374°F).Wait 10 minutes to allow the fuser to cool before touching it.
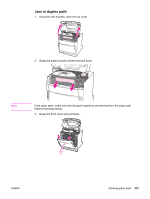
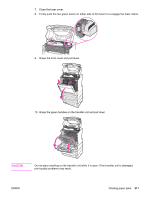
5.
Open the fuser cover.
6.
Inspect the fuser and remove any paper that is crumpled in the fuser.
WARNING!
Do not reach into the fuser until it has cooled.
Note
If the media tears, make sure that all media fragments are removed from the paper path
before resuming printing.
210
Chapter 8
Problemsolving
ENWW