HP 5550dn HP Color LaserJet 5550 series - User Guide - Page 246
Calibrating the printer, Print quality defect chart, QUICK CALIBRATE NOW, CALIBRATION, PRINT QUALITY - drum
 |
UPC - 829160126913
View all HP 5550dn manuals
Add to My Manuals
Save this manual to your list of manuals |
Page 246 highlights
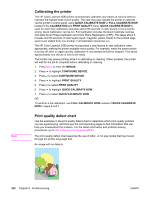
Note Calibrating the printer The HP Color LaserJet 5550 printer automatically calibrates and cleans at various times to maintain the highest level of print quality. The user may also request the printer to calibrate via the printer's control panel, using QUICK CALIBRATE NOW or FULL CALIBRATE NOW located in the CALIBRATION and PRINT QUALITY menu. QUICK CALIBRATE NOW is used for color tone calibration and takes about 90 seconds. If color density or tone seems wrong, Quick Calibration can be run. Full Calibration includes the Quick Calibrate routines and adds Drum Phase Calibration and Color Plane Registration (CPR). This takes about 3 minutes and 30 seconds. If color layers (cyan, magenta, yellow, black) on the printed page seem to be shifted from one another, Full Calibration should be run. The HP Color LaserJet 5550 printer incorporates a new feature to skip calibration when appropriate, making the printer available more quickly. For example, when the power switch is turned off, then on again quickly, calibration is not needed and will be skipped. This saves approximately one minute in time to be ready. The printer may pause printing while it is calibrating or cleaning. When possible, the printer will wait for the job to complete before calibrating or cleaning. 1. Press MENU to enter the MENUS. 2. Press to highlight CONFIGURE DEVICE. 3. Press to select CONFIGURE DEVICE. 4. Press to highlight PRINT QUALITY. 5. Press to select PRINT QUALITY. 6. Press to highlight QUICK CALIBRATE NOW. 7. Press to select QUICK CALIBRATE NOW. OR To perform a full calibration, use FULL CALIBRATE NOW instead of QUICK CALIBRATE NOW in steps 6 and 7. Print quality defect chart Use the examples in the print quality defect chart to determine which print-quality problem you are experiencing, and then see the corresponding pages to find information that can help you troubleshoot the problem. For the latest information and problem-solving procedures, go to http://www.hp.com/support/clj5550. The print-quality defect chart assumes the use of letter- or A4-size media that has moved through the printer long-edge first. An image with no defects 232 Chapter 8 Problemsolving ENWW
-
 1
1 -
2
-
3
-
4
-
5
-
6
-
7
-
8
-
9
-
10
-
11
-
12
-
13
-
14
-
15
-
16
-
17
-
18
-
19
-
20
-
21
-
22
-
23
-
24
-
25
-
26
-
27
-
28
-
29
-
30
-
31
-
32
-
33
-
34
-
35
-
36
-
37
-
38
-
39
-
40
-
41
-
42
-
43
-
44
-
45
-
46
-
47
-
48
-
49
-
50
-
51
-
52
-
53
-
54
-
55
-
56
-
57
-
58
-
59
-
60
-
61
-
62
-
63
-
64
-
65
-
66
-
67
-
68
-
69
-
70
-
71
-
72
-
73
-
74
-
75
-
76
-
77
-
78
-
79
-
80
-
81
-
82
-
83
-
84
-
85
-
86
-
87
-
88
-
89
-
90
-
91
-
92
-
93
-
94
-
95
-
96
-
97
-
98
-
99
-
100
-
101
-
102
-
103
-
104
-
105
-
106
-
107
-
108
-
109
-
110
-
111
-
112
-
113
-
114
-
115
-
116
-
117
-
118
-
119
-
120
-
121
-
122
-
123
-
124
-
125
-
126
-
127
-
128
-
129
-
130
-
131
-
132
-
133
-
134
-
135
-
136
-
137
-
138
-
139
-
140
-
141
-
142
-
143
-
144
-
145
-
146
-
147
-
148
-
149
-
150
-
151
-
152
-
153
-
154
-
155
-
156
-
157
-
158
-
159
-
160
-
161
-
162
-
163
-
164
-
165
-
166
-
167
-
168
-
169
-
170
-
171
-
172
-
173
-
174
-
175
-
176
-
177
-
178
-
179
-
180
-
181
-
182
-
183
-
184
-
185
-
186
-
187
-
188
-
189
-
190
-
191
-
192
-
193
-
194
-
195
-
196
-
197
-
198
-
199
-
200
-
201
-
202
-
203
-
204
-
205
-
206
-
207
-
208
-
209
-
210
-
211
-
212
-
213
-
214
-
215
-
216
-
217
-
218
-
219
-
220
-
221
-
222
-
223
-
224
-
225
-
226
-
227
-
228
-
229
-
230
-
231
-
232
-
233
-
234
-
235
-
236
-
237
-
238
-
239
-
240
-
 241
241 -
 242
242 -
 243
243 -
 244
244 -
 245
245 -
 246
246 -
 247
247 -
 248
248 -
 249
249 -
 250
250 -
 251
251 -
252
-
253
-
254
-
255
-
256
-
257
-
258
-
259
-
260
-
261
-
262
-
263
-
264
-
265
-
266
-
267
-
268
-
269
-
270
-
271
-
272
-
273
-
274
-
275
-
276
-
277
-
278
-
279
-
280
-
281
-
282
-
283
-
284
-
285
-
286
-
287
-
288
-
289
-
290
-
291
-
292
-
293
-
294
 |
 |