HP 5550dn HP Color LaserJet 5550 series - User Guide - Page 96
Loading Tray 1 when the same paper is used for multiple print jobs, Tray X <TYPE> <SIZE>
 |
UPC - 829160126913
View all HP 5550dn manuals
Add to My Manuals
Save this manual to your list of manuals |
Page 96 highlights
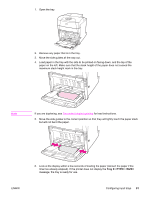
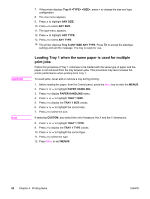
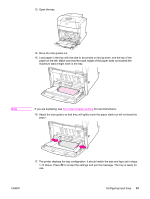
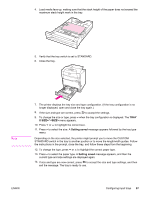
CAUTION Note 7. If the printer displays Tray X , press to change the size and type configuration. 8. The size menu appears. 9. Press to highlight ANY SIZE. 10. Press to select ANY SIZE. 11. The type menu appears. 12. Press to highlight ANY TYPE. 13. Press to select ANY TYPE. 14. The printer displays Tray X ANY SIZE ANY TYPE. Press to accept the size/type settings and exit the message. The tray is ready for use. Loading Tray 1 when the same paper is used for multiple print jobs Follow this procedure if Tray 1 continues to be loaded with the same type of paper and the paper is not removed from the tray between jobs. This procedure may also increase the printer performance when printing from Tray 1. To avoid jams, never add or remove a tray during printing. 1. Before loading the paper, from the Control panel, press the MENU key to enter the MENUS. 2. Press or to highlight PAPER HANDLING. 3. Press to display PAPER HANDLING menu. 4. Press or to highlight TRAY 1 SIZE. 5. Press to display the TRAY 1 SIZE values. 6. Press or to highlight the correct size. 7. Press to select the size. If selecting CUSTOM, also select the unit of measure, the X and the Y dimensions. 8. Press or to highlight TRAY 1 TYPE. 9. Press to display the TRAY 1 TYPE values. 10. Press or to highlight the correct type. 11. Press to select the type. 12. Press MENU to exit MENUS. 82 Chapter 4 Printing tasks ENWW
-
 1
1 -
2
-
3
-
4
-
5
-
6
-
7
-
8
-
9
-
10
-
11
-
12
-
13
-
14
-
15
-
16
-
17
-
18
-
19
-
20
-
21
-
22
-
23
-
24
-
25
-
26
-
27
-
28
-
29
-
30
-
31
-
32
-
33
-
34
-
35
-
36
-
37
-
38
-
39
-
40
-
41
-
42
-
43
-
44
-
45
-
46
-
47
-
48
-
49
-
50
-
51
-
52
-
53
-
54
-
55
-
56
-
57
-
58
-
59
-
60
-
61
-
62
-
63
-
64
-
65
-
66
-
67
-
68
-
69
-
70
-
71
-
72
-
73
-
74
-
75
-
76
-
77
-
78
-
79
-
80
-
81
-
82
-
83
-
84
-
85
-
86
-
87
-
88
-
89
-
90
-
 91
91 -
 92
92 -
 93
93 -
 94
94 -
 95
95 -
 96
96 -
 97
97 -
 98
98 -
 99
99 -
 100
100 -
 101
101 -
102
-
103
-
104
-
105
-
106
-
107
-
108
-
109
-
110
-
111
-
112
-
113
-
114
-
115
-
116
-
117
-
118
-
119
-
120
-
121
-
122
-
123
-
124
-
125
-
126
-
127
-
128
-
129
-
130
-
131
-
132
-
133
-
134
-
135
-
136
-
137
-
138
-
139
-
140
-
141
-
142
-
143
-
144
-
145
-
146
-
147
-
148
-
149
-
150
-
151
-
152
-
153
-
154
-
155
-
156
-
157
-
158
-
159
-
160
-
161
-
162
-
163
-
164
-
165
-
166
-
167
-
168
-
169
-
170
-
171
-
172
-
173
-
174
-
175
-
176
-
177
-
178
-
179
-
180
-
181
-
182
-
183
-
184
-
185
-
186
-
187
-
188
-
189
-
190
-
191
-
192
-
193
-
194
-
195
-
196
-
197
-
198
-
199
-
200
-
201
-
202
-
203
-
204
-
205
-
206
-
207
-
208
-
209
-
210
-
211
-
212
-
213
-
214
-
215
-
216
-
217
-
218
-
219
-
220
-
221
-
222
-
223
-
224
-
225
-
226
-
227
-
228
-
229
-
230
-
231
-
232
-
233
-
234
-
235
-
236
-
237
-
238
-
239
-
240
-
241
-
242
-
243
-
244
-
245
-
246
-
247
-
248
-
249
-
250
-
251
-
252
-
253
-
254
-
255
-
256
-
257
-
258
-
259
-
260
-
261
-
262
-
263
-
264
-
265
-
266
-
267
-
268
-
269
-
270
-
271
-
272
-
273
-
274
-
275
-
276
-
277
-
278
-
279
-
280
-
281
-
282
-
283
-
284
-
285
-
286
-
287
-
288
-
289
-
290
-
291
-
292
-
293
-
294
 |
 |
