HP 5550dn HP Color LaserJet 5550 series - User Guide - Page 189
Color Supply Out, Replace Transfer Kit - transfer kit replacement
 |
UPC - 829160126913
View all HP 5550dn manuals
Add to My Manuals
Save this manual to your list of manuals |
Page 189 highlights
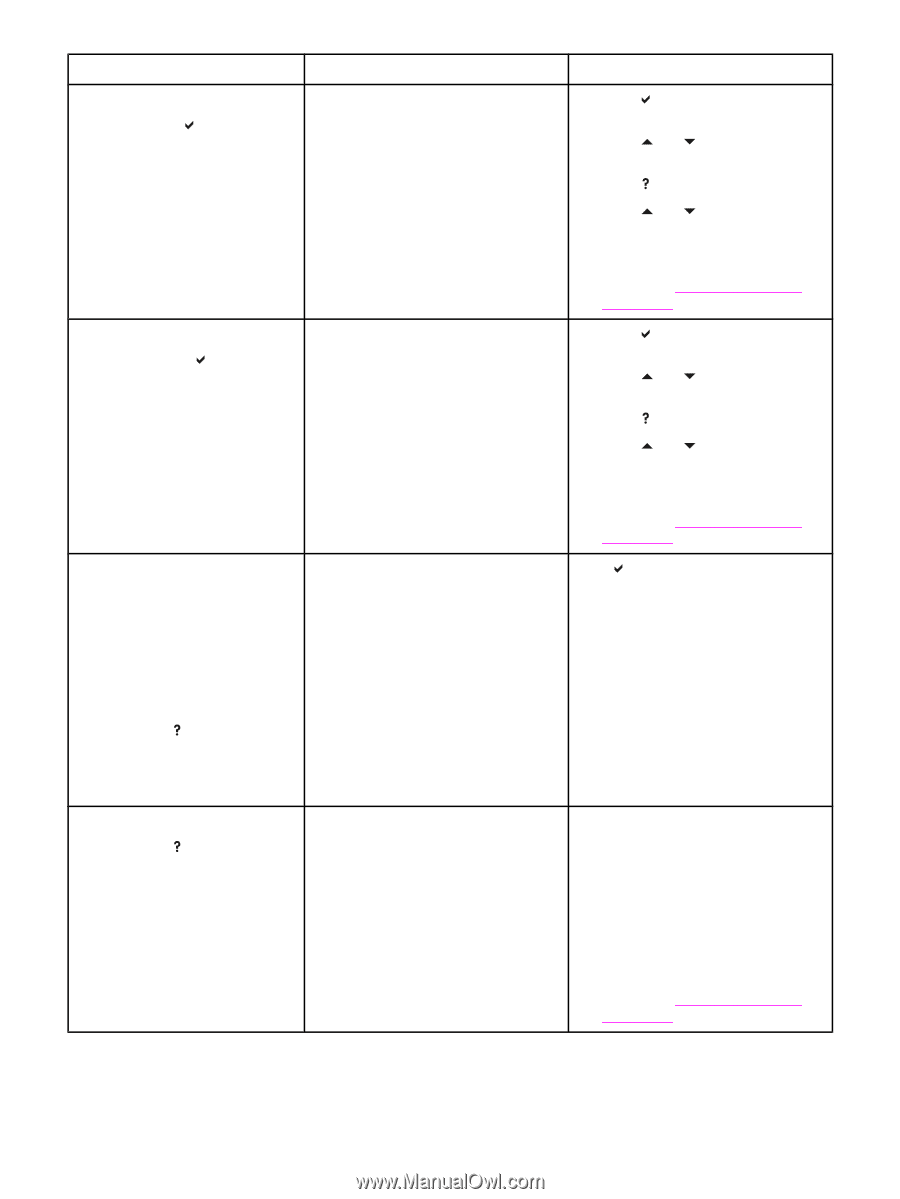
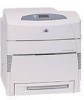
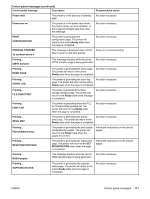
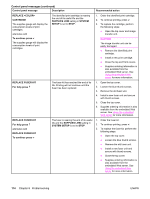
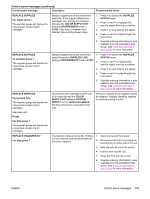
Control panel messages (continued) Control panel message Description Recommended action REPLACE SUPPLIES For status press The supplies gauge will display the consumption levels of print cartridges. Multiple supplies are at the end of their useful life. If the supplies affected are cartridges only, printing has stopped because the COLOR SUPPLY OUT setting in SYSTEM SETUP is set to STOP. If the fuser or transfer kit is affected, then printing always stops. 1. Press to access the SUPPLIES STATUS menu. 2. Press and to highlight the specific supply that has a problem. 3. Press to view help for the supply. 4. Press and to step through the instructions. 5. Supplies ordering information is also available from the embedded Web server. See Using the embedded Web server for more information. REPLACE SUPPLIES To continue press The supplies gauge will display the consumption levels of print cartridges. Multiple supplies are at the end of their 1. useful life and the SUPPLIES LOW setting in SYSTEM SETUP is set to STOP. 2. Press to access the SUPPLIES STATUS menu. Press and to highlight the specific supply that has a problem. 3. Press to view help for the supply. 4. Press and to step through the instructions. 5. Supplies ordering information is also available from the embedded Web server. See Using the embedded Web server for more information. REPLACE SUPPLIES Using black only The supplies gauge will display the consumption levels of print cartridges. alternates with Ready For help press The supplies gauge will display the consumption levels of print cartridges. At least one color cartridge is at the end of its useful life and the COLOR SUPPLY OUT setting in SYSTEM SETUP is set to autoContinueBlack. Printing will continue using black toner only. Press to identify which supplies should be replaced. Replace identified supplies to continue printing in color. REPLACE TRANSFER KIT For help press The transfer unit is at end of life. Printing will not continue until the the transfer kit has been replaced. 1. Open the top and front cover. 2. Remove the old unit by pressing the blue buttons on either side of the unit. 3. Slide the old unit out of the printer. 4. Install a new transfer unit. 5. Close the front and top covers. 6. Supplies ordering information is also available from the embedded Web server. See Using the embedded Web server for more information. ENWW Control panel messages 175
-
 1
1 -
2
-
3
-
4
-
5
-
6
-
7
-
8
-
9
-
10
-
11
-
12
-
13
-
14
-
15
-
16
-
17
-
18
-
19
-
20
-
21
-
22
-
23
-
24
-
25
-
26
-
27
-
28
-
29
-
30
-
31
-
32
-
33
-
34
-
35
-
36
-
37
-
38
-
39
-
40
-
41
-
42
-
43
-
44
-
45
-
46
-
47
-
48
-
49
-
50
-
51
-
52
-
53
-
54
-
55
-
56
-
57
-
58
-
59
-
60
-
61
-
62
-
63
-
64
-
65
-
66
-
67
-
68
-
69
-
70
-
71
-
72
-
73
-
74
-
75
-
76
-
77
-
78
-
79
-
80
-
81
-
82
-
83
-
84
-
85
-
86
-
87
-
88
-
89
-
90
-
91
-
92
-
93
-
94
-
95
-
96
-
97
-
98
-
99
-
100
-
101
-
102
-
103
-
104
-
105
-
106
-
107
-
108
-
109
-
110
-
111
-
112
-
113
-
114
-
115
-
116
-
117
-
118
-
119
-
120
-
121
-
122
-
123
-
124
-
125
-
126
-
127
-
128
-
129
-
130
-
131
-
132
-
133
-
134
-
135
-
136
-
137
-
138
-
139
-
140
-
141
-
142
-
143
-
144
-
145
-
146
-
147
-
148
-
149
-
150
-
151
-
152
-
153
-
154
-
155
-
156
-
157
-
158
-
159
-
160
-
161
-
162
-
163
-
164
-
165
-
166
-
167
-
168
-
169
-
170
-
171
-
172
-
173
-
174
-
175
-
176
-
177
-
178
-
179
-
180
-
181
-
182
-
183
-
 184
184 -
 185
185 -
 186
186 -
 187
187 -
 188
188 -
 189
189 -
 190
190 -
 191
191 -
 192
192 -
 193
193 -
 194
194 -
195
-
196
-
197
-
198
-
199
-
200
-
201
-
202
-
203
-
204
-
205
-
206
-
207
-
208
-
209
-
210
-
211
-
212
-
213
-
214
-
215
-
216
-
217
-
218
-
219
-
220
-
221
-
222
-
223
-
224
-
225
-
226
-
227
-
228
-
229
-
230
-
231
-
232
-
233
-
234
-
235
-
236
-
237
-
238
-
239
-
240
-
241
-
242
-
243
-
244
-
245
-
246
-
247
-
248
-
249
-
250
-
251
-
252
-
253
-
254
-
255
-
256
-
257
-
258
-
259
-
260
-
261
-
262
-
263
-
264
-
265
-
266
-
267
-
268
-
269
-
270
-
271
-
272
-
273
-
274
-
275
-
276
-
277
-
278
-
279
-
280
-
281
-
282
-
283
-
284
-
285
-
286
-
287
-
288
-
289
-
290
-
291
-
292
-
293
-
294
 |
 |