HP 6125G HP 6125G & 6125G/XG Blade Switches Fundamentals Configuration - Page 37
Enter AUX user interface, display types: ANSI and VT100. HP
 |
View all HP 6125G manuals
Add to My Manuals
Save this manual to your list of manuals |
Page 37 highlights
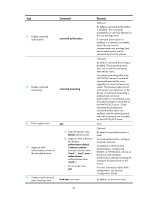
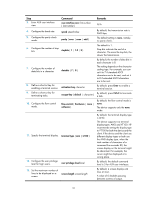
Step 3. Enter AUX user interface view. Command user-interface aux first-number [ last-number ] Remarks N/A 4. Configure the baud rate. 5. Configure the parity check mode. speed speed-value parity { even | none | odd } By default, the transmission rate is 9600 bps. The default setting is none, namely, no parity check. 6. Configure the number of stop bits. stopbits { 1 | 1.5 | 2 } The default is 1. Stop bits indicate the end of a character. The more the stop bits, the slower the transmission. By default, the number of data bits in each character is 8. 7. Configure the number of data bits in a character. databits { 7 | 8 } The setting depends on the character coding type. For example, you can set it to 7 if standard ASCII characters are to be sent, and set it to 8 if extended ASCII characters are to be sent. 8. Define a shortcut key for enabling a terminal session. activation-key character By default, press Enter to enable a terminal session. 9. Define a shortcut key for terminating tasks. escape-key { default | character } By default, press Ctrl+C to terminate a task. 10. Configure the flow control mode. flow-control { hardware | none | software } By default, the flow control mode is none. The device supports only the none mode. 11. Specify the terminal display. terminal type { ansi | vt100 } 12. Configure the user privilege level for login users. user privilege level level By default, the terminal display type is ANSI. The device supports two terminal display types: ANSI and VT100. HP recommends setting the display type to VT100 for both the device and the client. If the device and the client use different display types or both use the ANSI display type, when the total number of characters of a command line exceeds 80, the screen display on the terminal might be abnormal. For example, the cursor might be displayed at a wrong place. By default, the default command level is 3 for AUX user interfaces. 13. Set the maximum number of lines to be displayed on a screen. screen-length screen-length By default, a screen displays 24 lines at most. A value of 0 disables pausing between screens of output. 31
-
 1
1 -
2
-
3
-
4
-
5
-
6
-
7
-
8
-
9
-
10
-
11
-
12
-
13
-
14
-
15
-
16
-
17
-
18
-
19
-
20
-
21
-
22
-
23
-
24
-
25
-
26
-
27
-
28
-
29
-
30
-
31
-
 32
32 -
 33
33 -
 34
34 -
 35
35 -
 36
36 -
 37
37 -
 38
38 -
 39
39 -
 40
40 -
 41
41 -
 42
42 -
43
-
44
-
45
-
46
-
47
-
48
-
49
-
50
-
51
-
52
-
53
-
54
-
55
-
56
-
57
-
58
-
59
-
60
-
61
-
62
-
63
-
64
-
65
-
66
-
67
-
68
-
69
-
70
-
71
-
72
-
73
-
74
-
75
-
76
-
77
-
78
-
79
-
80
-
81
-
82
-
83
-
84
-
85
-
86
-
87
-
88
-
89
-
90
-
91
-
92
-
93
-
94
-
95
-
96
-
97
-
98
-
99
-
100
-
101
-
102
-
103
-
104
-
105
-
106
-
107
-
108
-
109
-
110
-
111
-
112
-
113
-
114
-
115
-
116
-
117
-
118
-
119
-
120
-
121
-
122
-
123
-
124
-
125
-
126
-
127
-
128
-
129
-
130
-
131
-
132
-
133
-
134
-
135
 |
 |
