HP 6125G HP 6125G & 6125G/XG Blade Switches Fundamentals Configuration - Page 38
Logging in through Telnet - default password
 |
View all HP 6125G manuals
Add to My Manuals
Save this manual to your list of manuals |
Page 38 highlights
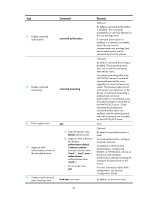
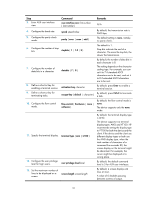
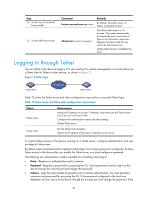
Step 14. Set the size of command history buffer. 15. Set the idle-timeout timer. Command history-command max-size value idle-timeout minutes [ seconds ] Remarks By default, the buffer saves 10 history commands at most. The default idle-timeout is 10 minutes. The system automatically terminates the user's connection if there is no information interaction between the device and the user within the idle-timeout time. Setting idle-timeout to 0 disables the timer. Logging in through Telnet You can Telnet to the device through a VTY user interface for remote management, or use the device as a Telnet client to Telnet to other devices, as shown in Figure 12. Figure 12 Telnet login Telnet client IP network Telnet server Table 13 shows the Telnet server and client configuration required for a successful Telnet login. Table 13 Telnet server and Telnet client configuration requirements Object Telnet server Requirements Assign an IP address to a Layer 3 interface, and make sure the Telnet server and client can reach each other. Configure the authentication mode and other settings. Enable Telnet server. Telnet client Run the Telnet client program. Obtain the IP address of the Layer 3 interface on the server. To control Telnet access to the device working as a Telnet server, configure authentication and user privilege for Telnet users. By default, password authentication applies to Telnet login, but no login password is configured. To allow Telnet access to the device after you enable the Telnet server, you must configure a password. The following are authentication modes available for controlling Telnet logins: • None-Requires no authentication and is insecure. • Password-Requires a password for accessing the CLI. If your password was lost, log in to the device through the console port and change the password. • Scheme-Uses the AAA module to provide local or remote authentication. You must provide a username and password for accessing the CLI. If the password configured in the local user database was lost, log in to the device through the console port and change the password. If the 32
-
 1
1 -
2
-
3
-
4
-
5
-
6
-
7
-
8
-
9
-
10
-
11
-
12
-
13
-
14
-
15
-
16
-
17
-
18
-
19
-
20
-
21
-
22
-
23
-
24
-
25
-
26
-
27
-
28
-
29
-
30
-
31
-
32
-
 33
33 -
 34
34 -
 35
35 -
 36
36 -
 37
37 -
 38
38 -
 39
39 -
 40
40 -
 41
41 -
 42
42 -
 43
43 -
44
-
45
-
46
-
47
-
48
-
49
-
50
-
51
-
52
-
53
-
54
-
55
-
56
-
57
-
58
-
59
-
60
-
61
-
62
-
63
-
64
-
65
-
66
-
67
-
68
-
69
-
70
-
71
-
72
-
73
-
74
-
75
-
76
-
77
-
78
-
79
-
80
-
81
-
82
-
83
-
84
-
85
-
86
-
87
-
88
-
89
-
90
-
91
-
92
-
93
-
94
-
95
-
96
-
97
-
98
-
99
-
100
-
101
-
102
-
103
-
104
-
105
-
106
-
107
-
108
-
109
-
110
-
111
-
112
-
113
-
114
-
115
-
116
-
117
-
118
-
119
-
120
-
121
-
122
-
123
-
124
-
125
-
126
-
127
-
128
-
129
-
130
-
131
-
132
-
133
-
134
-
135
 |
 |
