HP 6125G HP 6125G & 6125G/XG Blade Switches Fundamentals Configuration - Page 61
Configuring HTTPS login
 |
View all HP 6125G manuals
Add to My Manuals
Save this manual to your list of manuals |
Page 61 highlights
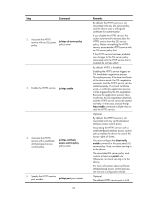
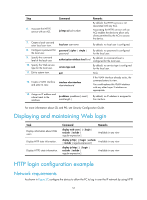
Step Command 4. Associate the HTTP service with an ACL. ip http acl acl-number 5. Create a local user and enter local user view. local-user user-name 6. Configure a password for the password { cipher | simple } local user. password 7. Specify the command level of the local user. authorization-attribute level level 8. Specify the Telnet service type for the local user. service-type web 9. Exit to system view. quit 10. Set the DSCP value for IP to use for HTTP packets. • For IPv4: ip http dscp dscp-value • For IPv6: ipv6 http dscp dscp-value 11. Create a VLAN interface and interface vlan-interface enter its view. vlan-interface-id 12. Assign an IP address and ip address ip-address { mask | subnet mask to the interface. mask-length } Remarks Optional. By default, the HTTP service is not associated with any ACL. Associating the HTTP service with an ACL enables the device to allow only clients permitted by the ACL to access the device. By default, no local user is configured. By default, no password is configured for the local user. No command level is configured for the local user. By default, no service type is configured for the local user. N/A Optional. The default is as follows: • 16 for IPv4. • 0 for IPv6. If the VLAN interface already exists, the command enters its view. By default, no IP address is assigned to the interface. Configuring HTTPS login When the HTTPS service and the SSL VPN service use the same port number, they must reference the same SSL server policy. Otherwise, you cannot enable the two services at the same time. When the HTTPS service and the SSL VPN service are both enabled and using the same port number, to modify the referenced SSL server policy, you must disable the two services first. After modifying the policy, enable the two services again to make the modified SSL server policy take effect. Step 1. Enter system view. Command system-view Remarks N/A 55
-
 1
1 -
2
-
3
-
4
-
5
-
6
-
7
-
8
-
9
-
10
-
11
-
12
-
13
-
14
-
15
-
16
-
17
-
18
-
19
-
20
-
21
-
22
-
23
-
24
-
25
-
26
-
27
-
28
-
29
-
30
-
31
-
32
-
33
-
34
-
35
-
36
-
37
-
38
-
39
-
40
-
41
-
42
-
43
-
44
-
45
-
46
-
47
-
48
-
49
-
50
-
51
-
52
-
53
-
54
-
55
-
 56
56 -
 57
57 -
 58
58 -
 59
59 -
 60
60 -
 61
61 -
 62
62 -
 63
63 -
 64
64 -
 65
65 -
 66
66 -
67
-
68
-
69
-
70
-
71
-
72
-
73
-
74
-
75
-
76
-
77
-
78
-
79
-
80
-
81
-
82
-
83
-
84
-
85
-
86
-
87
-
88
-
89
-
90
-
91
-
92
-
93
-
94
-
95
-
96
-
97
-
98
-
99
-
100
-
101
-
102
-
103
-
104
-
105
-
106
-
107
-
108
-
109
-
110
-
111
-
112
-
113
-
114
-
115
-
116
-
117
-
118
-
119
-
120
-
121
-
122
-
123
-
124
-
125
-
126
-
127
-
128
-
129
-
130
-
131
-
132
-
133
-
134
-
135
 |
 |
