HP 6125G HP 6125G & 6125G/XG Blade Switches Fundamentals Configuration - Page 68
Logging in through SNMP, Configuring SNMP login, Prerequisites
 |
View all HP 6125G manuals
Add to My Manuals
Save this manual to your list of manuals |
Page 68 highlights
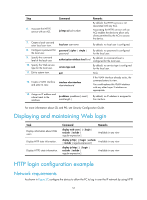
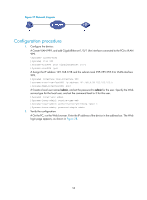
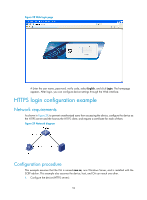
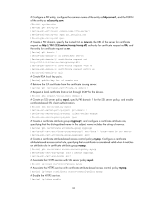
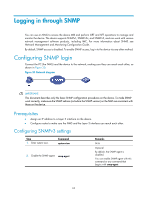
Logging in through SNMP You can use an NMS to access the device MIB and perform GET and SET operations to manage and monitor the device. The device supports SNMPv1, SNMPv2c, and SNMPv3, and can work with various network management software products, including IMC. For more information about SNMP, see Network Management and Monitoring Configuration Guide. By default, SNMP access is disabled. To enable SNMP access, log in to the device via any other method. Configuring SNMP login Connect the PC (the NMS) and the device to the network, making sure they can reach each other, as shown in Figure 30. Figure 30 Network diagram IMPORTANT: This document describes only the basic SNMP configuration procedures on the device. To make SNMP work correctly, make sure the SNMP settings (including the SNMP version) on the NMS are consistent with those on the device. Prerequisites • Assign an IP address to a Layer 3 interface on the device. • Configure routes to make sure the NMS and the Layer 3 interface can reach each other. Configuring SNMPv3 settings Step 1. Enter system view. Command system-view 2. Enable the SNMP agent. snmp-agent Remarks N/A Optional. By default, the SNMP agent is disabled. You can enable SNMP agent with this command or any command that begins with snmp-agent. 62
-
 1
1 -
2
-
3
-
4
-
5
-
6
-
7
-
8
-
9
-
10
-
11
-
12
-
13
-
14
-
15
-
16
-
17
-
18
-
19
-
20
-
21
-
22
-
23
-
24
-
25
-
26
-
27
-
28
-
29
-
30
-
31
-
32
-
33
-
34
-
35
-
36
-
37
-
38
-
39
-
40
-
41
-
42
-
43
-
44
-
45
-
46
-
47
-
48
-
49
-
50
-
51
-
52
-
53
-
54
-
55
-
56
-
57
-
58
-
59
-
60
-
61
-
62
-
 63
63 -
 64
64 -
 65
65 -
 66
66 -
 67
67 -
 68
68 -
 69
69 -
 70
70 -
 71
71 -
 72
72 -
 73
73 -
74
-
75
-
76
-
77
-
78
-
79
-
80
-
81
-
82
-
83
-
84
-
85
-
86
-
87
-
88
-
89
-
90
-
91
-
92
-
93
-
94
-
95
-
96
-
97
-
98
-
99
-
100
-
101
-
102
-
103
-
104
-
105
-
106
-
107
-
108
-
109
-
110
-
111
-
112
-
113
-
114
-
115
-
116
-
117
-
118
-
119
-
120
-
121
-
122
-
123
-
124
-
125
-
126
-
127
-
128
-
129
-
130
-
131
-
132
-
133
-
134
-
135
 |
 |
