HP Designjet 4000 Service Manual - Page 96
System Error, Code 01.0:10, System, Error Code 01.0:10, System Error Code 01.1:10, Code 79:03, Enter
 |
View all HP Designjet 4000 manuals
Add to My Manuals
Save this manual to your list of manuals |
Page 96 highlights
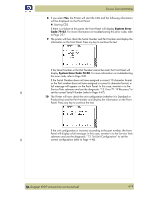
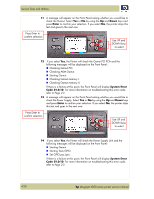
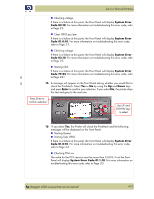
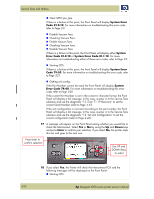
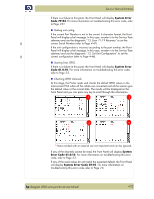
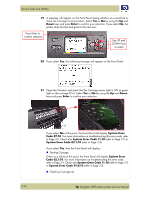
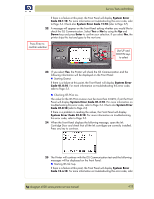
Service Tests and Utilities „ Clear GPIO psu_lpm. If there is a failure at this point, the Front Panel will display System Error Code 01.0:10. For more information on troubleshooting this error code, refer to Page 2-3. „ Disable Vacuum Fans. „ Checking Vacuum Fans. „ Enable Vacuum Fans. „ Checking Vacuum Fans. „ Disable Vacuum Fans. If there is a failure at this point, the Front Panel will display either System Error Code 01.0:10 or System Error Code 01.1:10. For more information on troubleshooting either of these error codes, refer to Page 2-3. „ Starting CDS. If there is a failure at this point, the Front Panel will display System Error Code 79:03. For more information on troubleshooting this error code, refer to Page 2-21. „ Getting unit config. If the Part Number cannot be read, the Front Panel will display System Error Code 74:00. For more information on troubleshooting this error code, refer to Page 2-20. If the current Part Number is not in the correct 6 character format, the Front Panel will display a fail message. In this case, re-enter in to the Service Tests submenu and use the diagnostic "13. Error 71:19 Recovery" to set the correct Serial Number (refer to Page 4-47). If the unit configuration is incorrect according to the part number, the Front Panel will display a fail message. In this case, re-enter in to the Service Tests submenu and use the diagnostic "12. Set Unit Configuration" to set the correct configuration (refer to Page 4-46). 17 A message will appear on the Front Panel asking whether you would like to check the Interconnect. Select Yes or No by using the Up and Down keys and press Enter to confirm your selection. If you select No, the printer skips this test and goes to the next one: Press Enter to confirm selection Use UP and DOWN keys to select 4-22 18 If you select Yes, the Printer will check the Interconnect PCA and the following messages will be displayed on the Front Panel: „ Starting CDS. hp designjet 4000 series printer service manual
-
 1
1 -
2
-
3
-
4
-
5
-
6
-
7
-
8
-
9
-
10
-
11
-
12
-
13
-
14
-
15
-
16
-
17
-
18
-
19
-
20
-
21
-
22
-
23
-
24
-
25
-
26
-
27
-
28
-
29
-
30
-
31
-
32
-
33
-
34
-
35
-
36
-
37
-
38
-
39
-
40
-
41
-
42
-
43
-
44
-
45
-
46
-
47
-
48
-
49
-
50
-
51
-
52
-
53
-
54
-
55
-
56
-
57
-
58
-
59
-
60
-
61
-
62
-
63
-
64
-
65
-
66
-
67
-
68
-
69
-
70
-
71
-
72
-
73
-
74
-
75
-
76
-
77
-
78
-
79
-
80
-
81
-
82
-
83
-
84
-
85
-
86
-
87
-
88
-
89
-
90
-
 91
91 -
 92
92 -
 93
93 -
 94
94 -
 95
95 -
 96
96 -
 97
97 -
 98
98 -
 99
99 -
 100
100 -
 101
101 -
102
-
103
-
104
-
105
-
106
-
107
-
108
-
109
-
110
-
111
-
112
-
113
-
114
-
115
-
116
-
117
-
118
-
119
-
120
-
121
-
122
-
123
-
124
-
125
-
126
-
127
-
128
-
129
-
130
-
131
-
132
-
133
-
134
-
135
-
136
-
137
-
138
-
139
-
140
-
141
-
142
-
143
-
144
-
145
-
146
-
147
-
148
-
149
-
150
-
151
-
152
-
153
-
154
-
155
-
156
-
157
-
158
-
159
-
160
-
161
-
162
-
163
-
164
-
165
-
166
-
167
-
168
-
169
-
170
-
171
-
172
-
173
-
174
-
175
-
176
-
177
-
178
-
179
-
180
-
181
-
182
-
183
-
184
-
185
-
186
-
187
-
188
-
189
-
190
-
191
-
192
-
193
-
194
-
195
-
196
-
197
-
198
-
199
-
200
-
201
-
202
-
203
-
204
-
205
-
206
-
207
-
208
-
209
-
210
-
211
-
212
-
213
-
214
-
215
-
216
-
217
-
218
-
219
-
220
-
221
-
222
-
223
-
224
-
225
-
226
-
227
-
228
-
229
-
230
-
231
-
232
-
233
-
234
-
235
-
236
-
237
-
238
-
239
-
240
-
241
-
242
-
243
-
244
-
245
-
246
-
247
-
248
-
249
-
250
-
251
-
252
-
253
-
254
-
255
-
256
-
257
-
258
-
259
-
260
-
261
-
262
-
263
-
264
-
265
-
266
-
267
-
268
-
269
-
270
-
271
-
272
-
273
-
274
-
275
-
276
-
277
-
278
-
279
-
280
-
281
-
282
-
283
-
284
-
285
-
286
-
287
-
288
-
289
-
290
-
291
-
292
-
293
-
294
-
295
-
296
-
297
-
298
-
299
-
300
-
301
-
302
-
303
-
304
-
305
-
306
-
307
-
308
-
309
-
310
-
311
-
312
-
313
-
314
-
315
-
316
-
317
-
318
-
319
-
320
-
321
-
322
-
323
-
324
-
325
-
326
-
327
-
328
-
329
-
330
-
331
-
332
-
333
-
334
-
335
-
336
-
337
-
338
-
339
-
340
-
341
-
342
-
343
-
344
-
345
-
346
-
347
-
348
-
349
-
350
-
351
-
352
-
353
-
354
-
355
-
356
-
357
-
358
-
359
-
360
-
361
-
362
-
363
-
364
-
365
-
366
-
367
-
368
-
369
-
370
-
371
-
372
 |
 |