HP LaserJet Pro CM1415 HP LaserJet Pro CM1410 - Software Technical Reference - Page 119
Font Substitution Table, External Fonts
 |
View all HP LaserJet Pro CM1415 manuals
Add to My Manuals
Save this manual to your list of manuals |
Page 119 highlights
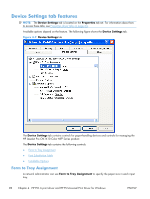
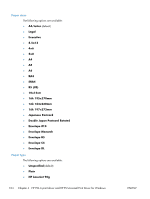
The HP LaserJet Pro CM1410 Color MFP Series product supports more than one source of paper. You can assign a form (which defines the paper size and margins) to each paper source. When a form is matched to a source, you can select the form when you print. The product prints from the tray to which that form is assigned. Network administrators can use the Form to Tray Assignment setting to specify, in the driver, the paper size that is loaded into each available input tray. The use of forms constrains the choices that are available in the paper-size list on the Paper/Quality tab in the Printing Preferences driver tabs. This constraint prevents (or reduces the likelihood of) tying up the product with paper-mount messages that occur when users request sizes or types that are not available. The trays listed in the Form to Tray Assignment setting include standard trays and optional accessory trays. Generally, items that are installed separately have a separate Installable Options setting. The input trays listed here are also listed as paper sources on the Paper/Quality tab. Configuring the trays 1. Select the appropriate tray in the Form to Tray Assignment list. 2. Use the drop-down menu to select the paper size (or form) that is loaded in that tray. 3. Repeat steps 1 and 2 for the remaining trays. 4. Click OK to enable your settings, or, if necessary, click Cancel to reconfigure all the trays, and remove the size and type constraints that have been imposed on the Paper/Quality tab. Font Substitution Table Use the Font Substitution Table settings to change the TrueType to printer font mapping and to install and remove external fonts for the product through the External Fonts option. External fonts can be soft fonts or DIMM fonts. Click the Font Substitution Table option to open a list of fonts, as show in the following figure. Use the settings to change the TrueType-to-product font mappings. External Fonts Use the External Fonts option to install and remove external fonts for the product. External fonts can be soft fonts or DIMM fonts. Click the External Fonts option to make the Properties button available. Click Properties to open the HP Font Installer dialog box, which is shown in the following figure. ENWW Device Settings tab features 99
-
 1
1 -
2
-
3
-
4
-
5
-
6
-
7
-
8
-
9
-
10
-
11
-
12
-
13
-
14
-
15
-
16
-
17
-
18
-
19
-
20
-
21
-
22
-
23
-
24
-
25
-
26
-
27
-
28
-
29
-
30
-
31
-
32
-
33
-
34
-
35
-
36
-
37
-
38
-
39
-
40
-
41
-
42
-
43
-
44
-
45
-
46
-
47
-
48
-
49
-
50
-
51
-
52
-
53
-
54
-
55
-
56
-
57
-
58
-
59
-
60
-
61
-
62
-
63
-
64
-
65
-
66
-
67
-
68
-
69
-
70
-
71
-
72
-
73
-
74
-
75
-
76
-
77
-
78
-
79
-
80
-
81
-
82
-
83
-
84
-
85
-
86
-
87
-
88
-
89
-
90
-
91
-
92
-
93
-
94
-
95
-
96
-
97
-
98
-
99
-
100
-
101
-
102
-
103
-
104
-
105
-
106
-
107
-
108
-
109
-
110
-
111
-
112
-
113
-
 114
114 -
 115
115 -
 116
116 -
 117
117 -
 118
118 -
 119
119 -
 120
120 -
 121
121 -
 122
122 -
 123
123 -
 124
124 -
125
-
126
-
127
-
128
-
129
-
130
-
131
-
132
-
133
-
134
-
135
-
136
-
137
-
138
-
139
-
140
-
141
-
142
-
143
-
144
-
145
-
146
-
147
-
148
-
149
-
150
-
151
-
152
-
153
-
154
-
155
-
156
-
157
-
158
-
159
-
160
-
161
-
162
-
163
-
164
-
165
-
166
-
167
-
168
-
169
-
170
-
171
-
172
-
173
-
174
-
175
-
176
-
177
-
178
-
179
-
180
-
181
-
182
-
183
-
184
-
185
-
186
-
187
-
188
-
189
-
190
-
191
-
192
-
193
-
194
-
195
-
196
-
197
-
198
-
199
-
200
-
201
-
202
-
203
-
204
-
205
-
206
-
207
-
208
-
209
-
210
-
211
-
212
-
213
-
214
-
215
-
216
-
217
-
218
-
219
-
220
-
221
-
222
-
223
-
224
-
225
-
226
-
227
-
228
-
229
-
230
-
231
-
232
-
233
-
234
-
235
-
236
-
237
-
238
-
239
-
240
-
241
-
242
-
243
-
244
-
245
-
246
-
247
-
248
-
249
-
250
-
251
-
252
-
253
-
254
-
255
-
256
-
257
-
258
-
259
-
260
-
261
-
262
-
263
-
264
-
265
-
266
-
267
-
268
-
269
-
270
-
271
-
272
-
273
-
274
-
275
-
276
-
277
-
278
-
279
-
280
-
281
-
282
 |
 |
