HP LaserJet Pro CM1415 HP LaserJet Pro CM1410 - Software Technical Reference - Page 223
Product resets, Restore the factory-set defaults
 |
View all HP LaserJet Pro CM1415 manuals
Add to My Manuals
Save this manual to your list of manuals |
Page 223 highlights
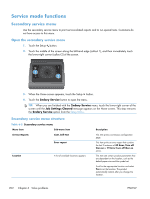
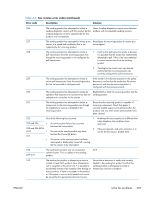
Table 6-3 Secondary service menu (continued) Menu item Sub-menu item Display test Button test Color Cal. PBX ring detect Clean Belt Pick roller Adjust color Timing On or Off Description This test verifies that the LEDs and characters on the control-panel display function correctly. At the beginning of the test, each of the LEDs is turned on one-at-time. Touch the OK button to continue to the next LED. After the LED test is complete, the character test begins by testing the pixels on each line. Then, each of the 255 characters is displayed in groups of 16. Touch the OK button to continue to the next group of 16 characters. You can cancel the test at any time by touching the Cancel button. This test verifies that the control-panel buttons function correctly. The display prompts you to press each button. This item adjusts density settings for contrast, highlights, midtones, and shadows. Adjust each color individually. This item specifies how frequently the product should automatically perform a color calibration. The default setting is 48 hours. You can turn automatic calibration off. Configure the PBX ring detect setting. This item runs additional belt-cleaning cycles. This item puts the pickup roller in position for replacement. Product resets The product resets-Restore Defaults and the NVRAM initialization-perform the same function. If possible, use the Restore Defaults function in the Service menu. If that menu is not accessible, use the NVRAM sequence. Restore the factory-set defaults CAUTION: Restoring the factory-set defaults returns all of the product and network settings to the factory defaults, and it also clears the fax header name, phone number, and any stored faxes in the product memory. This procedure also clears the fax phone book, and deletes any pages that are stored in the memory. The procedure then automatically restarts the product. 1. On the product control panel, touch the Setup button. 2. Scroll to and touch the Service menu. 3. Scroll to and touch the Restore Defaults button, and then touch the OK button. ENWW Service mode functions 203
-
 1
1 -
2
-
3
-
4
-
5
-
6
-
7
-
8
-
9
-
10
-
11
-
12
-
13
-
14
-
15
-
16
-
17
-
18
-
19
-
20
-
21
-
22
-
23
-
24
-
25
-
26
-
27
-
28
-
29
-
30
-
31
-
32
-
33
-
34
-
35
-
36
-
37
-
38
-
39
-
40
-
41
-
42
-
43
-
44
-
45
-
46
-
47
-
48
-
49
-
50
-
51
-
52
-
53
-
54
-
55
-
56
-
57
-
58
-
59
-
60
-
61
-
62
-
63
-
64
-
65
-
66
-
67
-
68
-
69
-
70
-
71
-
72
-
73
-
74
-
75
-
76
-
77
-
78
-
79
-
80
-
81
-
82
-
83
-
84
-
85
-
86
-
87
-
88
-
89
-
90
-
91
-
92
-
93
-
94
-
95
-
96
-
97
-
98
-
99
-
100
-
101
-
102
-
103
-
104
-
105
-
106
-
107
-
108
-
109
-
110
-
111
-
112
-
113
-
114
-
115
-
116
-
117
-
118
-
119
-
120
-
121
-
122
-
123
-
124
-
125
-
126
-
127
-
128
-
129
-
130
-
131
-
132
-
133
-
134
-
135
-
136
-
137
-
138
-
139
-
140
-
141
-
142
-
143
-
144
-
145
-
146
-
147
-
148
-
149
-
150
-
151
-
152
-
153
-
154
-
155
-
156
-
157
-
158
-
159
-
160
-
161
-
162
-
163
-
164
-
165
-
166
-
167
-
168
-
169
-
170
-
171
-
172
-
173
-
174
-
175
-
176
-
177
-
178
-
179
-
180
-
181
-
182
-
183
-
184
-
185
-
186
-
187
-
188
-
189
-
190
-
191
-
192
-
193
-
194
-
195
-
196
-
197
-
198
-
199
-
200
-
201
-
202
-
203
-
204
-
205
-
206
-
207
-
208
-
209
-
210
-
211
-
212
-
213
-
214
-
215
-
216
-
217
-
 218
218 -
 219
219 -
 220
220 -
 221
221 -
 222
222 -
 223
223 -
 224
224 -
 225
225 -
 226
226 -
 227
227 -
 228
228 -
229
-
230
-
231
-
232
-
233
-
234
-
235
-
236
-
237
-
238
-
239
-
240
-
241
-
242
-
243
-
244
-
245
-
246
-
247
-
248
-
249
-
250
-
251
-
252
-
253
-
254
-
255
-
256
-
257
-
258
-
259
-
260
-
261
-
262
-
263
-
264
-
265
-
266
-
267
-
268
-
269
-
270
-
271
-
272
-
273
-
274
-
275
-
276
-
277
-
278
-
279
-
280
-
281
-
282
 |
 |
