| Section |
Page |
| Document and product basics |
21 |
| Purpose and scope |
22 |
| Documentation availability and localization |
23 |
| User documentation |
24 |
| HP LaserJet Pro CM1410 Color MFP Series User Guide |
24 |
| HP LaserJet Pro CM1410 Color MFP Series Install Notes |
25 |
| Help and Learn Center |
25 |
| Administrator documentation |
25 |
| HP Driver Configuration Utility User Guide |
26 |
| HP Jetdirect Guide |
26 |
| Software availability and localization |
27 |
| Printing-system software on the Web |
27 |
| In-box printing-system software CD |
27 |
| HP LaserJet Windows software CD |
27 |
| CD versions and language support |
29 |
| Driver languages |
31 |
| Installer languages |
32 |
| Documentation languages |
33 |
| Windows software description |
35 |
| Introduction |
35 |
| Windows printing-system software |
36 |
| Windows printing-system software |
36 |
| HP Color LaserJet print drivers |
38 |
| HP PCL 6 Print Driver, PCL 5 Universal Print Driver, and PS Universal Print Driver |
38 |
| Print-driver version numbers for Windows operating systems |
38 |
| Driver configuration for Windows |
40 |
| Driver autoconfiguration |
40 |
| Bidirectional communication |
40 |
| Enterprise AutoConfiguration |
40 |
| Update Now |
42 |
| HP Driver Configuration |
43 |
| Lockable features |
45 |
| Continuous export |
45 |
| HP Driver Diagnostic Printer Check Tool |
46 |
| HP Customer Participation Program |
47 |
| Scan software |
48 |
| Scan methods |
48 |
| HP Scan software |
49 |
| E-mail |
52 |
| Scan settings |
52 |
| Scan drivers |
53 |
| WIA driver |
54 |
| HP LaserJet Fax Setup Utility |
55 |
| HP LaserJet Send Fax software |
56 |
| Fax to multiple recipients |
57 |
| Create a cover page |
57 |
| Fax pages scanned from the product document feeder |
57 |
| Fax without first printing and scanning the document |
57 |
| Font support |
58 |
| Basic fonts |
58 |
| Default fonts |
58 |
| HP Driver Deployment Utility |
64 |
| Install Windows printing-system components |
73 |
| Install overview |
74 |
| Software installation types for Windows |
74 |
| Installation options |
74 |
| General Windows installation instructions |
75 |
| General Windows installation for direct connections |
75 |
| Windows installation instructions for direct-connected (USB) products |
75 |
| Printer-driver only installation instructions (Microsoft Add Printer Wizard) |
75 |
| General Windows installation for network connections |
77 |
| Network setup |
77 |
| Windows installation instructions for network-connected products |
77 |
| Printer-driver only installation instructions (Microsoft Add Printer Wizard) |
78 |
| Printer sharing disclaimer |
79 |
| Point-and-Print installation for Windows |
79 |
| Modify a pre-existing installation |
80 |
| HP PCL 6 print driver and HP PS Universal Print Driver for Windows |
81 |
| Introduction |
81 |
| Access print drivers |
82 |
| Printing Preferences driver tabs |
82 |
| Properties driver tabs |
83 |
| Help system |
84 |
| “What's this?” Help |
84 |
| Incompatible Print Settings messages |
84 |
| Advanced tab features |
86 |
| Paper/Output |
86 |
| Copy Count |
87 |
| Graphic |
87 |
| Image Color Management |
87 |
| True Type Font |
87 |
| Document Options |
88 |
| Advanced Printing Features |
88 |
| Print Optimizations |
88 |
| Printer Features |
88 |
| Layout Options |
89 |
| Paper/Quality tab features |
90 |
| Paper Options |
90 |
| Paper sizes |
91 |
| Custom Paper Size |
91 |
| Name |
91 |
| Paper size |
92 |
| Units |
92 |
| Custom width and height control limits |
92 |
| Paper source |
92 |
| Paper type |
93 |
| Special pages |
94 |
| Covers |
95 |
| Print pages on different paper |
95 |
| Insert blank or preprinted pages |
95 |
| Chapter separator pages |
96 |
| Document preview image |
96 |
| Print Quality |
96 |
| Print Quality drop-down menu |
97 |
| Effects tab features |
98 |
| Resizing Options |
99 |
| Actual Size |
99 |
| Print Document On |
99 |
| Scale to Fit |
99 |
| % of Actual Size |
99 |
| Document preview image |
100 |
| Watermarks |
100 |
| Current watermarks |
101 |
| Watermark Message |
102 |
| Message Angle |
102 |
| Font Attributes |
102 |
| Default watermark settings |
103 |
| Finishing tab features |
105 |
| Document Options |
105 |
| Print on Both Sides |
106 |
| Print on both sides manually |
106 |
| Flip Pages Up |
108 |
| Booklet Layout |
109 |
| Book and Booklet Printing |
109 |
| Pages per Sheet |
110 |
| Print Page Borders |
110 |
| Page Order |
110 |
| Document preview image |
110 |
| Orientation |
111 |
| Color tab features |
112 |
| Color Options |
113 |
| Automatic |
113 |
| Manual |
113 |
| Neutral Grays |
114 |
| Color Themes |
114 |
| Default (sRGB) |
114 |
| Photo (sRGB) |
114 |
| Photo (Adobe RGB 1998) |
114 |
| Vivid (sRGB) |
115 |
| None |
115 |
| Document preview image |
115 |
| Services tab features |
116 |
| Internet Services |
117 |
| Device services |
117 |
| Device Settings tab features |
118 |
| Form to Tray Assignment |
118 |
| Font Substitution Table |
119 |
| External Fonts |
119 |
| Installing external fonts |
120 |
| Removing external fonts |
120 |
| Installable Options |
120 |
| Automatic Configuration |
121 |
| Allow Manual Duplexing |
121 |
| Job Separator |
121 |
| Printing Shortcuts tab features |
122 |
| Use defined printing shortcuts |
123 |
| General Everyday Printing |
123 |
| Paper source |
123 |
| Paper sizes |
124 |
| Paper type |
124 |
| Print on both sides |
126 |
| Eco-print (Two-sided Printing) |
126 |
| Factory Defaults |
126 |
| Envelopes |
126 |
| Cardstock Heavy |
126 |
| Glossy/Presentation |
127 |
| Snapshot Photos |
127 |
| Labels |
127 |
| Labels |
127 |
| Create a custom printing shortcut |
127 |
| About tab features |
129 |
| Macintosh software and utilities |
131 |
| Supported operating systems for Macintosh |
132 |
| Macintosh system requirements |
132 |
| Hardware requirements |
132 |
| Macintosh printing-system software |
132 |
| HP LaserJet Pro CM1410 Color MFP Series PPD |
132 |
| HP LaserJet Pro CM1410 Color MFP Series PDE |
133 |
| HP USB EWS Gateway |
133 |
| HP LaserJet Utility |
133 |
| Supported printer drivers for Macintosh |
133 |
| Priority for print settings for Macintosh |
133 |
| Change printer-driver settings for Macintosh |
134 |
| Software for Macintosh computers |
134 |
| HP LaserJet Utility |
134 |
| Open the HP LaserJet Utility |
134 |
| Embedded Web Server |
134 |
| Availability |
134 |
| Printing-system software on the Web |
135 |
| In-box printing-system software CD |
135 |
| Macintosh disk |
135 |
| Macintosh install and uninstall instructions |
136 |
| Install the Macintosh printing-system software |
136 |
| General installation for Macintosh operating systems |
136 |
| Setup instructions |
136 |
| Setting up a printer with Mac OS X v10.5 and v10.6 |
137 |
| Troubleshooting the product setup |
137 |
| Remove the printing-system software from Macintosh operating systems |
138 |
| Solve problems |
139 |
| Problem-solving checklist |
140 |
| Step 1: Check that the product power is on |
140 |
| Step 2: Check the environment where the product is installed |
140 |
| Step 3: Check the control panel for error messages |
140 |
| Step 4: Test print functionality |
141 |
| Step 5: Test copy functionality |
141 |
| Step 6: Test the fax sending functionality |
141 |
| Step 7: Test the fax receiving functionality |
141 |
| Step 8: Try sending a print job from a computer |
141 |
| Step 9: Test the walk-up USB printing functionality |
142 |
| Troubleshooting process |
142 |
| Power subsystem |
142 |
| Power-on checks |
142 |
| Tools for troubleshooting |
143 |
| Component diagnostics |
143 |
| LED diagnostics |
143 |
| Network LEDs |
143 |
| Control panel LEDs |
143 |
| Control-panel diagnostics |
144 |
| Engine Diagnostics |
144 |
| Engine test |
144 |
| Use the HP ToolboxFX software |
145 |
| View the HP ToolboxFX |
145 |
| Status |
145 |
| Fax |
146 |
| Fax Receive |
146 |
| Fax phone book |
146 |
| Fax send log |
148 |
| Fax receive log |
148 |
| Block Faxes |
148 |
| Help |
148 |
| System Settings |
149 |
| Device Information |
149 |
| Paper Setup |
150 |
| Print Quality |
150 |
| Print Density |
150 |
| Paper Types |
150 |
| System setup |
151 |
| Device polling |
151 |
| Print Settings |
151 |
| Printing |
151 |
| PCL5 |
151 |
| PostScript |
151 |
| Network Settings |
151 |
| Internal print-quality test pages |
152 |
| Configuration page |
152 |
| Print-quality troubleshooting tools |
153 |
| Calibrate the product to align the colors |
153 |
| Control panel menus |
153 |
| Setup Menu |
153 |
| Reports menu |
154 |
| Quick Forms menu |
155 |
| Fax Setup menu |
156 |
| System Setup menu |
159 |
| Service menu |
162 |
| Network Setup menu |
164 |
| Function specific menus |
165 |
| Copy Menu |
165 |
| Fax Menu |
166 |
| Scan Menu |
169 |
| USB Flash Drive |
170 |
| Interpret control-panel messages |
171 |
| Control panel message types |
171 |
| Control panel messages |
171 |
| 10.100X Supply Memory Error |
171 |
| 49 Error, Turn off then on |
171 |
| 50.x Fuser Error |
171 |
| 79 Error Turn off then on |
173 |
| Black Cartridge Low |
173 |
| Black in wrong position |
173 |
| Black Very Low |
173 |
| Canceled scan. Clear document |
175 |
| Communication error. |
175 |
| Cyan Cartridge Low |
175 |
| Cyan in wrong position |
175 |
| Cyan Very Low |
176 |
| Device error, press OK |
176 |
| Device is busy. Try again later |
176 |
| Document feeder jam. Clear and reload. |
176 |
| Document feeder mispick. Reload |
177 |
| Door open |
177 |
| Engine Communication Error |
177 |
| Engine error. Press OK to continue. |
177 |
| Fax is busy. Canceled send. |
177 |
| Fax is busy. Redial pending. |
178 |
| Fax receive error. |
178 |
| Fax Send error. |
179 |
| Fax storage is full. Canceling the fax receive. |
179 |
| Fax storage is full. Canceling the fax send. |
179 |
| Fit to Page on flatbed only |
179 |
| Install [color] cartridge |
180 |
| Invalid driver Press OK |
180 |
| Invalid entry |
180 |
| Jam in (area), Open door and clear jam |
180 |
| Jam in Tray 1, Clear jam and then press OK |
180 |
| Load paper |
181 |
| Load Tray 1 <TYPE> <SIZE>, Press OK to use available media |
181 |
| Load Tray 1, <PLAIN> <SIZE> / Cleaning mode, OK to start |
181 |
| Magenta Cartridge Low |
181 |
| Magenta in wrong position |
181 |
| Magenta Very Low |
181 |
| Manual Duplex Load Tray 1, Press OK |
182 |
| Manual feed <SIZE> <TYPE>, Press OK to use available media |
182 |
| Memory is low. Try again later |
182 |
| Memory is low. Press OK. |
182 |
| Memory low Only 1 copy made. Press OK to continue. |
183 |
| Misprint, Press OK |
183 |
| No dial tone. |
183 |
| No fax answer. Canceled send. |
184 |
| No fax answer. Redial pending. |
184 |
| No fax detected. |
184 |
| Print failure, press OK. If error repeats, turn off then on. |
185 |
| Replace [color] |
185 |
| Scanner error #, Turn off then on |
185 |
| Scanner reserved for PC scan |
186 |
| Scanning error Cannot connect |
186 |
| Settings cleared |
186 |
| Used [color] installed, to accept press OK |
186 |
| Yellow Cartridge Low |
186 |
| Yellow in wrong position |
187 |
| Yellow Very Low |
187 |
| Event-log messages |
188 |
| Menu map |
190 |
| Paper feeds incorrectly or becomes jammed |
191 |
| The product does not pick up paper |
191 |
| The product picks up multiple sheets of paper |
191 |
| Prevent paper jams |
191 |
| Clear jams |
192 |
| Jam locations |
192 |
| Clear jams from the document feeder |
193 |
| Clear jams from the input tray |
195 |
| Clear jams from the output bin |
198 |
| Improve print quality |
199 |
| Use the correct paper type setting in the printer driver |
199 |
| Change the paper type setting for Windows |
199 |
| Change the paper type setting for Mac |
199 |
| Adjust color settings in the printer driver |
200 |
| Change the color theme for a print job |
200 |
| Change the color options |
200 |
| Use paper that meets HP specifications |
202 |
| Print a cleaning page |
202 |
| Calibrate the product to align the colors |
203 |
| Check the print cartridges |
203 |
| Print the Supplies Status page |
204 |
| Interpret the Print Quality Page |
205 |
| Inspect the print cartridge for damage |
206 |
| Repetitive image defects |
207 |
| Use the printer driver that best meets your printing needs |
208 |
| Improve print quality for copies |
209 |
| Clean the product |
210 |
| Clean the exterior |
210 |
| Clean the paper path |
210 |
| Clean the paper path from the product control panel |
210 |
| Clean the scanner glass strip and platen |
210 |
| Clean the document feeder pickup rollers and separation pad |
211 |
| Clean the touch screen |
212 |
| The product does not print or it prints slowly |
213 |
| The product does not print |
213 |
| The product prints slowly |
214 |
| Solve walk-up USB printing problems |
215 |
| The USB Flash Drive menu does not open when you insert the USB accessory |
215 |
| The file does not print from the USB storage accessory |
215 |
| The file that you want to print is not listed in the USB Flash Drive menu |
215 |
| Solve connectivity problems |
216 |
| Solve direct-connect problems |
216 |
| Solve network problems |
216 |
| Poor physical connection |
216 |
| The computer is using the incorrect IP address for the product |
216 |
| The computer is unable to communicate with the product |
217 |
| The product is using incorrect link and duplex settings for the network |
217 |
| New software programs might be causing compatibility problems |
217 |
| The computer or workstation might be set up incorrectly |
217 |
| The product is disabled, or other network settings are incorrect |
217 |
| Solve wireless network problems |
218 |
| Wireless connectivity checklist |
218 |
| The control panel displays the message: The wireless feature on this product has been turned off |
219 |
| The product does not print after the wireless configuration completes |
219 |
| The product does not print, and the computer has a third-party firewall installed |
219 |
| The wireless connection does not work after moving the wireless router or product |
219 |
| Cannot connect more computers to the wireless product |
220 |
| The wireless product loses communication when connected to a VPN |
220 |
| The network does not appear in the wireless networks list |
220 |
| The wireless network is not functioning |
221 |
| Service mode functions |
222 |
| Secondary service menu |
222 |
| Open the secondary service menu |
222 |
| Secondary service menu structure |
222 |
| Product resets |
223 |
| Restore the factory-set defaults |
223 |
| NVRAM initialization |
224 |
| Solve fax problems |
224 |
| Fax troubleshooting checklist |
224 |
| Troubleshoot fax codes and trace reports |
226 |
| View and interpret fax error codes |
226 |
| Fax trace report |
237 |
| Fax logs and reports |
237 |
| Print all fax reports |
237 |
| Print individual fax reports |
239 |
| Set the fax error report |
239 |
| Change error correction and fax speed |
239 |
| Set the fax-error-correction mode |
239 |
| Change the fax speed |
240 |
| Solve problems sending faxes |
240 |
| An error message displays on the control panel |
240 |
| The Communication error. message appears |
240 |
| No dial tone. |
241 |
| The Fax is busy. message appears |
241 |
| The No fax answer. message appears |
242 |
| Document feeder paper jam |
242 |
| The Fax storage is full. message appears |
243 |
| Scanner error |
243 |
| The control panel displays a Ready message with no attempt to send the fax |
243 |
| The control panel displays the message \ |
244 |
| Faxes can be received, but not sent |
244 |
| Unable to use fax functions from the control panel |
244 |
| Unable to use speed dials |
245 |
| Unable to use group dials |
245 |
| Receive a recorded error message from the phone company when trying to send a fax |
245 |
| Unable to send a fax when a phone is connected to the product |
246 |
| Solve problems receiving faxes |
247 |
| The fax does not respond |
247 |
| The fax has a dedicated phone line |
247 |
| An answering machine is connected to the product |
247 |
| A telephone handset is connected to the product |
248 |
| The Answer Mode setting is set to the Manual setting |
248 |
| Voice mail is available on the fax line |
248 |
| The product is connected to a DSL phone service |
249 |
| The product uses a fax over IP or VoIP phone service |
249 |
| An error message displays on the control panel |
249 |
| The No fax detected. message appears |
249 |
| The Communication error. message appears |
250 |
| The Fax storage is full. message appears |
251 |
| The Fax is busy. message appears |
251 |
| A fax is received but does not print |
251 |
| The Private Receive feature is on |
251 |
| Sender receives a busy signal |
252 |
| A handset is connected to the product |
252 |
| A phone line splitter is being used |
252 |
| No dial tone |
252 |
| Cannot send or receive a fax on a PBX line |
252 |
| Solve general fax problems |
253 |
| Faxes are sending slowly |
253 |
| Fax quality is poor |
254 |
| Fax cuts off or prints on two pages |
254 |
| Product updates |
255 |
| Engineering Details |
257 |
| Introduction |
257 |
| Printing print-ready documents |
258 |
| Print-ready file printing by using FTP through a browser |
258 |
| Print-ready file printing by using FTP on a direct network connection |
259 |
| Windows operating systems |
259 |
| Macintosh operating systems |
260 |
| Print-ready printing by using a local Windows port |
260 |
| Windows 2000 Service Pack 3, Windows XP, Windows Server 2003, Windows Server 2008, or Windows Vista |
261 |
| Print-ready file printing in a Windows network |
261 |
| Print-ready file printing in UNIX systems |
261 |
| Print-ready file printing by using the LPR command |
261 |
| Paper and print media |
263 |
| Media sources and destinations |
263 |
| Source commands |
263 |
| Media types |
264 |
| Media-type commands |
264 |
| Parameter settings (fax data-store parameters) |
264 |
| Installation notes |
265 |
| I. INTRODUCTION |
265 |
| PURPOSE OF THIS DOCUMENT |
265 |
| SUPPORTED OPERATING SYSTEMS |
265 |
| OVERVIEW OF THE PRINTING-SYSTEM COMPONENTS |
266 |
| Drivers |
266 |
| Software Applications |
266 |
| HP ToolboxFX |
267 |
| HP Help and Learn Center |
267 |
| Uninstaller |
267 |
| II. INSTALLATION INSTRUCTIONS |
267 |
| INSTALLING SOFTWARE |
267 |
| INSTALLING SOFTWARE |
267 |
| Printing-system installation from the CD or Internet download for network and USB connections |
268 |
| Port selection |
268 |
| Windows XP, Windows Server 2003, or Windows Server 2008 |
268 |
| Windows Vista and Windows 7 |
268 |
| Printer driver only (Add Printer) - Windows XP, Windows Server 2003, and Windows Server 2008 |
268 |
| Printer driver only (Add Printer) - Windows Vista and Windows 7 |
269 |
| UNINSTALLER |
270 |
| III. LATE-BREAKING INFORMATION |
270 |
| KNOWN ISSUES AND WORKAROUNDS |
270 |
| General |
270 |
| Upgrading Windows |
270 |
| IV. TECHNICAL ASSISTANCE |
271 |
| CUSTOMER SUPPORT |
271 |
| WEB |
271 |
| HP SOFTWARE AND SUPPORT SERVICES - ADDITIONAL INFORMATION |
271 |
| V. LEGAL STATEMENTS |
271 |
| TRADEMARK NOTICES |
271 |
| SOFTWARE WARRANTY, LICENSE, AND COPYRIGHT |
271 |
| Warranty |
271 |
| License |
271 |
| Copyright |
271 |
 1
1 187
187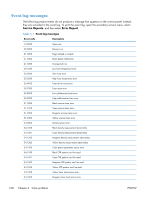 188
188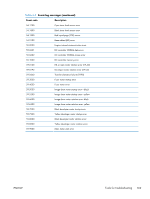 189
189 190
190 191
191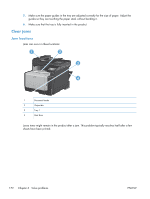 192
192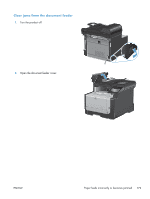 193
193 194
194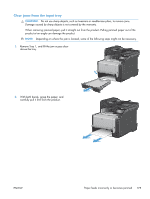 195
195 196
196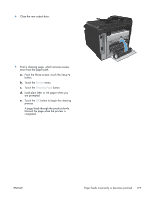 197
197

