HP StorageWorks 1606 Brocade Fabric Watch Administrator's Guide v6.3.0 (53-100 - Page 85
Port fencing, In this Configuring port fencing using the fwCon command,
 |
View all HP StorageWorks 1606 manuals
Add to My Manuals
Save this manual to your list of manuals |
Page 85 highlights
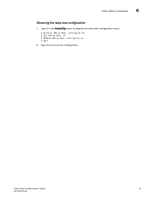
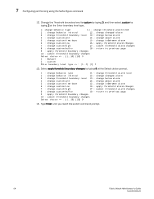
Port fencing Chapter 7 In this chapter •Configuring port fencing using the fwConfigure command 61 •Configuring port fencing using the portFencing command 65 Configuring port fencing using the fwConfigure command The Port Fencing feature, which can be set for the Port class, E_Port class, and FOP_ Port class only, is an optional procedure. The allowed threshold configuration settings are displayed on a per-class basis. Although Port Fencing is displayed for other areas, such as RX Performance, for which Port Fencing is not supported, you will not be able to set or apply the changes on such areas. Refer to "Port fencing types" on page 111 for a list of port fencing types that are available in M-EOS and Fabric OS v6.3.0. NOTE The following is an example of selecting the Port class with Invalid CRCs. With the exception of step 1, the same steps are required to enable the E_Port or FOP_Port class, as well as each available area for the selected class (described in step 4). 1. Type fwalarmsfilterset 1 to enable Fabric Watch alarms. 2. Navigate to a specific class and area with the fwConfigure command. switch:admin> fwconfigure 1 : Environment class 2 : SFP class 3 : Port class 4 : Fabric class 5 : E-Port class 6 : F/FL Port (Optical) class 7 : Alpa Performance Monitor class 8 : EE Performance Monitor class 9 : Filter Performance Monitor class 10 : Security class 11 : Resource class 12 : Quit Select a class => : (1..12) [12] 5 3. Type the number from the list that corresponds to the class that you want to configure. Select 3 for Port class, 5 for E_Port class, or 6 for F/FL Port (Optical) class. For each class that you select, Fabric Watch provides a list of the areas of the class available for configuration. Fabric Watch Administrator's Guide 61 53-1001342-01
-
 1
1 -
2
-
3
-
4
-
5
-
6
-
7
-
8
-
9
-
10
-
11
-
12
-
13
-
14
-
15
-
16
-
17
-
18
-
19
-
20
-
21
-
22
-
23
-
24
-
25
-
26
-
27
-
28
-
29
-
30
-
31
-
32
-
33
-
34
-
35
-
36
-
37
-
38
-
39
-
40
-
41
-
42
-
43
-
44
-
45
-
46
-
47
-
48
-
49
-
50
-
51
-
52
-
53
-
54
-
55
-
56
-
57
-
58
-
59
-
60
-
61
-
62
-
63
-
64
-
65
-
66
-
67
-
68
-
69
-
70
-
71
-
72
-
73
-
74
-
75
-
76
-
77
-
78
-
79
-
 80
80 -
 81
81 -
 82
82 -
 83
83 -
 84
84 -
 85
85 -
 86
86 -
 87
87 -
 88
88 -
 89
89 -
 90
90 -
91
-
92
-
93
-
94
-
95
-
96
-
97
-
98
-
99
-
100
-
101
-
102
-
103
-
104
-
105
-
106
-
107
-
108
-
109
-
110
-
111
-
112
-
113
-
114
-
115
-
116
-
117
-
118
-
119
-
120
-
121
-
122
-
123
-
124
-
125
-
126
-
127
-
128
-
129
-
130
-
131
-
132
-
133
-
134
-
135
-
136
-
137
-
138
 |
 |
