HP StorageWorks 1606 Brocade Fabric Watch Administrator's Guide v6.3.0 (53-100 - Page 86
for more details about classes and areas., at the Select choice prompt.
 |
View all HP StorageWorks 1606 manuals
Add to My Manuals
Save this manual to your list of manuals |
Page 86 highlights
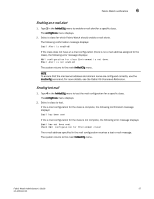
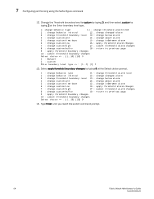
7 Configuring port fencing using the fwConfigure command 4. Select an area (areas 1 - 2 and 4 - 6 are available for Port Fencing). 1 : Link loss (E-port) 2 : Sync loss (E-port) 3 : Signal loss (E-port) 4 : Protocol error (E-port) 5 : Invalid words (E-port) 6 : Invalid CRCS (E-port) 7 : RXPerformance(E-port) 8 : TXPerformance (E-port) 9 : State Changes (E/VE-port) 10 : Link reset (E-port) 11 : Utilization (VE-port) 12 : Packet loss (VE-port) 13 : C3TX_TO 14 : return to previous page Select an area => : (1..2) (4..6) [10] 1 In this example, if you type 1, the menu corresponding to the Link loss displays. See Chapter 3, "Fabric Watch components" for more details about classes and areas. 5. Select advanced configuration by typing 4 at the Select choice prompt. 1 : refresh 2 : disable a threshold 3 : enable a threshold 4 : advanced configuration 5 : return to previous page Select an area => : (1..5) [5] 4 6. Select change above alarm by typing 14 at the Select choice prompt. 1 : change behavior type 11 : change threshold alarm level 2 : change behavior interval 12 : change changed alarm 3 : change threshold boundary level 13 : change below alarm 4 : change custom unit 14 : change above alarm 5 : change custom time base 15 : change inBetween alarm 6 : change custom low 16 : apply threshold alarm changes 7 : change custom high 17 : cancel threshold alarm changes 8 : change custom buffer 18 : return to previous page 9 : apply threshold boundary changes 10 : cancel threshold boundary changes Select choice => : (1..18) [18] 14 7. Set the alarm for Port Fencing (32) by typing 32 at the Enter above alarm matrix prompt. Errlog-1, SnmpTrap-2, PortLogLock-4 RapiTrap-8, EmailAlert-16, PortFencing-32 Valid alarm matrix is 63 Enter above alarm matrix => : (0..63) [0] 32 62 Fabric Watch Administrator's Guide 53-1001342-01
-
 1
1 -
2
-
3
-
4
-
5
-
6
-
7
-
8
-
9
-
10
-
11
-
12
-
13
-
14
-
15
-
16
-
17
-
18
-
19
-
20
-
21
-
22
-
23
-
24
-
25
-
26
-
27
-
28
-
29
-
30
-
31
-
32
-
33
-
34
-
35
-
36
-
37
-
38
-
39
-
40
-
41
-
42
-
43
-
44
-
45
-
46
-
47
-
48
-
49
-
50
-
51
-
52
-
53
-
54
-
55
-
56
-
57
-
58
-
59
-
60
-
61
-
62
-
63
-
64
-
65
-
66
-
67
-
68
-
69
-
70
-
71
-
72
-
73
-
74
-
75
-
76
-
77
-
78
-
79
-
80
-
 81
81 -
 82
82 -
 83
83 -
 84
84 -
 85
85 -
 86
86 -
 87
87 -
 88
88 -
 89
89 -
 90
90 -
 91
91 -
92
-
93
-
94
-
95
-
96
-
97
-
98
-
99
-
100
-
101
-
102
-
103
-
104
-
105
-
106
-
107
-
108
-
109
-
110
-
111
-
112
-
113
-
114
-
115
-
116
-
117
-
118
-
119
-
120
-
121
-
122
-
123
-
124
-
125
-
126
-
127
-
128
-
129
-
130
-
131
-
132
-
133
-
134
-
135
-
136
-
137
-
138
 |
 |