HP StorageWorks 8/80 Brocade Web Tools Administrator's Guide v6.2.0 (53-100119 - Page 247
Deleting user-defined accounts, Enabled, Disabled, Confirm Password, Home AD, Chassis Role, Apply
 |
View all HP StorageWorks 8/80 manuals
Add to My Manuals
Save this manual to your list of manuals |
Page 247 highlights
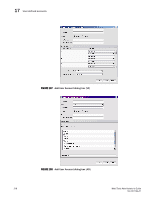
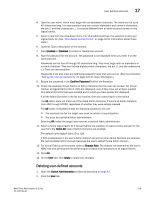
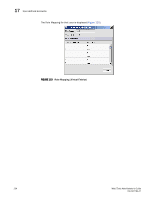
User-defined accounts 17 4. Type the user name, which must begin with an alphabetic character. The name can be up to 40 characters long. It is case-sensitive and can contain alphabetic and numeric characters, the dot (.) and the underscore (_). It must be different from all other account names on the logical switch. 5. Select a role from the drop-down menu. For VF-enabled switches, the selection is done per logical fabric ID. (See "Role-Based Access Control" on page 16 for information about these roles.) 6. Optional: Type a description of the account. 7. Click Enabled or Disabled to enable or disable the account. 8. Type the password for the account. The password is not displayed when you enter it on the command line. Passwords can be from 8 through 40 characters long. They must begin with an alphabetic or numeric character. They can include alphanumeric characters, the dot (.), and the underscore (_). They are case-sensitive. Passwords must also meet any additional password rules that were set up. (See the procedure "Setting the rules for passwords" on page 222 for more information.) 9. Retype the password in the Confirm Password field for confirmation. 10. Check the available Virtual Fabrics or Admin Domains that the user can access. For Virtual Fabrics, all logical fabrics IDs (1-255) are displayed, even if they have not all been created. Only Admin Domains that were created and to which you have access are displayed. If all the Admin Domains in the list are inactive, then you cannot log in to the switch. The All option does not mean all of the listed Admin Domains; it means all Admin Domains from AD0 through AD255, regardless of whether they were already created. The All button is disabled unless the following conditions are met: • The selected role for the target user must be admin or securityadmin. • You must be a physical fabric administrator. Selecting All makes the target user account a physical fabric administrator. 11. Select a home logical fabric ID if Virtual Fabrics are enabled, or select a home domain for the user from the Home AD menu if Admin Domains are enabled. The default home logical fabric ID is 128. If AD0 is deselected in the user's Admin Domain list and no other Admin Domains are selected, the next available Admin Domain becomes the user's default home Admin Domain. 12. For Virtual Fabrics environments, select a Chassis Role. The chassis role determines the user's RBAC role and permissions for performing all chassis level operations in all logical fabrics. 13. Click OK. 14. On the User tab, click Apply to apply your changes. Deleting user-defined accounts 1. Open the Switch Administration window as described on page 41. 2. Click the User tab. Web Tools Administrator's Guide 219 53-1001194-01
-
 1
1 -
2
-
3
-
4
-
5
-
6
-
7
-
8
-
9
-
10
-
11
-
12
-
13
-
14
-
15
-
16
-
17
-
18
-
19
-
20
-
21
-
22
-
23
-
24
-
25
-
26
-
27
-
28
-
29
-
30
-
31
-
32
-
33
-
34
-
35
-
36
-
37
-
38
-
39
-
40
-
41
-
42
-
43
-
44
-
45
-
46
-
47
-
48
-
49
-
50
-
51
-
52
-
53
-
54
-
55
-
56
-
57
-
58
-
59
-
60
-
61
-
62
-
63
-
64
-
65
-
66
-
67
-
68
-
69
-
70
-
71
-
72
-
73
-
74
-
75
-
76
-
77
-
78
-
79
-
80
-
81
-
82
-
83
-
84
-
85
-
86
-
87
-
88
-
89
-
90
-
91
-
92
-
93
-
94
-
95
-
96
-
97
-
98
-
99
-
100
-
101
-
102
-
103
-
104
-
105
-
106
-
107
-
108
-
109
-
110
-
111
-
112
-
113
-
114
-
115
-
116
-
117
-
118
-
119
-
120
-
121
-
122
-
123
-
124
-
125
-
126
-
127
-
128
-
129
-
130
-
131
-
132
-
133
-
134
-
135
-
136
-
137
-
138
-
139
-
140
-
141
-
142
-
143
-
144
-
145
-
146
-
147
-
148
-
149
-
150
-
151
-
152
-
153
-
154
-
155
-
156
-
157
-
158
-
159
-
160
-
161
-
162
-
163
-
164
-
165
-
166
-
167
-
168
-
169
-
170
-
171
-
172
-
173
-
174
-
175
-
176
-
177
-
178
-
179
-
180
-
181
-
182
-
183
-
184
-
185
-
186
-
187
-
188
-
189
-
190
-
191
-
192
-
193
-
194
-
195
-
196
-
197
-
198
-
199
-
200
-
201
-
202
-
203
-
204
-
205
-
206
-
207
-
208
-
209
-
210
-
211
-
212
-
213
-
214
-
215
-
216
-
217
-
218
-
219
-
220
-
221
-
222
-
223
-
224
-
225
-
226
-
227
-
228
-
229
-
230
-
231
-
232
-
233
-
234
-
235
-
236
-
237
-
238
-
239
-
240
-
241
-
 242
242 -
 243
243 -
 244
244 -
 245
245 -
 246
246 -
 247
247 -
 248
248 -
 249
249 -
 250
250 -
 251
251 -
 252
252 -
253
-
254
-
255
-
256
-
257
-
258
-
259
-
260
-
261
-
262
-
263
-
264
-
265
-
266
-
267
-
268
-
269
-
270
-
271
-
272
-
273
-
274
-
275
-
276
-
277
-
278
-
279
-
280
-
281
-
282
-
283
-
284
-
285
-
286
-
287
-
288
-
289
-
290
-
291
-
292
-
293
-
294
-
295
-
296
-
297
-
298
-
299
-
300
-
301
-
302
-
303
-
304
-
305
-
306
-
307
-
308
-
309
-
310
-
311
-
312
-
313
-
314
 |
 |