HP StorageWorks 8/80 Brocade Web Tools Administrator's Guide v6.2.0 (53-100119 - Page 261
Changing the systemGroup configuration parameters, Setting SNMPv1 configuration parameters
 |
View all HP StorageWorks 8/80 manuals
Add to My Manuals
Save this manual to your list of manuals |
Page 261 highlights
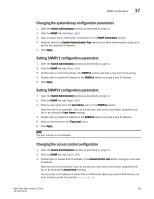
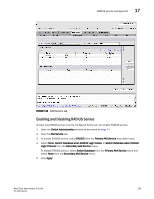
SNMP configuration 17 Changing the systemGroup configuration parameters 1. Open the Switch Administration window as described on page 41. 2. Click the SNMP tab (see Figure 114). 3. Type a contact name, description, and location in the SNMP Information section. 4. Optional: Select the Enable Authentication Trap check box to allow authentication traps to be sent to the reception IP address. 5. Click Apply. Setting SNMPv1 configuration parameters 1. Open the Switch Administration window as described on page 41. 2. Click the SNMP tab (see Figure 114). 3. Double-click a community string in the SNMPv1 section and type a new community string. 4. Double-click a recipient IP address in the SNMPv1 section and type a new IP address. 5. Click Apply. Setting SNMPv3 configuration parameters 1. Open the Switch Administration window as described on page 41. 2. Click the SNMP tab (see Figure 114). 3. Select a user name from the User Name menu in the SNMPv3 section. Note that the list is scrollable. If you do not see your user name, scroll down using the scroll bar or by clicking the User Name heading. 4. Double-click a recipient IP address in the SNMPv3 section and type a new IP address. 5. Select a trap level from the Trap Level menu. 6. Click Apply. NOTE The port number is not included. Changing the access control configuration 1. Open the Switch Administration window as described on page 41. 2. Click the SNMP tab (see Figure 114). 3. Double-click an access host IP address in the Access Control List section and type a new host IP address. Note that the list is scrollable. If you do not see your user name, scroll down using the scroll bar or by clicking the Access Host heading. You can enter an IP address in either IPv4 or IPv6 format. When you use the IPv6 format, you must include a prefix, for example fec0::2002/64. Web Tools Administrator's Guide 233 53-1001194-01
-
 1
1 -
2
-
3
-
4
-
5
-
6
-
7
-
8
-
9
-
10
-
11
-
12
-
13
-
14
-
15
-
16
-
17
-
18
-
19
-
20
-
21
-
22
-
23
-
24
-
25
-
26
-
27
-
28
-
29
-
30
-
31
-
32
-
33
-
34
-
35
-
36
-
37
-
38
-
39
-
40
-
41
-
42
-
43
-
44
-
45
-
46
-
47
-
48
-
49
-
50
-
51
-
52
-
53
-
54
-
55
-
56
-
57
-
58
-
59
-
60
-
61
-
62
-
63
-
64
-
65
-
66
-
67
-
68
-
69
-
70
-
71
-
72
-
73
-
74
-
75
-
76
-
77
-
78
-
79
-
80
-
81
-
82
-
83
-
84
-
85
-
86
-
87
-
88
-
89
-
90
-
91
-
92
-
93
-
94
-
95
-
96
-
97
-
98
-
99
-
100
-
101
-
102
-
103
-
104
-
105
-
106
-
107
-
108
-
109
-
110
-
111
-
112
-
113
-
114
-
115
-
116
-
117
-
118
-
119
-
120
-
121
-
122
-
123
-
124
-
125
-
126
-
127
-
128
-
129
-
130
-
131
-
132
-
133
-
134
-
135
-
136
-
137
-
138
-
139
-
140
-
141
-
142
-
143
-
144
-
145
-
146
-
147
-
148
-
149
-
150
-
151
-
152
-
153
-
154
-
155
-
156
-
157
-
158
-
159
-
160
-
161
-
162
-
163
-
164
-
165
-
166
-
167
-
168
-
169
-
170
-
171
-
172
-
173
-
174
-
175
-
176
-
177
-
178
-
179
-
180
-
181
-
182
-
183
-
184
-
185
-
186
-
187
-
188
-
189
-
190
-
191
-
192
-
193
-
194
-
195
-
196
-
197
-
198
-
199
-
200
-
201
-
202
-
203
-
204
-
205
-
206
-
207
-
208
-
209
-
210
-
211
-
212
-
213
-
214
-
215
-
216
-
217
-
218
-
219
-
220
-
221
-
222
-
223
-
224
-
225
-
226
-
227
-
228
-
229
-
230
-
231
-
232
-
233
-
234
-
235
-
236
-
237
-
238
-
239
-
240
-
241
-
242
-
243
-
244
-
245
-
246
-
247
-
248
-
249
-
250
-
251
-
252
-
253
-
254
-
255
-
 256
256 -
 257
257 -
 258
258 -
 259
259 -
 260
260 -
 261
261 -
 262
262 -
 263
263 -
 264
264 -
 265
265 -
 266
266 -
267
-
268
-
269
-
270
-
271
-
272
-
273
-
274
-
275
-
276
-
277
-
278
-
279
-
280
-
281
-
282
-
283
-
284
-
285
-
286
-
287
-
288
-
289
-
290
-
291
-
292
-
293
-
294
-
295
-
296
-
297
-
298
-
299
-
300
-
301
-
302
-
303
-
304
-
305
-
306
-
307
-
308
-
309
-
310
-
311
-
312
-
313
-
314
 |
 |