HP StorageWorks 8/80 Brocade Web Tools Administrator's Guide v6.2.0 (53-100119 - Page 71
Configuring a syslog IP address, Removing a syslog IP address, Setting up IP Filtering
 |
View all HP StorageWorks 8/80 manuals
Add to My Manuals
Save this manual to your list of manuals |
Page 71 highlights
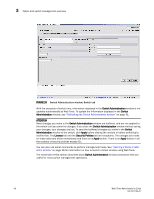
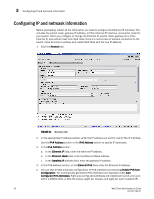
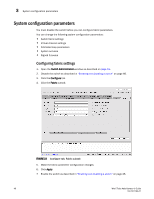
Configuring a syslog IP address 3 Configuring a syslog IP address The syslog IP represents the IP address of the server that is running the syslog process. The syslog daemon reads and forwards system messages to the appropriate log files or users, depending on the system configuration. When one or more IP addresses are configured, the switch forwards all error log entries to the syslog on the specified servers. Up to six servers are supported. See Fabric OS Administrator's Guide for more information on configuring the syslog daemon. 1. Open the Switch Administration window as described on page 41. 2. Click the Network tab (see Figure 21). 3. In the New IP field, enter an IP address in either IPv4 or IPv6 format, or enter a DNS name. 4. Click Add. The new IP address is displayed in the Syslog IP area. 5. Click Apply. Removing a syslog IP address 1. Open the Switch Administration window as described on page 41. 2. Click the Network tab. 3. Select a syslog IP in the table and click Remove. You can click Clear All to remove all of the syslog IP addresses from the table. 4. Click Apply. Setting up IP Filtering Web Tools provides the ability to control what client IP addresses may connect to a switch or fabric. 1. Open the Switch Administration window as described on page 41. 2. Click the Security Policies tab. 3. Click IPFilter on the Security Policies menu. 4. Click Create Policy. The Create IP Filter Policy window opens. 5. Enter a policy name, choose a policy type, and then click the Add Rule button. 6. Enter the rule order and source IP address, and modify the service/destination port, protocol, and action as necessary. 7. Click OK. After you create a policy, you can use the controls on this tab to manage the policies: • The Edit Policy button lets you select an existing policy and make changes to it. • The Show Policy button lets you view the details of the policy in a read-only window. • The Delete Policy button lets you delete a policy. Web Tools Administrator's Guide 43 53-1001194-01
-
 1
1 -
2
-
3
-
4
-
5
-
6
-
7
-
8
-
9
-
10
-
11
-
12
-
13
-
14
-
15
-
16
-
17
-
18
-
19
-
20
-
21
-
22
-
23
-
24
-
25
-
26
-
27
-
28
-
29
-
30
-
31
-
32
-
33
-
34
-
35
-
36
-
37
-
38
-
39
-
40
-
41
-
42
-
43
-
44
-
45
-
46
-
47
-
48
-
49
-
50
-
51
-
52
-
53
-
54
-
55
-
56
-
57
-
58
-
59
-
60
-
61
-
62
-
63
-
64
-
65
-
 66
66 -
 67
67 -
 68
68 -
 69
69 -
 70
70 -
 71
71 -
 72
72 -
 73
73 -
 74
74 -
 75
75 -
 76
76 -
77
-
78
-
79
-
80
-
81
-
82
-
83
-
84
-
85
-
86
-
87
-
88
-
89
-
90
-
91
-
92
-
93
-
94
-
95
-
96
-
97
-
98
-
99
-
100
-
101
-
102
-
103
-
104
-
105
-
106
-
107
-
108
-
109
-
110
-
111
-
112
-
113
-
114
-
115
-
116
-
117
-
118
-
119
-
120
-
121
-
122
-
123
-
124
-
125
-
126
-
127
-
128
-
129
-
130
-
131
-
132
-
133
-
134
-
135
-
136
-
137
-
138
-
139
-
140
-
141
-
142
-
143
-
144
-
145
-
146
-
147
-
148
-
149
-
150
-
151
-
152
-
153
-
154
-
155
-
156
-
157
-
158
-
159
-
160
-
161
-
162
-
163
-
164
-
165
-
166
-
167
-
168
-
169
-
170
-
171
-
172
-
173
-
174
-
175
-
176
-
177
-
178
-
179
-
180
-
181
-
182
-
183
-
184
-
185
-
186
-
187
-
188
-
189
-
190
-
191
-
192
-
193
-
194
-
195
-
196
-
197
-
198
-
199
-
200
-
201
-
202
-
203
-
204
-
205
-
206
-
207
-
208
-
209
-
210
-
211
-
212
-
213
-
214
-
215
-
216
-
217
-
218
-
219
-
220
-
221
-
222
-
223
-
224
-
225
-
226
-
227
-
228
-
229
-
230
-
231
-
232
-
233
-
234
-
235
-
236
-
237
-
238
-
239
-
240
-
241
-
242
-
243
-
244
-
245
-
246
-
247
-
248
-
249
-
250
-
251
-
252
-
253
-
254
-
255
-
256
-
257
-
258
-
259
-
260
-
261
-
262
-
263
-
264
-
265
-
266
-
267
-
268
-
269
-
270
-
271
-
272
-
273
-
274
-
275
-
276
-
277
-
278
-
279
-
280
-
281
-
282
-
283
-
284
-
285
-
286
-
287
-
288
-
289
-
290
-
291
-
292
-
293
-
294
-
295
-
296
-
297
-
298
-
299
-
300
-
301
-
302
-
303
-
304
-
305
-
306
-
307
-
308
-
309
-
310
-
311
-
312
-
313
-
314
 |
 |
