Intel S1200BTL Product Specification - Page 131
Appendix A: Integration and Usage Tips - diagnostic led
 |
View all Intel S1200BTL manuals
Add to My Manuals
Save this manual to your list of manuals |
Page 131 highlights
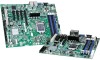
Intel®Server Board S1200BT TPS Appendix A: Integration and Usage Tips Appendix A: Integration and Usage Tips When adding or removing components or peripherals from the server board, AC power must be removed. With AC power plugged into the server board, 5-Volt standby is still present even though the server board is powered off. When updating BIOS and BMC, AC power must be on. Supports only Intel® Xeon® Processor E3-1200 Series with 95 W or Intel® Core™ Processor i3-2100 and less Thermal Design Power (TDP). Does not support previous generations of the Intel® Xeon® processor. On the back edge of the server board are diagnostic LEDs that display a sequence of amber POST codes during the boot process. If the server board hangs during POST, the LEDs display the last POST event run before the hang. Supports only unbuffered DDR3 DIMMs (UDIMMs). Does not support the mixing of RDIMMs and UDIMMs. The Intel® Remote Management Module 4 (Intel® RMM4) lite connector is not compatible with the Intel® Remote Management Module (Product Order Code - AXXRMM), Intel® Remote Management Module 2 (Product Order Code - AXXRMM2) or Intel® Remote Management Module 3 (Product Order Code - AXXRMM3) Clear the CMOS with the AC power cord plugged in. Removing the AC power before performing the CMOS clear operation causes the system to automatically power up and immediately power down after the CMOS clear procedure is followed and AC power is re-applied. If this happens, remove the AC power cord, wait 30 seconds, and then reconnect the AC power cord. Power up the system and proceed to the BIOS Setup utility to reset the needed settings. Normal Integrated BMC functionality is disabled with the force Integrated BMC update jumper set to the ―enabled‖ position (pins 2-3). The server should never be run with the Integrated BMC force update jumper set in this position and should only be used when the standard firmware update process fails. This jumper should remain in the default (disabled) position (pins 1-2) when the server is running normally. When performing a normal BIOS update procedure, the BIOS recovery jumper must be set to its default position (pins 1-2). Revision 1.0 119 Intel order number G13326-003
-
 1
1 -
2
-
3
-
4
-
5
-
6
-
7
-
8
-
9
-
10
-
11
-
12
-
13
-
14
-
15
-
16
-
17
-
18
-
19
-
20
-
21
-
22
-
23
-
24
-
25
-
26
-
27
-
28
-
29
-
30
-
31
-
32
-
33
-
34
-
35
-
36
-
37
-
38
-
39
-
40
-
41
-
42
-
43
-
44
-
45
-
46
-
47
-
48
-
49
-
50
-
51
-
52
-
53
-
54
-
55
-
56
-
57
-
58
-
59
-
60
-
61
-
62
-
63
-
64
-
65
-
66
-
67
-
68
-
69
-
70
-
71
-
72
-
73
-
74
-
75
-
76
-
77
-
78
-
79
-
80
-
81
-
82
-
83
-
84
-
85
-
86
-
87
-
88
-
89
-
90
-
91
-
92
-
93
-
94
-
95
-
96
-
97
-
98
-
99
-
100
-
101
-
102
-
103
-
104
-
105
-
106
-
107
-
108
-
109
-
110
-
111
-
112
-
113
-
114
-
115
-
116
-
117
-
118
-
119
-
120
-
121
-
122
-
123
-
124
-
125
-
 126
126 -
 127
127 -
 128
128 -
 129
129 -
 130
130 -
 131
131 -
 132
132 -
 133
133 -
 134
134 -
 135
135 -
 136
136 -
137
-
138
-
139
-
140
-
141
-
142
-
143
-
144
-
145
-
146
-
147
-
148
-
149
-
150
-
151
-
152
-
153
 |
 |
