Kyocera KM-1820 1820 Operation Guide (Advanced Edition) - Page 28
Selecting the Original Size for Scanning, Selecting the Send Size, Scanning Functions
 |
View all Kyocera KM-1820 manuals
Add to My Manuals
Save this manual to your list of manuals |
Page 28 highlights
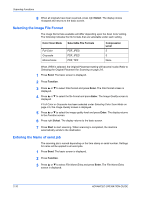
Scanning Functions Selecting the Original Size for Scanning The original size defines the area to be scanned and must be identical to the physical size of the original. 1 Press Send. The basic screen is displayed. 2 Press Original Size. 3 Press S or T to select the original size and press Enter. The display shows Completed and returns to the basic screen. If the original size required is not shown, select Others and press Enter. The Others screen is displayed. 4 Press S or T to select the original size required and press Enter. The display shows Completed and returns to the basic screen. Selecting the Send Size The send size defines the size of the image attached and received. This does not apply if Full Color or Grayscale is selected, when the images are sent at the same size as their originals. 1 Press Send. The basic screen is displayed. 2 Press Function. 3 Press S or T to select Send Size and press Enter. The Send Size screen is displayed. 4 Press S or T to select the send size required and press Enter.The display shows Completed and returns to the Function screen. If the required send size is not shown, select Others and press Enter. 5 Press S or T to select the send size required and press Enter.The display shows Completed and returns to the Function screen. ADVANCED OPERATION GUIDE 2-7
-
 1
1 -
2
-
3
-
4
-
5
-
6
-
7
-
8
-
9
-
10
-
11
-
12
-
13
-
14
-
15
-
16
-
17
-
18
-
19
-
20
-
21
-
22
-
 23
23 -
 24
24 -
 25
25 -
 26
26 -
 27
27 -
 28
28 -
 29
29 -
 30
30 -
 31
31 -
 32
32 -
 33
33 -
34
-
35
-
36
-
37
-
38
-
39
-
40
-
41
-
42
-
43
-
44
-
45
-
46
-
47
-
48
-
49
-
50
-
51
-
52
-
53
-
54
-
55
-
56
-
57
-
58
-
59
-
60
-
61
-
62
-
63
-
64
-
65
-
66
-
67
-
68
-
69
-
70
-
71
-
72
-
73
-
74
-
75
-
76
-
77
-
78
-
79
-
80
-
81
-
82
-
83
-
84
-
85
-
86
-
87
-
88
-
89
-
90
-
91
-
92
-
93
-
94
-
95
-
96
-
97
-
98
-
99
-
100
-
101
-
102
-
103
-
104
-
105
-
106
-
107
-
108
-
109
-
110
-
111
-
112
-
113
-
114
-
115
-
116
-
117
-
118
-
119
-
120
-
121
-
122
-
123
-
124
-
125
-
126
-
127
-
128
-
129
-
130
-
131
-
132
-
133
-
134
-
135
-
136
-
137
-
138
-
139
-
140
-
141
-
142
-
143
-
144
-
145
-
146
-
147
 |
 |