Kyocera KM-1820 1820 Operation Guide (Advanced Edition) - Page 30
Continuous Scanning
 |
View all Kyocera KM-1820 manuals
Add to My Manuals
Save this manual to your list of manuals |
Page 30 highlights
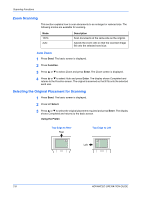
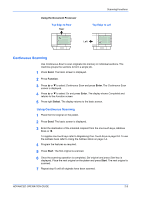
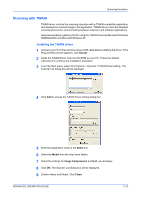
Using the Document Processor Top Edge to Rear Rear Scanning Functions Top Edge to Left Left Continuous Scanning Use Continuous Scan to scan originals into memory in individual sections. The machine groups the sections to form a single job. 1 Press Send. The basic screen is displayed. 2 Press Function. 3 Press S or T to select Continuous Scan and press Enter. The Continuous Scan screen is displayed. 4 Press S or T to select On and press Enter. The display shows Completed and returns to the Function screen. 5 Press right Select. The display returns to the basic screen. Using Continuous Scanning 1 Place the first original on the platen. 2 Press Send. The basic screen is displayed. 3 Enter the destination of the intended recipient from the one-touch keys, Address Book or W. To register one-touch keys refer to Registering One-Touch Keys on page 5-6. To use the address book refer to Using the Address Book on page 2-4. 4 Program the features as required. 5 Press Start. The first original is scanned. 6 Once the scanning operation is completed, Set original and press Start key is displayed. Place the next original on the platen and press Start. The next original is scanned. 7 Repeat step 6 until all originals have been scanned. ADVANCED OPERATION GUIDE 2-9
-
 1
1 -
2
-
3
-
4
-
5
-
6
-
7
-
8
-
9
-
10
-
11
-
12
-
13
-
14
-
15
-
16
-
17
-
18
-
19
-
20
-
21
-
22
-
23
-
24
-
 25
25 -
 26
26 -
 27
27 -
 28
28 -
 29
29 -
 30
30 -
 31
31 -
 32
32 -
 33
33 -
 34
34 -
 35
35 -
36
-
37
-
38
-
39
-
40
-
41
-
42
-
43
-
44
-
45
-
46
-
47
-
48
-
49
-
50
-
51
-
52
-
53
-
54
-
55
-
56
-
57
-
58
-
59
-
60
-
61
-
62
-
63
-
64
-
65
-
66
-
67
-
68
-
69
-
70
-
71
-
72
-
73
-
74
-
75
-
76
-
77
-
78
-
79
-
80
-
81
-
82
-
83
-
84
-
85
-
86
-
87
-
88
-
89
-
90
-
91
-
92
-
93
-
94
-
95
-
96
-
97
-
98
-
99
-
100
-
101
-
102
-
103
-
104
-
105
-
106
-
107
-
108
-
109
-
110
-
111
-
112
-
113
-
114
-
115
-
116
-
117
-
118
-
119
-
120
-
121
-
122
-
123
-
124
-
125
-
126
-
127
-
128
-
129
-
130
-
131
-
132
-
133
-
134
-
135
-
136
-
137
-
138
-
139
-
140
-
141
-
142
-
143
-
144
-
145
-
146
-
147
 |
 |
