Kyocera TASKalfa 500ci 500ci/400ci/300ci/250ci Operation Guide Rev-1 - Page 419

Changing User Properties, Management, OPERATION GUIDE, Adding a User on User Login Setting

Page 419 highlights

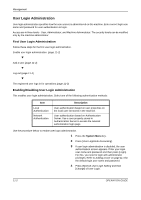
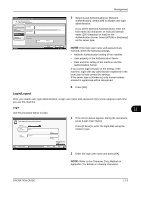
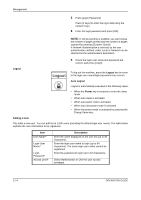
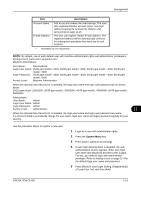
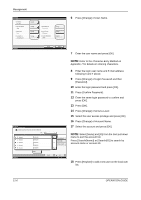
Management Changing User Properties User properties can be changed. Types of user properties that could be changed may be different depending on user access privilege. For a user with administrator rights who logs in User properties can be changed and users can be deleted. The items, which can be added, are all able to be changed. Use the procedure below to change the user properties. 1 Press the System Menu key. 2 Press [User Login/Job Accounting]. 3 If user login administration is disabled, the user authentication screen appears. Enter your login user name and password and then press [Login]. For this, you need to login with administrator privileges. Refer to Adding a User on page 11-4 for the default login user name and password. 4 Press [Next] of User Login Setting and [Register/ Edit] of Local User List. 5 Select the user whose properties you wish to change. User: User Name: 01 User Login User Name: 0099 Access Level: User E-mail Address: [email protected] Change Change Change Change Login Password: ********** Account Name: 02 Account IC Card Information: Empty Change Change Change NOTE: Select [Name] and [Login Name] from the Sort pull-down menu to sort the user list. Press [Search(Name)] or [Search(Login)] to search by name or login user name. 11 The procedure differs depending on the details to be edited. Changing user information 1 Press [Detail]. 2 Refer to steps 6 to 17 of Adding a User to change a user property. Status Cancel Register 10/10/2008 10:10 3 Press [Register]. OPERATION GUIDE 11-7

  • 1
  • 2
  • 3
  • 4
  • 5
  • 6
  • 7
  • 8
  • 9
  • 10
  • 11
  • 12
  • 13
  • 14
  • 15
  • 16
  • 17
  • 18
  • 19
  • 20
  • 21
  • 22
  • 23
  • 24
  • 25
  • 26
  • 27
  • 28
  • 29
  • 30
  • 31
  • 32
  • 33
  • 34
  • 35
  • 36
  • 37
  • 38
  • 39
  • 40
  • 41
  • 42
  • 43
  • 44
  • 45
  • 46
  • 47
  • 48
  • 49
  • 50
  • 51
  • 52
  • 53
  • 54
  • 55
  • 56
  • 57
  • 58
  • 59
  • 60
  • 61
  • 62
  • 63
  • 64
  • 65
  • 66
  • 67
  • 68
  • 69
  • 70
  • 71
  • 72
  • 73
  • 74
  • 75
  • 76
  • 77
  • 78
  • 79
  • 80
  • 81
  • 82
  • 83
  • 84
  • 85
  • 86
  • 87
  • 88
  • 89
  • 90
  • 91
  • 92
  • 93
  • 94
  • 95
  • 96
  • 97
  • 98
  • 99
  • 100
  • 101
  • 102
  • 103
  • 104
  • 105
  • 106
  • 107
  • 108
  • 109
  • 110
  • 111
  • 112
  • 113
  • 114
  • 115
  • 116
  • 117
  • 118
  • 119
  • 120
  • 121
  • 122
  • 123
  • 124
  • 125
  • 126
  • 127
  • 128
  • 129
  • 130
  • 131
  • 132
  • 133
  • 134
  • 135
  • 136
  • 137
  • 138
  • 139
  • 140
  • 141
  • 142
  • 143
  • 144
  • 145
  • 146
  • 147
  • 148
  • 149
  • 150
  • 151
  • 152
  • 153
  • 154
  • 155
  • 156
  • 157
  • 158
  • 159
  • 160
  • 161
  • 162
  • 163
  • 164
  • 165
  • 166
  • 167
  • 168
  • 169
  • 170
  • 171
  • 172
  • 173
  • 174
  • 175
  • 176
  • 177
  • 178
  • 179
  • 180
  • 181
  • 182
  • 183
  • 184
  • 185
  • 186
  • 187
  • 188
  • 189
  • 190
  • 191
  • 192
  • 193
  • 194
  • 195
  • 196
  • 197
  • 198
  • 199
  • 200
  • 201
  • 202
  • 203
  • 204
  • 205
  • 206
  • 207
  • 208
  • 209
  • 210
  • 211
  • 212
  • 213
  • 214
  • 215
  • 216
  • 217
  • 218
  • 219
  • 220
  • 221
  • 222
  • 223
  • 224
  • 225
  • 226
  • 227
  • 228
  • 229
  • 230
  • 231
  • 232
  • 233
  • 234
  • 235
  • 236
  • 237
  • 238
  • 239
  • 240
  • 241
  • 242
  • 243
  • 244
  • 245
  • 246
  • 247
  • 248
  • 249
  • 250
  • 251
  • 252
  • 253
  • 254
  • 255
  • 256
  • 257
  • 258
  • 259
  • 260
  • 261
  • 262
  • 263
  • 264
  • 265
  • 266
  • 267
  • 268
  • 269
  • 270
  • 271
  • 272
  • 273
  • 274
  • 275
  • 276
  • 277
  • 278
  • 279
  • 280
  • 281
  • 282
  • 283
  • 284
  • 285
  • 286
  • 287
  • 288
  • 289
  • 290
  • 291
  • 292
  • 293
  • 294
  • 295
  • 296
  • 297
  • 298
  • 299
  • 300
  • 301
  • 302
  • 303
  • 304
  • 305
  • 306
  • 307
  • 308
  • 309
  • 310
  • 311
  • 312
  • 313
  • 314
  • 315
  • 316
  • 317
  • 318
  • 319
  • 320
  • 321
  • 322
  • 323
  • 324
  • 325
  • 326
  • 327
  • 328
  • 329
  • 330
  • 331
  • 332
  • 333
  • 334
  • 335
  • 336
  • 337
  • 338
  • 339
  • 340
  • 341
  • 342
  • 343
  • 344
  • 345
  • 346
  • 347
  • 348
  • 349
  • 350
  • 351
  • 352
  • 353
  • 354
  • 355
  • 356
  • 357
  • 358
  • 359
  • 360
  • 361
  • 362
  • 363
  • 364
  • 365
  • 366
  • 367
  • 368
  • 369
  • 370
  • 371
  • 372
  • 373
  • 374
  • 375
  • 376
  • 377
  • 378
  • 379
  • 380
  • 381
  • 382
  • 383
  • 384
  • 385
  • 386
  • 387
  • 388
  • 389
  • 390
  • 391
  • 392
  • 393
  • 394
  • 395
  • 396
  • 397
  • 398
  • 399
  • 400
  • 401
  • 402
  • 403
  • 404
  • 405
  • 406
  • 407
  • 408
  • 409
  • 410
  • 411
  • 412
  • 413
  • 414
  • 415
  • 416
  • 417
  • 418
  • 419
  • 420
  • 421
  • 422
  • 423
  • 424
  • 425
  • 426
  • 427
  • 428
  • 429
  • 430
  • 431
  • 432
  • 433
  • 434
  • 435
  • 436
  • 437
  • 438
  • 439
  • 440
  • 441
  • 442
  • 443
  • 444
  • 445
  • 446
  • 447
  • 448
  • 449
  • 450
  • 451
  • 452
  • 453
  • 454
  • 455
  • 456
  • 457
  • 458
  • 459
  • 460
  • 461
  • 462
  • 463
  • 464
  • 465
  • 466
  • 467
  • 468
  • 469
  • 470
  • 471
  • 472
  • 473
  • 474
  • 475
  • 476
  • 477
  • 478
  • 479
  • 480
  • 481
  • 482
  • 483
  • 484
  • 485
  • 486
  • 487
  • 488

Management
OPERATION GUIDE
11-7
11
Changing User Properties
User properties can be changed. Types of user properties that could be changed may be different depending
on user access privilege.
For a user with administrator rights who logs in
User properties can be changed and users can be deleted. The items, which can be added, are all able to be
changed.
Use the procedure below to change the user properties.
1
Press the
System Menu
key.
2
Press [User Login/Job Accounting].
3
If user login administration is disabled, the user
authentication screen appears. Enter your login
user name and password and then press [Login].
For this, you need to login with administrator
privileges. Refer to
Adding a User on page 11-4
for
the default login user name and password.
4
Press [Next] of
User Login Setting
and [Register/
Edit] of
Local User List
.
5
Select the user whose properties you wish to
change.
NOTE:
Select [Name] and [Login Name] from the
Sort
pull-down menu to sort the user list.
Press [Search(Name)] or [Search(Login)] to search by
name or login user name.
The procedure differs depending on the details to
be edited.
Changing user information
1
Press [Detail].
2
Refer to steps 6 to 17 of
Adding a User
to
change a user property.
3
Press [Register].
User:
User Name:
Account Name:
Access Level:
Register
E-mail Address:
Login Password:
Login User Name:
Cancel
02
User
**********
0099
Change
10/10/2008
10:10
Status
Change
Change
Change
Change
Change
Change
IC Card Information:
Empty
01 User
Account