Kyocera TASKalfa 500ci 500ci/400ci/300ci/250ci Operation Guide Rev-1 - Page 424
Obtain Network User Property, Description, Enabling/Disabling User Login Administration
 |
View all Kyocera TASKalfa 500ci manuals
Add to My Manuals
Save this manual to your list of manuals |
Page 424 highlights
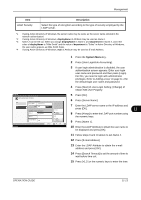
Management Group:xxx Group ID: Change Access Level: Change Print Restriction (Color): Change Copy Restriction (Color): Change Send Restriction: Change Status Group Name: Change Print Restriction: Change Copy Restriction: Change Copy Restr. (Full Color): Change Cancel 1/2 Register 2008/10/10 10:10 5 Press [Change] of Group ID. 6 Enter the group ID and press [OK]. 7 Press [Change] of Group Name. 8 Enter the group name and press [OK]. NOTE: Refer to the Character Entry Method on Appendix-7 for details on entering characters. 9 Press [Change] of Access Level. 10 Select the user access privilege and press [OK]. 11 Press [Change] of Print Restr. (B & W). 12 Select [Reject Usage] or [Off] and press [OK]. 13 Follow steps 11 and 12 above to set Print Restr. (Full Color), Copy Restr. (B & W), Copy Restr. (SingleColor), Copy Restr. (Full Color), Send Restriction, FAX TX Restriction, Storing Restr. in Box, and Storing Restr. in Memory. 14 Press [Register] to add a new group on the group list. Obtain Network User Property Set the required information to obtain the network user property from the LDAP server. NOTE: To obtain the network user property from the LDAP server, [Network Authentication] must be selected for the authentication method in Enabling/Disabling User Login Administration on page 11-2. The table below explains the required information to be registered.Use the procedure below. Item Server Name*1 Port Name 1*2 Name 2*3 E-mail Address*4 Search Timeout Description Enter the LDAP server name or the IP address (up to 64 characters). Set the LDAP port number or use the default port 389. Enter the LDAP Attribute to obtain the user name to be displayed from the LDAP server (up to 32 characters). Enter the LDAP Attribute to obtain the user name to be displayed from the LDAP server (up to 32 characters). Enter the LDAP Attribute to obtain the e-mail address from the LDAP server (up to 32 characters). Set the amount of time to wait before time-out in seconds (from 5 to 255 seconds). 11-12 OPERATION GUIDE
-
 1
1 -
2
-
3
-
4
-
5
-
6
-
7
-
8
-
9
-
10
-
11
-
12
-
13
-
14
-
15
-
16
-
17
-
18
-
19
-
20
-
21
-
22
-
23
-
24
-
25
-
26
-
27
-
28
-
29
-
30
-
31
-
32
-
33
-
34
-
35
-
36
-
37
-
38
-
39
-
40
-
41
-
42
-
43
-
44
-
45
-
46
-
47
-
48
-
49
-
50
-
51
-
52
-
53
-
54
-
55
-
56
-
57
-
58
-
59
-
60
-
61
-
62
-
63
-
64
-
65
-
66
-
67
-
68
-
69
-
70
-
71
-
72
-
73
-
74
-
75
-
76
-
77
-
78
-
79
-
80
-
81
-
82
-
83
-
84
-
85
-
86
-
87
-
88
-
89
-
90
-
91
-
92
-
93
-
94
-
95
-
96
-
97
-
98
-
99
-
100
-
101
-
102
-
103
-
104
-
105
-
106
-
107
-
108
-
109
-
110
-
111
-
112
-
113
-
114
-
115
-
116
-
117
-
118
-
119
-
120
-
121
-
122
-
123
-
124
-
125
-
126
-
127
-
128
-
129
-
130
-
131
-
132
-
133
-
134
-
135
-
136
-
137
-
138
-
139
-
140
-
141
-
142
-
143
-
144
-
145
-
146
-
147
-
148
-
149
-
150
-
151
-
152
-
153
-
154
-
155
-
156
-
157
-
158
-
159
-
160
-
161
-
162
-
163
-
164
-
165
-
166
-
167
-
168
-
169
-
170
-
171
-
172
-
173
-
174
-
175
-
176
-
177
-
178
-
179
-
180
-
181
-
182
-
183
-
184
-
185
-
186
-
187
-
188
-
189
-
190
-
191
-
192
-
193
-
194
-
195
-
196
-
197
-
198
-
199
-
200
-
201
-
202
-
203
-
204
-
205
-
206
-
207
-
208
-
209
-
210
-
211
-
212
-
213
-
214
-
215
-
216
-
217
-
218
-
219
-
220
-
221
-
222
-
223
-
224
-
225
-
226
-
227
-
228
-
229
-
230
-
231
-
232
-
233
-
234
-
235
-
236
-
237
-
238
-
239
-
240
-
241
-
242
-
243
-
244
-
245
-
246
-
247
-
248
-
249
-
250
-
251
-
252
-
253
-
254
-
255
-
256
-
257
-
258
-
259
-
260
-
261
-
262
-
263
-
264
-
265
-
266
-
267
-
268
-
269
-
270
-
271
-
272
-
273
-
274
-
275
-
276
-
277
-
278
-
279
-
280
-
281
-
282
-
283
-
284
-
285
-
286
-
287
-
288
-
289
-
290
-
291
-
292
-
293
-
294
-
295
-
296
-
297
-
298
-
299
-
300
-
301
-
302
-
303
-
304
-
305
-
306
-
307
-
308
-
309
-
310
-
311
-
312
-
313
-
314
-
315
-
316
-
317
-
318
-
319
-
320
-
321
-
322
-
323
-
324
-
325
-
326
-
327
-
328
-
329
-
330
-
331
-
332
-
333
-
334
-
335
-
336
-
337
-
338
-
339
-
340
-
341
-
342
-
343
-
344
-
345
-
346
-
347
-
348
-
349
-
350
-
351
-
352
-
353
-
354
-
355
-
356
-
357
-
358
-
359
-
360
-
361
-
362
-
363
-
364
-
365
-
366
-
367
-
368
-
369
-
370
-
371
-
372
-
373
-
374
-
375
-
376
-
377
-
378
-
379
-
380
-
381
-
382
-
383
-
384
-
385
-
386
-
387
-
388
-
389
-
390
-
391
-
392
-
393
-
394
-
395
-
396
-
397
-
398
-
399
-
400
-
401
-
402
-
403
-
404
-
405
-
406
-
407
-
408
-
409
-
410
-
411
-
412
-
413
-
414
-
415
-
416
-
417
-
418
-
 419
419 -
 420
420 -
 421
421 -
 422
422 -
 423
423 -
 424
424 -
 425
425 -
 426
426 -
 427
427 -
 428
428 -
 429
429 -
430
-
431
-
432
-
433
-
434
-
435
-
436
-
437
-
438
-
439
-
440
-
441
-
442
-
443
-
444
-
445
-
446
-
447
-
448
-
449
-
450
-
451
-
452
-
453
-
454
-
455
-
456
-
457
-
458
-
459
-
460
-
461
-
462
-
463
-
464
-
465
-
466
-
467
-
468
-
469
-
470
-
471
-
472
-
473
-
474
-
475
-
476
-
477
-
478
-
479
-
480
-
481
-
482
-
483
-
484
-
485
-
486
-
487
-
488
 |
 |
