Lexmark 16Z0000 User's Guide - Page 143
Poor copy quality, Adjust the brightness of the copy
 |
UPC - 734646046657
View all Lexmark 16Z0000 manuals
Add to My Manuals
Save this manual to your list of manuals |
Page 143 highlights
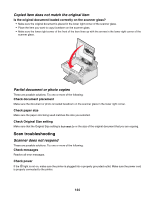
Poor copy quality • Blank pages • Checkerboard pattern • Distorted graphics or pictures • Missing characters • Faded print • Dark print • Skewed lines • Smudges • Streaks • Unexpected characters • White lines in print These are possible solutions. Try one or more of the following: Check messages If an error message is displayed, see "Error messages on the computer screen" on page 153. Check ink Check the ink levels, and install a new print cartridge if necessary. Clean the scanner glass If the scanner glass is dirty, gently wipe it with a clean, lint-free cloth dampened with water. Review steps to improve print quality See "Improving print quality" on page 118. Adjust the brightness of the copy 1 Load the document facedown on the scanner glass. 2 From the control panel, press or repeatedly to choose Copy. 3 Press . 4 Press repeatedly to choose Lighter/Darker. 5 Press or repeatedly to lighten or darken the copy. 6 Press Start. Check quality of original document If the quality of the original document is not satisfactory, try using a clearer version of the document or image. Are you scanning from photo or glossy paper, a magazine, or a newspaper? If you are copying or scanning from photo or glossy paper, a magazine, or a newspaper, see "Removing wavy patterns from scanned photos, magazines, or newspapers" on page 70. Check document placement Make sure the document or photo is loaded facedown on the scanner glass in the lower right corner. 143
-
 1
1 -
2
-
3
-
4
-
5
-
6
-
7
-
8
-
9
-
10
-
11
-
12
-
13
-
14
-
15
-
16
-
17
-
18
-
19
-
20
-
21
-
22
-
23
-
24
-
25
-
26
-
27
-
28
-
29
-
30
-
31
-
32
-
33
-
34
-
35
-
36
-
37
-
38
-
39
-
40
-
41
-
42
-
43
-
44
-
45
-
46
-
47
-
48
-
49
-
50
-
51
-
52
-
53
-
54
-
55
-
56
-
57
-
58
-
59
-
60
-
61
-
62
-
63
-
64
-
65
-
66
-
67
-
68
-
69
-
70
-
71
-
72
-
73
-
74
-
75
-
76
-
77
-
78
-
79
-
80
-
81
-
82
-
83
-
84
-
85
-
86
-
87
-
88
-
89
-
90
-
91
-
92
-
93
-
94
-
95
-
96
-
97
-
98
-
99
-
100
-
101
-
102
-
103
-
104
-
105
-
106
-
107
-
108
-
109
-
110
-
111
-
112
-
113
-
114
-
115
-
116
-
117
-
118
-
119
-
120
-
121
-
122
-
123
-
124
-
125
-
126
-
127
-
128
-
129
-
130
-
131
-
132
-
133
-
134
-
135
-
136
-
137
-
 138
138 -
 139
139 -
 140
140 -
 141
141 -
 142
142 -
 143
143 -
 144
144 -
 145
145 -
 146
146 -
 147
147 -
 148
148 -
149
-
150
-
151
-
152
-
153
-
154
-
155
-
156
-
157
-
158
-
159
-
160
-
161
-
162
-
163
-
164
-
165
-
166
-
167
-
168
-
169
-
170
-
171
-
172
-
173
-
174
-
175
-
176
 |
 |