Lexmark 16Z0000 User's Guide - Page 87
Creating a PDF from a scanned item, Canceling a scan job, Customizing scan settings using the computer
 |
UPC - 734646046657
View all Lexmark 16Z0000 manuals
Add to My Manuals
Save this manual to your list of manuals |
Page 87 highlights
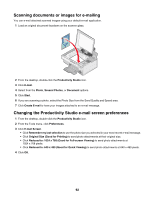
2 From the desktop, double-click the Productivity Studio icon. 3 Click Scan. 4 Select the Several Photos option. 5 Click Start. Creating a PDF from a scanned item 1 Load an original document facedown on the scanner glass. 2 From the desktop, double-click the Productivity Studio icon. 3 From the Welcome Screen, click Convert to PDF. 4 Select Photo, Several Photos, or Document. 5 Click to begin scanning. 6 Click Add Another to scan additional images, or to add an image from the Library. 7 To add or scan another image, do one of the following: • Select Add New Scan and repeat step 3 to scan another image or • Select Add Photo from Photo Library to add a previously scanned image. Select or deselect images by clicking on them in the preview pane. Click Add Files when you have made your selections. 8 Select Save all images as one PDF file or Save each image as individual PDF file. 9 Click Create PDF. 10 If you want to save the scanned image separately, make your selections and click Save. Otherwise, click Cancel when the Photo Save options appear. The software prepares your PDF and opens a Save dialog. 11 Enter a file name for your PDF and select a storage location. 12 Click Save. Canceling a scan job To cancel a job being scanned on the scanner glass, go to the control panel, and press . To cancel a scan job started in the Productivity Studio, click Scan and then click Stop. Customizing scan settings using the computer 1 From the desktop, double-click the Productivity Studio icon. 2 Click Scan. 3 Click Custom Settings. 87
-
 1
1 -
2
-
3
-
4
-
5
-
6
-
7
-
8
-
9
-
10
-
11
-
12
-
13
-
14
-
15
-
16
-
17
-
18
-
19
-
20
-
21
-
22
-
23
-
24
-
25
-
26
-
27
-
28
-
29
-
30
-
31
-
32
-
33
-
34
-
35
-
36
-
37
-
38
-
39
-
40
-
41
-
42
-
43
-
44
-
45
-
46
-
47
-
48
-
49
-
50
-
51
-
52
-
53
-
54
-
55
-
56
-
57
-
58
-
59
-
60
-
61
-
62
-
63
-
64
-
65
-
66
-
67
-
68
-
69
-
70
-
71
-
72
-
73
-
74
-
75
-
76
-
77
-
78
-
79
-
80
-
81
-
 82
82 -
 83
83 -
 84
84 -
 85
85 -
 86
86 -
 87
87 -
 88
88 -
 89
89 -
 90
90 -
 91
91 -
 92
92 -
93
-
94
-
95
-
96
-
97
-
98
-
99
-
100
-
101
-
102
-
103
-
104
-
105
-
106
-
107
-
108
-
109
-
110
-
111
-
112
-
113
-
114
-
115
-
116
-
117
-
118
-
119
-
120
-
121
-
122
-
123
-
124
-
125
-
126
-
127
-
128
-
129
-
130
-
131
-
132
-
133
-
134
-
135
-
136
-
137
-
138
-
139
-
140
-
141
-
142
-
143
-
144
-
145
-
146
-
147
-
148
-
149
-
150
-
151
-
152
-
153
-
154
-
155
-
156
-
157
-
158
-
159
-
160
-
161
-
162
-
163
-
164
-
165
-
166
-
167
-
168
-
169
-
170
-
171
-
172
-
173
-
174
-
175
-
176
 |
 |