Lexmark 16Z0000 User's Guide - Page 37
Con network printers, Con Add printers, Refresh
 |
UPC - 734646046657
View all Lexmark 16Z0000 manuals
Add to My Manuals
Save this manual to your list of manuals |
Page 37 highlights
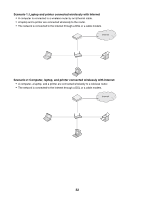
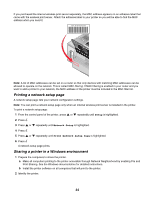
6 Click Share this printer, and assign a name to your printer. 7 Follow the directions on the computer screen until installation is complete. Windows 2000 or Windows XP users only: 1 For more information, see the setup information that came with your printer. 2 Click Start ΠSettings ΠPrinters. 3 Right-click your printer icon, and select Sharing. 4 Click Shared as, and assign a name to your printer. 5 Follow the directions on the computer screen until installation is complete. Installing the shared printer on other network computers (on the client computers) Using the peer-to-peer method Using the point-and-print method 1 Go to a network computer that you want to enable to print to the shared printer. 2 Insert the printer software CD. 3 Agree to the license agreement, and then click Next. 4 Select Manual Setup. 5 From the Network Printer Setup dialog, select the Peer-to-Peer client option, and then click Next. 6 Select the appropriate printer from the list, and then click Next. 7 Select the software you want to install, and then click Next. 8 When setup is complete, click Finished. 9 Repeat this procedure for each network computer you want to access the shared printer. 1 Go to a network computer that you want to enable to print to the shared printer. 2 Browse the Network Neighborhood until you find the name of the shared printer assigned in step 4 on page 37. 3 Right-click the printer icon, and select Open or Connect. 4 This will copy a subset of the printer software from the host computer. A printer object will be created in the Printers folder of the client. Configure network printers Configure To configure a network printer, select a printer from the list in the window. Click Configure to assign the printer an Internet Protocol (IP) address. Contact your system support person for more information. Add printers Specify remote subnets that may have direct network attached printers. If the software detects a direct network attached printer, you must first highlight the printer in the window, and then click Configure to manually assign an IP address to the printer. Contact your system support person for more information. Note: The software does not automatically configure printers found on remote subnets. Refresh Click Refresh to have the Configuration Utility automatically search to find and configure newly added printers. 37
-
 1
1 -
2
-
3
-
4
-
5
-
6
-
7
-
8
-
9
-
10
-
11
-
12
-
13
-
14
-
15
-
16
-
17
-
18
-
19
-
20
-
21
-
22
-
23
-
24
-
25
-
26
-
27
-
28
-
29
-
30
-
31
-
 32
32 -
 33
33 -
 34
34 -
 35
35 -
 36
36 -
 37
37 -
 38
38 -
 39
39 -
 40
40 -
 41
41 -
 42
42 -
43
-
44
-
45
-
46
-
47
-
48
-
49
-
50
-
51
-
52
-
53
-
54
-
55
-
56
-
57
-
58
-
59
-
60
-
61
-
62
-
63
-
64
-
65
-
66
-
67
-
68
-
69
-
70
-
71
-
72
-
73
-
74
-
75
-
76
-
77
-
78
-
79
-
80
-
81
-
82
-
83
-
84
-
85
-
86
-
87
-
88
-
89
-
90
-
91
-
92
-
93
-
94
-
95
-
96
-
97
-
98
-
99
-
100
-
101
-
102
-
103
-
104
-
105
-
106
-
107
-
108
-
109
-
110
-
111
-
112
-
113
-
114
-
115
-
116
-
117
-
118
-
119
-
120
-
121
-
122
-
123
-
124
-
125
-
126
-
127
-
128
-
129
-
130
-
131
-
132
-
133
-
134
-
135
-
136
-
137
-
138
-
139
-
140
-
141
-
142
-
143
-
144
-
145
-
146
-
147
-
148
-
149
-
150
-
151
-
152
-
153
-
154
-
155
-
156
-
157
-
158
-
159
-
160
-
161
-
162
-
163
-
164
-
165
-
166
-
167
-
168
-
169
-
170
-
171
-
172
-
173
-
174
-
175
-
176
 |
 |