Lexmark 16Z0000 User's Guide - Page 78
Copying a photo using the computer, Enlarging or reducing an image, Productivity Studio, Photo, Start
 |
UPC - 734646046657
View all Lexmark 16Z0000 manuals
Add to My Manuals
Save this manual to your list of manuals |
Page 78 highlights
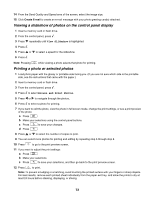
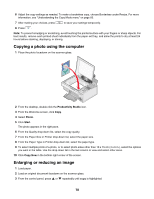
6 Adjust the copy settings as needed. To make a borderless copy, choose Borderless under Resize. For more information, see "Understanding the Copy Mode menu" on page 83. 7 After making your choices, press to save your settings temporarily. 8 Press . Note: To prevent smudging or scratching, avoid touching the printed surface with your fingers or sharp objects. For best results, remove each printed sheet individually from the paper exit tray, and allow the prints to dry at least 24 hours before stacking, displaying, or storing. Copying a photo using the computer 1 Place the photo facedown on the scanner glass. WI F I PRINTING 2 From the desktop, double-click the Productivity Studio icon. 3 From the Welcome screen, click Copy. 4 Select Photo. 5 Click Start. The photo appears in the right pane. 6 From the Quality drop-down list, select the copy quality. 7 From the Paper Size in Printer drop-down list, select the paper size. 8 From the Paper Type in Printer drop-down list, select the paper type. 9 To select multiple prints of a photo, or to select photo sizes other than 10 x 15 cm (4 x 6 in.), select the options you want in the table. Use the drop-down list in the last column to view and select other sizes. 10 Click Copy Now in the bottom right corner of the screen. Enlarging or reducing an image 1 Load paper. 2 Load an original document facedown on the scanner glass. 3 From the control panel, press or repeatedly until Copy is highlighted. 78
-
 1
1 -
2
-
3
-
4
-
5
-
6
-
7
-
8
-
9
-
10
-
11
-
12
-
13
-
14
-
15
-
16
-
17
-
18
-
19
-
20
-
21
-
22
-
23
-
24
-
25
-
26
-
27
-
28
-
29
-
30
-
31
-
32
-
33
-
34
-
35
-
36
-
37
-
38
-
39
-
40
-
41
-
42
-
43
-
44
-
45
-
46
-
47
-
48
-
49
-
50
-
51
-
52
-
53
-
54
-
55
-
56
-
57
-
58
-
59
-
60
-
61
-
62
-
63
-
64
-
65
-
66
-
67
-
68
-
69
-
70
-
71
-
72
-
 73
73 -
 74
74 -
 75
75 -
 76
76 -
 77
77 -
 78
78 -
 79
79 -
 80
80 -
 81
81 -
 82
82 -
 83
83 -
84
-
85
-
86
-
87
-
88
-
89
-
90
-
91
-
92
-
93
-
94
-
95
-
96
-
97
-
98
-
99
-
100
-
101
-
102
-
103
-
104
-
105
-
106
-
107
-
108
-
109
-
110
-
111
-
112
-
113
-
114
-
115
-
116
-
117
-
118
-
119
-
120
-
121
-
122
-
123
-
124
-
125
-
126
-
127
-
128
-
129
-
130
-
131
-
132
-
133
-
134
-
135
-
136
-
137
-
138
-
139
-
140
-
141
-
142
-
143
-
144
-
145
-
146
-
147
-
148
-
149
-
150
-
151
-
152
-
153
-
154
-
155
-
156
-
157
-
158
-
159
-
160
-
161
-
162
-
163
-
164
-
165
-
166
-
167
-
168
-
169
-
170
-
171
-
172
-
173
-
174
-
175
-
176
 |
 |