Samsung SPH-D700 User Manual (user Manual) (ver.f6) (English) - Page 112
Contacts Entry Options
 |
View all Samsung SPH-D700 manuals
Add to My Manuals
Save this manual to your list of manuals |
Page 112 highlights
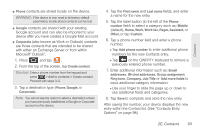
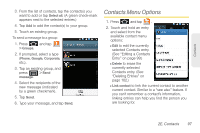
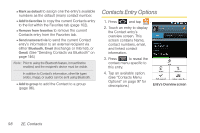
Ⅲ Mark as default to assign one the entry's available numbers as the default (main) contact number. Ⅲ Add to favorites to copy the current Contacts entry to the list within the Favorites tab (page 102). Ⅲ Remove from favorites to remove the current Contacts entry from the Favorites tab. Ⅲ Send namecard via to send the current Contact entry's information to an external recipient via either Bluetooth, Email (Exchange or Internet), or Gmail. (See "Sending Contacts via Bluetooth" on page 146.) Note: Prior to using the Bluetooth feature, it must first be enabled, and the recipient's device must be visible. In addition to Contact's information, other file types (video, image, or audio) can be sent using Bluetooth. Ⅲ Add to group to add the Contact to a group (page 96). Contacts Entry Options 1. Press and tap . 2. Touch an entry to display the Contact entry's overview screen. This screen contains Name, contact numbers, email, and linked contact information. 3. Press to reveal the context menu specific to this entry. 4. Tap an available option. (See "Contacts Menu Options" on page 97 for descriptions.) Entry's Overview screen 98 2E. Contacts
-
 1
1 -
2
-
3
-
4
-
5
-
6
-
7
-
8
-
9
-
10
-
11
-
12
-
13
-
14
-
15
-
16
-
17
-
18
-
19
-
20
-
21
-
22
-
23
-
24
-
25
-
26
-
27
-
28
-
29
-
30
-
31
-
32
-
33
-
34
-
35
-
36
-
37
-
38
-
39
-
40
-
41
-
42
-
43
-
44
-
45
-
46
-
47
-
48
-
49
-
50
-
51
-
52
-
53
-
54
-
55
-
56
-
57
-
58
-
59
-
60
-
61
-
62
-
63
-
64
-
65
-
66
-
67
-
68
-
69
-
70
-
71
-
72
-
73
-
74
-
75
-
76
-
77
-
78
-
79
-
80
-
81
-
82
-
83
-
84
-
85
-
86
-
87
-
88
-
89
-
90
-
91
-
92
-
93
-
94
-
95
-
96
-
97
-
98
-
99
-
100
-
101
-
102
-
103
-
104
-
105
-
106
-
 107
107 -
 108
108 -
 109
109 -
 110
110 -
 111
111 -
 112
112 -
 113
113 -
 114
114 -
 115
115 -
 116
116 -
 117
117 -
118
-
119
-
120
-
121
-
122
-
123
-
124
-
125
-
126
-
127
-
128
-
129
-
130
-
131
-
132
-
133
-
134
-
135
-
136
-
137
-
138
-
139
-
140
-
141
-
142
-
143
-
144
-
145
-
146
-
147
-
148
-
149
-
150
-
151
-
152
-
153
-
154
-
155
-
156
-
157
-
158
-
159
-
160
-
161
-
162
-
163
-
164
-
165
-
166
-
167
-
168
-
169
-
170
-
171
-
172
-
173
-
174
-
175
-
176
-
177
-
178
-
179
-
180
-
181
-
182
-
183
-
184
-
185
-
186
-
187
-
188
-
189
-
190
-
191
-
192
-
193
-
194
-
195
-
196
-
197
-
198
-
199
-
200
-
201
-
202
-
203
-
204
-
205
-
206
-
207
-
208
-
209
-
210
-
211
-
212
-
213
-
214
-
215
-
216
-
217
-
218
-
219
-
220
-
221
-
222
-
223
-
224
-
225
-
226
-
227
-
228
-
229
-
230
-
231
-
232
-
233
-
234
-
235
-
236
-
237
-
238
-
239
-
240
-
241
-
242
-
243
-
244
-
245
-
246
-
247
-
248
-
249
-
250
-
251
-
252
-
253
-
254
-
255
-
256
-
257
-
258
-
259
-
260
-
261
-
262
-
263
-
264
 |
 |
