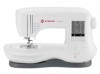
Singer C440 LEGACY Instruction Manual and Troubleshooting Guide - Page 10
Setting, Machine
 |
View all Singer C440 LEGACY manuals
Add to My Manuals
Save this manual to your list of manuals |
Page 10 highlights
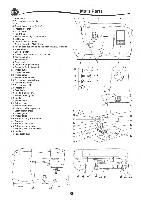
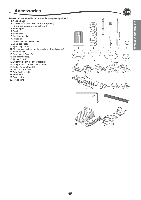
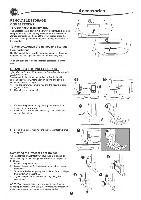
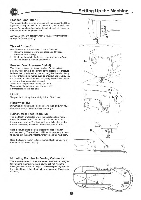
UNPACKING 1. Place the box on a steady, flat surface. Lift your machine out of the box and remove the outer packaging. 2. Remove all other packing material and the plastic bag. ELECTRICAL CONNECTION 1. Place machine on stable surface. 2. Connect the power line cord to the machine by inserting the 2-hole plug into the power cord connector. Setting Up the Machine EMI 3. Connect the power line plug to the electric outlet. 4. Turn on the power switch. 5. The LED lights will light up when the switch is turned on (symbol I). 6. To disconnect, turn the power switch to the off position (symbol O), then remove plug from outlet. O /I /I 0 0 CO a FOR UNITED STATES AND CANADA USERS: POLARIZED PLUG INFORMATION This sewing machine has a polarized plug (one blade wider than the other). To reduce the risk of electric shock, this plug is intended to fit in a polarized outlet only one way. If the plug does not fit fully in the outlet, reverse the plug. If it still does not fit, contact a qualified electrician to install the proper outlet. Do not modify the plug in any way. FOOT CONTROL IN Use only foot controlprovided with this machine. (type C-9001 manufactured by CHIEN HUNG TAIWAN Ltd) The foot control is operated by your foot. The foot control permits the starting and stopping of the machine, as well as sewing speed. 1. Turn off the power switch. (symbol O) 2. Push foot control plug into the connector on machine. 3. Place foot control at your feet. 4. Turn on the power switch. 0 V Ol- 2 3, 0 0 p
-
 1
1 -
2
-
3
-
4
-
 5
5 -
 6
6 -
 7
7 -
 8
8 -
 9
9 -
 10
10 -
 11
11 -
 12
12 -
 13
13 -
 14
14 -
 15
15 -
16
-
17
-
18
-
19
-
20
-
21
-
22
-
23
-
24
-
25
-
26
-
27
-
28
-
29
-
30
-
31
-
32
-
33
-
34
-
35
-
36
-
37
-
38
-
39
-
40
-
41
-
42
-
43
-
44
-
45
-
46
-
47
-
48
-
49
-
50
-
51
-
52
-
53
-
54
-
55
-
56
-
57
-
58
-
59
-
60
-
61
-
62
-
63
-
64
-
65
-
66
-
67
-
68
-
69
-
70
-
71
-
72
-
73
-
74
-
75
-
76
-
77
-
78
-
79
-
80
-
81
-
82
-
83
-
84
-
85
-
86
-
87
-
88
-
89
-
90
-
91
-
92
-
93
-
94
-
95
-
96
-
97
-
98
-
99
-
100
-
101
-
102
-
103
-
104
-
105
-
106
-
107
-
108
-
109
-
110
-
111
-
112
-
113
-
114
-
115
-
116
-
117
-
118
-
119
-
120
-
121
-
122
-
123
-
124
-
125
-
126
-
127
-
128
-
129
-
130
-
131
-
132
-
133
-
134
-
135
-
136
-
137
-
138
-
139
-
140
 |
 |
