Singer C440 LEGACY Instruction Manual and Troubleshooting Guide - Page 22
Starting
 |
View all Singer C440 LEGACY manuals
Add to My Manuals
Save this manual to your list of manuals |
Page 22 highlights
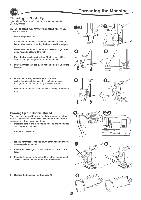
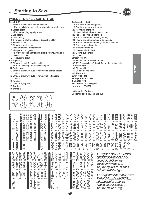
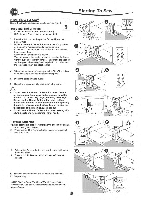
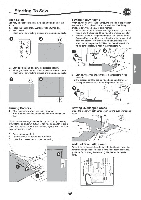
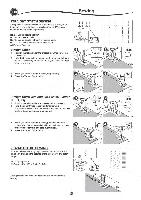
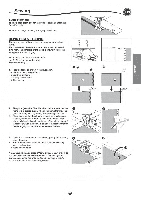
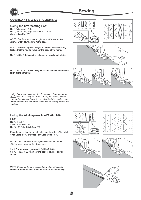
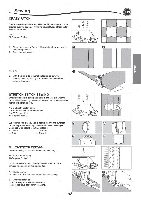
Starting To Sew STARTING TO SEW Select the straight stitch center needle position. (No. 0) C:) Start and End of Seam 0 1. Check the presser foot (All-Purpose Foot). Refer to page 8 for changing the presser foot. 2. Place the fabric under the presser foot and lower the presser foot. 3. Hold the threads at the back. Press the Start/Stop button or step on the foot control pedal to start sewing. Continue to hold the thread tails for the first few stitches, then release them. Lightly guide the fabric while sewing. You can regulate the sewing speed by pressing the Speed Control buttons or the foot control. The buttons are used to set the speed when using Start/Stop button and also sets the top speed when using foot control. 4. When you reach end of seam, press the Start/Stop button 0 to stop sewing or release the foot control pedal. 5. Press the Thread Cutter button. 6. Raise the presser foot lifter and remove the fabric. LN • Do not press the Thread Cutter button when there is no fabric under the presser foot or no need to cut the threads. The thread may tangle, resulting in damage. • Do not use the Thread Cutter button when cutting thread thicker than #30, nylon thread or other specialty threads. In this case, use the thread cutter located on the left side of the machine. (See page 12) • Do not use the Thread Cutter button when sewing with a twin needle or a hemstitching (wing) needle. ) 11 00 00 00 0 Reverse Stitching Reverse stitching is used for reinforcing the ends of the seams. 1. Start sewing 4-5 stitches. 2. Press and hold the Reverse button to sew reverse stitch until start point. 0 0 0
-
 1
1 -
2
-
3
-
4
-
5
-
6
-
7
-
8
-
9
-
10
-
11
-
12
-
13
-
14
-
15
-
16
-
 17
17 -
 18
18 -
 19
19 -
 20
20 -
 21
21 -
 22
22 -
 23
23 -
 24
24 -
 25
25 -
 26
26 -
 27
27 -
28
-
29
-
30
-
31
-
32
-
33
-
34
-
35
-
36
-
37
-
38
-
39
-
40
-
41
-
42
-
43
-
44
-
45
-
46
-
47
-
48
-
49
-
50
-
51
-
52
-
53
-
54
-
55
-
56
-
57
-
58
-
59
-
60
-
61
-
62
-
63
-
64
-
65
-
66
-
67
-
68
-
69
-
70
-
71
-
72
-
73
-
74
-
75
-
76
-
77
-
78
-
79
-
80
-
81
-
82
-
83
-
84
-
85
-
86
-
87
-
88
-
89
-
90
-
91
-
92
-
93
-
94
-
95
-
96
-
97
-
98
-
99
-
100
-
101
-
102
-
103
-
104
-
105
-
106
-
107
-
108
-
109
-
110
-
111
-
112
-
113
-
114
-
115
-
116
-
117
-
118
-
119
-
120
-
121
-
122
-
123
-
124
-
125
-
126
-
127
-
128
-
129
-
130
-
131
-
132
-
133
-
134
-
135
-
136
-
137
-
138
-
139
-
140
 |
 |
