Singer C440 LEGACY Instruction Manual and Troubleshooting Guide - Page 44
Op IQ
 |
View all Singer C440 LEGACY manuals
Add to My Manuals
Save this manual to your list of manuals |
Page 44 highlights
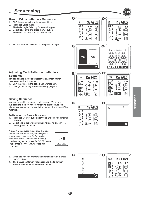
p To reduce the risk ofelectric shock, disconnect the power line plug from the electric outlet before carrying out any maintenance. CLEANING If lint and bits of thread accumulate in the hook, this will interfere with the smooth operation of the machine. Check regularly and clean the stitching mechanism as needed. NOTE: An LED lamp is used to illuminate the stitching area. It does not require replacement. In the unlikely event it does not light up, go to wwwsingercom for more information about machine service. There is no need to lubricate this machine. Bobbin Holder Remove the bobbin cover and bobbin. Clean the bobbin holder with a brush. Maintenance O Hook Race and Feed Teeth 1 1. Remove the needle, presser foot and holder. Remove the bobbin cover and bobbin. Remove the screws holding the needle plate. 2. Remove the needle plate by lifting up the right side of the plate. 3. Lift up the bobbin holder and remove it. 3 Q Toprevent accidents, donot touch the threadcutterunit (a). 4. Clean the hook race, feed teeth and bobbin holder with a brush. Also clean them, using a soft, dry cloth. O Itt 4 5. Replace the bobbin holder into the hook race so that the tip (b) 5 fits to the stopper (c) as shown. 6. Replace the needle plate inserting the hook into the machine. Replace the screws and tighten. I 0 as O
-
 1
1 -
2
-
3
-
4
-
5
-
6
-
7
-
8
-
9
-
10
-
11
-
12
-
13
-
14
-
15
-
16
-
17
-
18
-
19
-
20
-
21
-
22
-
23
-
24
-
25
-
26
-
27
-
28
-
29
-
30
-
31
-
32
-
33
-
34
-
35
-
36
-
37
-
38
-
 39
39 -
 40
40 -
 41
41 -
 42
42 -
 43
43 -
 44
44 -
 45
45 -
 46
46 -
 47
47 -
 48
48 -
 49
49 -
50
-
51
-
52
-
53
-
54
-
55
-
56
-
57
-
58
-
59
-
60
-
61
-
62
-
63
-
64
-
65
-
66
-
67
-
68
-
69
-
70
-
71
-
72
-
73
-
74
-
75
-
76
-
77
-
78
-
79
-
80
-
81
-
82
-
83
-
84
-
85
-
86
-
87
-
88
-
89
-
90
-
91
-
92
-
93
-
94
-
95
-
96
-
97
-
98
-
99
-
100
-
101
-
102
-
103
-
104
-
105
-
106
-
107
-
108
-
109
-
110
-
111
-
112
-
113
-
114
-
115
-
116
-
117
-
118
-
119
-
120
-
121
-
122
-
123
-
124
-
125
-
126
-
127
-
128
-
129
-
130
-
131
-
132
-
133
-
134
-
135
-
136
-
137
-
138
-
139
-
140
 |
 |
