Singer C440 LEGACY Instruction Manual and Troubleshooting Guide - Page 42
Sequence, Single, Sewing, Beginning
 |
View all Singer C440 LEGACY manuals
Add to My Manuals
Save this manual to your list of manuals |
Page 42 highlights
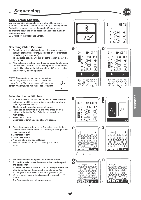
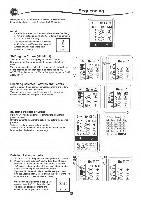
To Recall Memorized Sequence 1. Press the Load button on the Sequence Screen. 2. The memories are indicated by numbers. Press the desired sequence/memory. Sequencing 06 Cs 06 1 2 V 0 X 06 3. When the selected file number is highlighted, press the "v" button. 4. Recalled sequence is shown on the left side of LCD. 2 You can now sew the recalled sequence. NOTE: If another sequence has been created or loaded before loading from memory, the loaded sequence will be added at the cursor position. Sew the Sequence After selecting stitches for a sequence, the sequence will sew O repeatedly. 1. Attach the Satin Foot when sewing decorative & letter stitches. 2. Lower the presser foot and start sewing. Machine will start sewing from first entered pattern, and sew the sequence repeatedly. NOTE: By pressing the Thread Cutter button while sewing, machine will stop at the end of sequence and cut threads. Single Sequence Mode By pressing the Single Sequence button, the icon will change to a circle and activate the single sequence mode. This mode has two functions. 1. Adjustments as one stitch pattern: The value of stitch length and width are now common for all stitch patterns in the sequence. You can change the length/width and mirror/ reverse of all stitches as one stitch pattern. 2. Sewing one single time: The stitch sequence will sew one time and then stop at the end of the sequence. NOTE: In this mode, the Delete button is not activated. Press the Single Sequence button again to activate. Or; 06 81 Cs B Ei cJ Sewing Sequence from the Beginning Whenever pressing the Restart button, machine will start sewing sequence from beginning. MB El 7.0 16.0 T• • I a UlQ
-
 1
1 -
2
-
3
-
4
-
5
-
6
-
7
-
8
-
9
-
10
-
11
-
12
-
13
-
14
-
15
-
16
-
17
-
18
-
19
-
20
-
21
-
22
-
23
-
24
-
25
-
26
-
27
-
28
-
29
-
30
-
31
-
32
-
33
-
34
-
35
-
36
-
 37
37 -
 38
38 -
 39
39 -
 40
40 -
 41
41 -
 42
42 -
 43
43 -
 44
44 -
 45
45 -
 46
46 -
 47
47 -
48
-
49
-
50
-
51
-
52
-
53
-
54
-
55
-
56
-
57
-
58
-
59
-
60
-
61
-
62
-
63
-
64
-
65
-
66
-
67
-
68
-
69
-
70
-
71
-
72
-
73
-
74
-
75
-
76
-
77
-
78
-
79
-
80
-
81
-
82
-
83
-
84
-
85
-
86
-
87
-
88
-
89
-
90
-
91
-
92
-
93
-
94
-
95
-
96
-
97
-
98
-
99
-
100
-
101
-
102
-
103
-
104
-
105
-
106
-
107
-
108
-
109
-
110
-
111
-
112
-
113
-
114
-
115
-
116
-
117
-
118
-
119
-
120
-
121
-
122
-
123
-
124
-
125
-
126
-
127
-
128
-
129
-
130
-
131
-
132
-
133
-
134
-
135
-
136
-
137
-
138
-
139
-
140
 |
 |
