Singer C440 LEGACY Instruction Manual and Troubleshooting Guide - Page 14
≥11
 |
View all Singer C440 LEGACY manuals
Add to My Manuals
Save this manual to your list of manuals |
Page 14 highlights
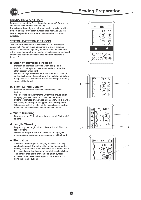
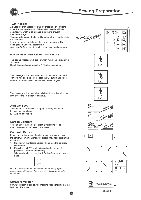
CD SELECTING A STITCH By pressing one of the Direct Selection buttons (0-9), you can select that stitch number immediately. Press two or three digits in quick succession to select a stitch from 10 and up. If the stitch number does not exist, you will hear a beep and the last entered stitch number will remain selected. STITCH PATTERN OPTIONS Your machine will automatically select optimum settings for each stitch. You can make adjustments to every stitch as desired. Adjusted settings only affect the selected stitch and will be reset to default when another stitch is selected. Adjusted settings are not automatically saved when the machine is turned off. a. Stitch Width/Needle Position Increase or decrease the stitch width using + and buttons. For straight stitches, use + and - to move the stitch position left or right. Default settings are shown as in the illustration. When a setting is changed, the numbers will be highlighted. When trying to exceed minimum or maximum settings, a warning sound will be heard. b. Stitch Length/Density Increase or decrease the stitch length using + and buttons. When sewing stitches from the Buttonhole or Elongation category (stitches 16-29, 142-159), use the + and buttons to increase or decrease stitch density. This may be necessary depending on the type of thread being used. When such a stitch is selected, the icon changes to show that stitch density is active instead of stitch length. c. Width Mirroring By pressing the Width Mirror button, stitch will flip from left to right. d. Length Mirroring By pressing the Length Mirror button, stitch will flip from top to bottom. When mirroring is active, the button will be highlighted. If mirroring is not available, a warning sound will be heard. e. Elongation Stitches in the Elongation category (stitches 142-159) can be elongated. The entire stitch will be longer but the density will remain the same. Press the Alt button to show the elongation setting instead of density for satin stitches. The density changes to show an elongation symbol. Increase or decrease the elongation of the satin stitch using the + and - buttons. Sewing Preparation 35 C1B 0 N ≥5(1.01 6.0 I+ N N 13 IS z ® SID CD ,SCSS J 135 JIB- -L a N aa U f14L HEI 3.4 7.0_ o. - lai4 18 1 1142 MB ID 7.0 xl
-
 1
1 -
2
-
3
-
4
-
5
-
6
-
7
-
8
-
 9
9 -
 10
10 -
 11
11 -
 12
12 -
 13
13 -
 14
14 -
 15
15 -
 16
16 -
 17
17 -
 18
18 -
 19
19 -
20
-
21
-
22
-
23
-
24
-
25
-
26
-
27
-
28
-
29
-
30
-
31
-
32
-
33
-
34
-
35
-
36
-
37
-
38
-
39
-
40
-
41
-
42
-
43
-
44
-
45
-
46
-
47
-
48
-
49
-
50
-
51
-
52
-
53
-
54
-
55
-
56
-
57
-
58
-
59
-
60
-
61
-
62
-
63
-
64
-
65
-
66
-
67
-
68
-
69
-
70
-
71
-
72
-
73
-
74
-
75
-
76
-
77
-
78
-
79
-
80
-
81
-
82
-
83
-
84
-
85
-
86
-
87
-
88
-
89
-
90
-
91
-
92
-
93
-
94
-
95
-
96
-
97
-
98
-
99
-
100
-
101
-
102
-
103
-
104
-
105
-
106
-
107
-
108
-
109
-
110
-
111
-
112
-
113
-
114
-
115
-
116
-
117
-
118
-
119
-
120
-
121
-
122
-
123
-
124
-
125
-
126
-
127
-
128
-
129
-
130
-
131
-
132
-
133
-
134
-
135
-
136
-
137
-
138
-
139
-
140
 |
 |