Singer C440 LEGACY Instruction Manual and Troubleshooting Guide - Page 13
Sewing, Preparation, CD5CDSCD, OSCOS
 |
View all Singer C440 LEGACY manuals
Add to My Manuals
Save this manual to your list of manuals |
Page 13 highlights
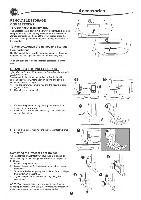
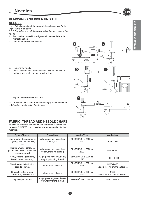
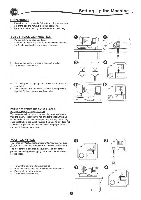
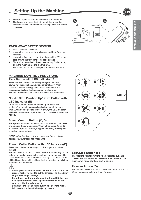
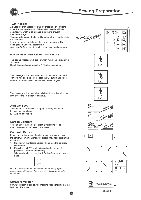
SETTING UP THE MACHINE Sewing Preparation TOUCH PANEL LCD When you turn on the power, the touch panel LCD will display the Home Screen. NOTE: If the message shown here appears, this means the needle is not in correct position. Turn the handwheel toward you to raise the needle to its highest position. Then press the "J" button. A Do not press the screen too hard and do not use sharp objects to touch it. Doing so can damage the screen. Touch the screen with your finger only. Home Screen (A) When you turn on the power, machine will display the Home Screen (see below). Home Screen will display two buttons: A a. Sewing Mode Button By pressing this button, you can select stitch patterns to sew continuously. You can also select buttonholes. b. Sequence Mode Button By pressing this button, you can combine stitch patterns B and letters easily by selecting each pattern or letter. Note: For sequence mode, see page 39. Home Button (B) You can return to the Home Screen from any other view by pressing the Home Button. a i .a . CD5CDSCD OSCOS SEWING MODE At the Home Screen, by pressing the Sewing Mode button, machine will select straight stitch first. You can select and sew all stitch patterns indicated in the Direct Selection buttons and the pattern chart located inside of the top cover. Stitch Information a. Stitch pattern The shape of stitch pattern will change according to the setting of stitch length, width, mirror/reverse and elongation. b. Pattern number c. Recommended presser foot The presser foot shown in the illustration is recommended for normal sewing. The presser foot recommendation may change, depending on the stitch selected. Use of included presser feet is described in this manual. d. Stitch width/needle position e. Stitch length/density b c ito
-
 1
1 -
2
-
3
-
4
-
5
-
6
-
7
-
 8
8 -
 9
9 -
 10
10 -
 11
11 -
 12
12 -
 13
13 -
 14
14 -
 15
15 -
 16
16 -
 17
17 -
 18
18 -
19
-
20
-
21
-
22
-
23
-
24
-
25
-
26
-
27
-
28
-
29
-
30
-
31
-
32
-
33
-
34
-
35
-
36
-
37
-
38
-
39
-
40
-
41
-
42
-
43
-
44
-
45
-
46
-
47
-
48
-
49
-
50
-
51
-
52
-
53
-
54
-
55
-
56
-
57
-
58
-
59
-
60
-
61
-
62
-
63
-
64
-
65
-
66
-
67
-
68
-
69
-
70
-
71
-
72
-
73
-
74
-
75
-
76
-
77
-
78
-
79
-
80
-
81
-
82
-
83
-
84
-
85
-
86
-
87
-
88
-
89
-
90
-
91
-
92
-
93
-
94
-
95
-
96
-
97
-
98
-
99
-
100
-
101
-
102
-
103
-
104
-
105
-
106
-
107
-
108
-
109
-
110
-
111
-
112
-
113
-
114
-
115
-
116
-
117
-
118
-
119
-
120
-
121
-
122
-
123
-
124
-
125
-
126
-
127
-
128
-
129
-
130
-
131
-
132
-
133
-
134
-
135
-
136
-
137
-
138
-
139
-
140
 |
 |
