Singer C440 LEGACY Instruction Manual and Troubleshooting Guide - Page 4
Table, Contents, WELCOME
 |
View all Singer C440 LEGACY manuals
Add to My Manuals
Save this manual to your list of manuals |
Page 4 highlights
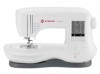
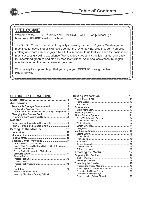
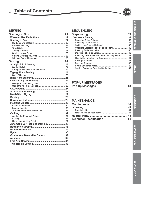
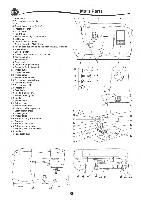
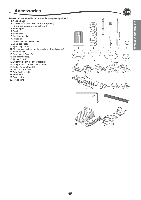
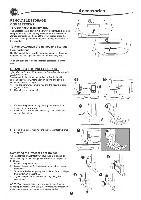
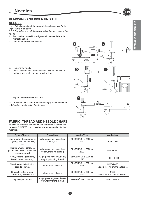
ap Table of Contents I .. I •• • as% % WELCOME Welcome to the SINGER® family and CONGRATULATIONS on purchasing a brand new SINGER® sewing machine! The SINGER® brand has stood for quality in sewing for over 160 years. We design our machines for sewists of all skill levels so that the joy of sewing, creating, do-it-yourself, crafting and more can be enjoyed by all. It is important to us that you have the easiest and most successful sewing experience. We have provided an instruction manual with easyto-understand graphics and step-by-step instructions. Additional assistance, by region, may be found on the web at www.singer.com. We're ready to help and hope that you enjoy your SINGER® sewing machine. Happy Sewing! I1• •%. .0I ..1 SETTING UP THE MACHINE Sewing Preparation 13 Main Parts 6 Touch Panel LCD 13 Accessories 7 Home Screen Home Button 13 13 Removable Storage Compartment 8 Sewing Mode 13 To Open the Accessory Tray 8 Stitch Information 13 To Remove/Attach the Removable Storage Compartment 8 Selecting a Stitch 14 Changing the Presser Foot 8 Stitch Pattern Options 14 Removing the Presser Foot Holder 8 Stitch Width/Needle Position 14 Needles 9 Stitch Length/Density 14 Removing and Inserting the Needle 9 Width Mirroring 14 Fabric, Thread and Needle Chart 9 Length Mirroring 14 Setting Up the Machine 10 Elongation 14 Unpacking 10 Machine Settings 15 Electrical Connection Foot Control 10 10 Setting Button Thread Tension Twin Needle 15 15 16 Machine Control Functions 11 Audible Beep 16 Tack Button with LED Indicator 11 Screen Contrast 16 Needle Stop Position Up/Down Button with LED Indicator...11 Calibrate Screen 16 Speed Control Button 11 Software Version 16 Thread Cutter Button with LED Indicator 11 Threading the Machine 17 Start/Stop Button Reverse Button 11 11 Preparing the Bobbin 17 Presser Foot Lifter 12 Bobbin Winding 17 Thread Cutter 12 Inserting the Bobbin 18 Presser Foot Pressure Dial 12 Threading the Needle 19 Lid 12 Preparing to Thread Machine 19 Handwheel 12 Setting Spool of Thread on Spool Pin 19 Raise/Lower Feed Teeth 12 Threading the Upper Thread 19 Mounting Machine in Sewing Cabinet 12 Threading the Needle Eye 20 Drawing Up the Bobbin Thread 20
-
 1
1 -
 2
2 -
 3
3 -
 4
4 -
 5
5 -
 6
6 -
 7
7 -
 8
8 -
 9
9 -
 10
10 -
11
-
12
-
13
-
14
-
15
-
16
-
17
-
18
-
19
-
20
-
21
-
22
-
23
-
24
-
25
-
26
-
27
-
28
-
29
-
30
-
31
-
32
-
33
-
34
-
35
-
36
-
37
-
38
-
39
-
40
-
41
-
42
-
43
-
44
-
45
-
46
-
47
-
48
-
49
-
50
-
51
-
52
-
53
-
54
-
55
-
56
-
57
-
58
-
59
-
60
-
61
-
62
-
63
-
64
-
65
-
66
-
67
-
68
-
69
-
70
-
71
-
72
-
73
-
74
-
75
-
76
-
77
-
78
-
79
-
80
-
81
-
82
-
83
-
84
-
85
-
86
-
87
-
88
-
89
-
90
-
91
-
92
-
93
-
94
-
95
-
96
-
97
-
98
-
99
-
100
-
101
-
102
-
103
-
104
-
105
-
106
-
107
-
108
-
109
-
110
-
111
-
112
-
113
-
114
-
115
-
116
-
117
-
118
-
119
-
120
-
121
-
122
-
123
-
124
-
125
-
126
-
127
-
128
-
129
-
130
-
131
-
132
-
133
-
134
-
135
-
136
-
137
-
138
-
139
-
140
 |
 |
