Singer C440 LEGACY Instruction Manual and Troubleshooting Guide - Page 18
Inserting, Bobbin
 |
View all Singer C440 LEGACY manuals
Add to My Manuals
Save this manual to your list of manuals |
Page 18 highlights
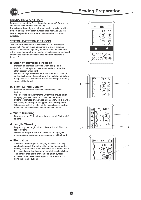
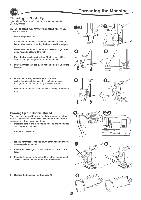
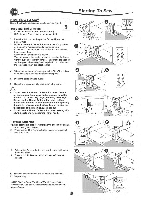
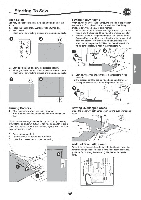
a Inserting the Bobbin 1. Place bobbin into bobbin case, making sure the bobbin turns in a counter-clockwise direction. Threading the Machine 1.)- ..----1 2. Draw thread into notch (a) while holding the bobbin lightly with your finger. \ a 3. Pull thread along the groove, up and around the top, to the left, then down. Pull thread to the right to cut the thread. 4. Replace the bobbin cover. Set the left tabs into the holes in needle plate and push the right side of bobbin cover down until it clicks into place. NOTE: This machine can start to sew without drawing up the bobbin thread. If you want to draw up the bobbin thread, see page 20. Be sure to use only SINGER® Class 15 bobbins (transparent) in this machine. t e
-
 1
1 -
2
-
3
-
4
-
5
-
6
-
7
-
8
-
9
-
10
-
11
-
12
-
 13
13 -
 14
14 -
 15
15 -
 16
16 -
 17
17 -
 18
18 -
 19
19 -
 20
20 -
 21
21 -
 22
22 -
 23
23 -
24
-
25
-
26
-
27
-
28
-
29
-
30
-
31
-
32
-
33
-
34
-
35
-
36
-
37
-
38
-
39
-
40
-
41
-
42
-
43
-
44
-
45
-
46
-
47
-
48
-
49
-
50
-
51
-
52
-
53
-
54
-
55
-
56
-
57
-
58
-
59
-
60
-
61
-
62
-
63
-
64
-
65
-
66
-
67
-
68
-
69
-
70
-
71
-
72
-
73
-
74
-
75
-
76
-
77
-
78
-
79
-
80
-
81
-
82
-
83
-
84
-
85
-
86
-
87
-
88
-
89
-
90
-
91
-
92
-
93
-
94
-
95
-
96
-
97
-
98
-
99
-
100
-
101
-
102
-
103
-
104
-
105
-
106
-
107
-
108
-
109
-
110
-
111
-
112
-
113
-
114
-
115
-
116
-
117
-
118
-
119
-
120
-
121
-
122
-
123
-
124
-
125
-
126
-
127
-
128
-
129
-
130
-
131
-
132
-
133
-
134
-
135
-
136
-
137
-
138
-
139
-
140
 |
 |

a
Inserting
the
Bobbin
1.
Place
bobbin
into
bobbin
case,
making
sure
the
bobbin
turns
in
a
counter
-clockwise direction.
2.
Draw
thread
into
notch
(a)
while
holding
the
bobbin
lightly
with
your
finger.
3.
Pull
thread
along
the
groove,
up
and
around
the
top,
to
the
left,
then
down.
Pull
thread
to
the
right
to
cut
the
thread.
4.
Replace
the
bobbin
cover.
Set
the
left
tabs
into
the
holes
in
needle
plate
and
push
the
right
side
of
bobbin
cover
down
until
it
clicks
into
place.
NOTE:
This
machine
can
start
to
sew
without
drawing
up
the
bobbin
thread.
If
you
want
to
draw
up
the
bobbin
thread,
see
page
20.
Be
sure
to
use
only
SINGER
®
Class
15
bobbins
(transparent)
in
this
machine.
Threading
the
Machine
1
.-
)
..----1
\
--
_--
----
----------
a
t
e