Singer C440 LEGACY Instruction Manual and Troubleshooting Guide - Page 8
REMOVABLE, STORAGE, COMPARTMENT, the Accessory, Remove/Attach, Removable, Storage, Compartment,
 |
View all Singer C440 LEGACY manuals
Add to My Manuals
Save this manual to your list of manuals |
Page 8 highlights
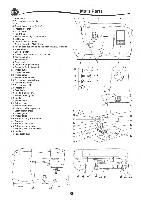
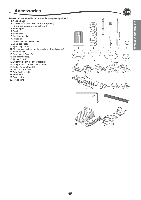
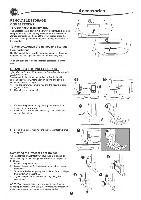
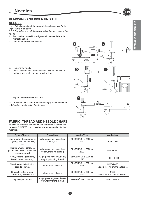
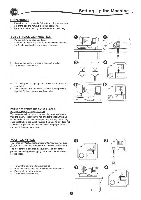
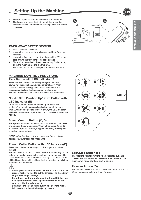
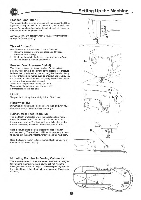
Accessories REMOVABLE STORAGE COMPARTMENT To Open the Accessory Tray The accessories are stored in the tray of the removable storage compartment. To open the tray, reach under the removable I storage compartment, then pull the lever located under the removable storage compartment, while resting your thumb on the top edge. To Remove/Attach the Removable Storage Compartment Hold left side of the removable storage compartment and pull to the left (DO NOT pull the lever for the accessory tray). To attach, slide the removable storage compartment to the right. CHANGING THE PRESSER FOOT A For safety, turn off the power switch before changing the presser foot. The presser foot must be changed according to the stitch or technique you sew. Information on sewing and sewing techniques begins on page 21. 1. Turn the handwheel toward you until the needle is at its highest position. 00G0 08O 2 Raise the presser foot lifter. [HI 3. Remove the presser foot by pushing the presser foot release lever toward you. 4. Place desired foot with its pin directly under the slot in presser foot holder. 0 5. Lower the presser foot lifter and the presser foot will snap into place. Removing the Presser Foot Holder When attaching presser feet that have their own shank, or when cleaning the machine, you should remove the presser foot holder. 1. Remove the presser foot. 2. Loosen the presser foot screw and remove the presser foot holder. 3. To replace the holder, pull up the holder as far as it will go from bottom of presser bar. 4. Tighten the presser foot screw securely using the screwdriver. NOTE: This sewing machine is a low shank model. When shopping for optional SINGER° presser feet and accessories, make sure they are designed for low shank models. 0000 0 4 O
-
 1
1 -
2
-
 3
3 -
 4
4 -
 5
5 -
 6
6 -
 7
7 -
 8
8 -
 9
9 -
 10
10 -
 11
11 -
 12
12 -
 13
13 -
14
-
15
-
16
-
17
-
18
-
19
-
20
-
21
-
22
-
23
-
24
-
25
-
26
-
27
-
28
-
29
-
30
-
31
-
32
-
33
-
34
-
35
-
36
-
37
-
38
-
39
-
40
-
41
-
42
-
43
-
44
-
45
-
46
-
47
-
48
-
49
-
50
-
51
-
52
-
53
-
54
-
55
-
56
-
57
-
58
-
59
-
60
-
61
-
62
-
63
-
64
-
65
-
66
-
67
-
68
-
69
-
70
-
71
-
72
-
73
-
74
-
75
-
76
-
77
-
78
-
79
-
80
-
81
-
82
-
83
-
84
-
85
-
86
-
87
-
88
-
89
-
90
-
91
-
92
-
93
-
94
-
95
-
96
-
97
-
98
-
99
-
100
-
101
-
102
-
103
-
104
-
105
-
106
-
107
-
108
-
109
-
110
-
111
-
112
-
113
-
114
-
115
-
116
-
117
-
118
-
119
-
120
-
121
-
122
-
123
-
124
-
125
-
126
-
127
-
128
-
129
-
130
-
131
-
132
-
133
-
134
-
135
-
136
-
137
-
138
-
139
-
140
 |
 |
