Singer C440 LEGACY Instruction Manual and Troubleshooting Guide - Page 12
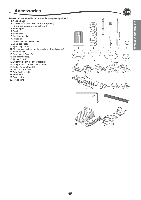
Presser, Lifter, Thread, Cutter, Pressure, Handwheel, Raise/Lower, Teeth, Mounting, Machine, Sewing
 |
View all Singer C440 LEGACY manuals
Add to My Manuals
Save this manual to your list of manuals |
Page 12 highlights
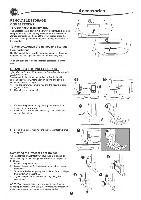
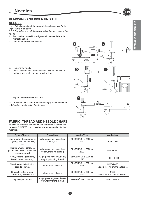
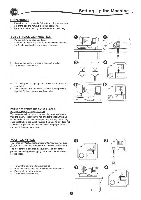
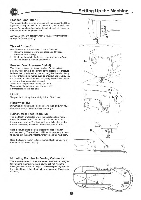
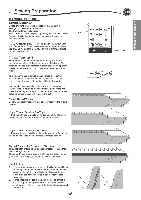
Presser Foot Lifter (H) The presser foot is lowered or raised with the presser foot lifter. If you are sewing on thick fabric or several layers of fabric, the presser foot can be raised higher to make it easier to place the fabric underneath the presser foot. NOTE: Machine will not start when the presser foot is raised (except for bobbin winding). Thread Cutter (I) Use this cutter if the thread cutter button is not used. 1. Raise the presser foot and bring fabric and threads backward after sewing. 2. Hook the threads to the thread cutter from back to front. 3_ Pull the thread tails to cut the threads. Presser Foot Pressure Dial (J) The correct presser foot pressure allows fabrics to feed properly while sewing. The setting of the presser foot pressure is determined mainly by the type and weight of the fabric being sewn. For lightweight fabrics such as sheers, batiste, voile, etc, the pressure is decreased. For heavyweight fabrics like denim or canvas, the pressure is increased. To increase the pressure, turn dial to 4 or 5. To decrease the pressure, turn dial to 1 or 2. For most fabrics, turn dial to N. Lid (K) To open the lid, lift up the front right side of the cover. Handwheel (L) By turning the handwheel, the needle will raise or lower. You should always turn the handwheel toward you. Raise/Lower Feed Teeth (M) The feed teeth are located under the needle plate, directly below the presser foot. Their function is to move the fabric forward when sewing. The feed teeth lever is located on the back of the sewing machine at the base of the free arm. Slide the lever (M) to the right to raise the feed teeth for ordinary sewing. The feed teeth will then raise when you begin to sew or turn the handwheel towards you one full revolution. Slide the lever to the left to lower the feed teeth for sewing on buttons or free motion sewing. Setting Up the Machine I 00 0 0 °000e) Mounting Machine in Sewing Cabinet (N) There are two holes on the underside of the machine designed for mounting the machine into a sewing cabinet. Align the holes (indicated in the picture) with the corresponding holes in the cabinet base. Attach the machine with screws. (Screws not included) o @ ao a O 0 oo o 00 O
-
 1
1 -
2
-
3
-
4
-
5
-
6
-
 7
7 -
 8
8 -
 9
9 -
 10
10 -
 11
11 -
 12
12 -
 13
13 -
 14
14 -
 15
15 -
 16
16 -
 17
17 -
18
-
19
-
20
-
21
-
22
-
23
-
24
-
25
-
26
-
27
-
28
-
29
-
30
-
31
-
32
-
33
-
34
-
35
-
36
-
37
-
38
-
39
-
40
-
41
-
42
-
43
-
44
-
45
-
46
-
47
-
48
-
49
-
50
-
51
-
52
-
53
-
54
-
55
-
56
-
57
-
58
-
59
-
60
-
61
-
62
-
63
-
64
-
65
-
66
-
67
-
68
-
69
-
70
-
71
-
72
-
73
-
74
-
75
-
76
-
77
-
78
-
79
-
80
-
81
-
82
-
83
-
84
-
85
-
86
-
87
-
88
-
89
-
90
-
91
-
92
-
93
-
94
-
95
-
96
-
97
-
98
-
99
-
100
-
101
-
102
-
103
-
104
-
105
-
106
-
107
-
108
-
109
-
110
-
111
-
112
-
113
-
114
-
115
-
116
-
117
-
118
-
119
-
120
-
121
-
122
-
123
-
124
-
125
-
126
-
127
-
128
-
129
-
130
-
131
-
132
-
133
-
134
-
135
-
136
-
137
-
138
-
139
-
140
 |
 |
