Singer C440 LEGACY Instruction Manual and Troubleshooting Guide - Page 30
INSERTING, ZIPPERS, Centered, Insertion, Lapped
 |
View all Singer C440 LEGACY manuals
Add to My Manuals
Save this manual to your list of manuals |
Page 30 highlights
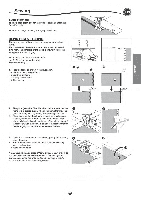
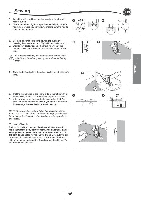
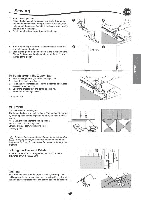
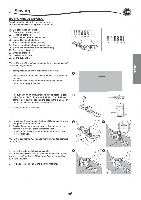
Sewing INSERTING ZIPPERS Centered Insertion No. 0 Straight stitch (center needle position) 0 Zipper Foot (E) A Changing needle position in the wrong direction when the Zipper Foot is attached could cause the needle to hit the presser foot, which could break the needle or damage the machine. If adjusting the needle position make sure the needle moves away from the center of the Zipper Foot. Before sewing, turn the handwheel toward you very slowly, making sure the needle does not hit the Zipper Foot. a 1. Baste the zipper opening to the seam line. a: Straight stitch b: End of opening c: Basting d: Wrong side of fabric 2. Press open the seam allowance. Place the open zipper face down on the seam allowance with the teeth against the seam line. Baste the zipper tape. 0 3. Attach the Zipper Foot. Attach the left side of the presser foot pin to the presser foot holder when sewing the right side of the zipper, and right side of the presser foot pin to the holder when sewing the left side of the zipper. 4. Sewing on the right side of the fabric, stitch the left side of the zipper from bottom to top. 5 mm 5. Stitch across the lower end and right side of zipper. Remove the basting and press. 7-10 mm *- 7-10 mm Lapped Insertion No. 0 Straight stitch (center needle position) Zipper Foot (E) 0 A Changing needle position in the wrong direction when the Zipper Foot is attached could cause the needle to hit the presser foot, which could break the needle or damage the machine. If adjusting the needle position make sure the needle moves away from the center of the Zipper Foot. Before sewing, turn the handwheel toward you very slowly, making sure the needle does not hit the Zipper Foot. O 1. Baste the zipper opening to the seam line. a: Straight stitch b: End of opening c: Basting d: Wrong side of fabric 2. Fold back to the left seam allowance. Turn under the right seam allowance to form 3 mm (1/8") fold. a 5 mm
-
 1
1 -
2
-
3
-
4
-
5
-
6
-
7
-
8
-
9
-
10
-
11
-
12
-
13
-
14
-
15
-
16
-
17
-
18
-
19
-
20
-
21
-
22
-
23
-
24
-
 25
25 -
 26
26 -
 27
27 -
 28
28 -
 29
29 -
 30
30 -
 31
31 -
 32
32 -
 33
33 -
 34
34 -
 35
35 -
36
-
37
-
38
-
39
-
40
-
41
-
42
-
43
-
44
-
45
-
46
-
47
-
48
-
49
-
50
-
51
-
52
-
53
-
54
-
55
-
56
-
57
-
58
-
59
-
60
-
61
-
62
-
63
-
64
-
65
-
66
-
67
-
68
-
69
-
70
-
71
-
72
-
73
-
74
-
75
-
76
-
77
-
78
-
79
-
80
-
81
-
82
-
83
-
84
-
85
-
86
-
87
-
88
-
89
-
90
-
91
-
92
-
93
-
94
-
95
-
96
-
97
-
98
-
99
-
100
-
101
-
102
-
103
-
104
-
105
-
106
-
107
-
108
-
109
-
110
-
111
-
112
-
113
-
114
-
115
-
116
-
117
-
118
-
119
-
120
-
121
-
122
-
123
-
124
-
125
-
126
-
127
-
128
-
129
-
130
-
131
-
132
-
133
-
134
-
135
-
136
-
137
-
138
-
139
-
140
 |
 |
