Singer C440 LEGACY Instruction Manual and Troubleshooting Guide - Page 40
Sequencing
 |
View all Singer C440 LEGACY manuals
Add to My Manuals
Save this manual to your list of manuals |
Page 40 highlights
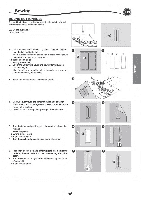
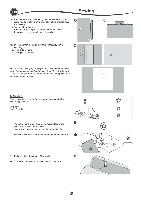
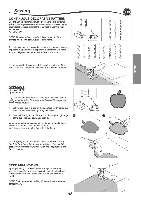
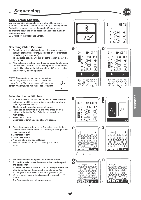
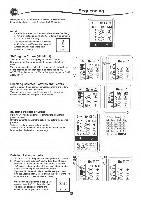
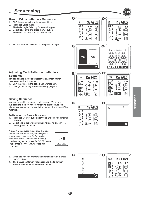
Sequencing When you return to the Sequence Screen, the last entered letter will be shown on the left side of the LCD screen. NOTE: 1. If a letter is selected, which has a different base line (like 7" or "g'), the width and length of other letters will be adjusted to proportion automatically. • 2. The sequence can contain a maximum of 40 patterns and letters. Message will appear when you reach the limit. Press the 'V" button. ( 4) 110 • 5.0 • Shifting the Cursor (Highlight) The cursor position is the highlighted pattern or letter. By pressing the Cursor buttons (a, b), cursor will shift up or down. The cursor is used to check selected patterns, insert patterns, a delete patterns or edit each pattern as described below. NOTE: When the cursor is shifted to the top of sequence, it will disappear. (c) b 81 cv 13B a© Checking Selected Patterns and Letters As the length of the sequence increases, patterns and letters will disappear from view on screen. You can check patterns and letters by moving the cursor upward or downward using the cursor buttons. .181 MB RE) 7.0 16.0 Cis 80 5.0 Inserting Pattern or Letter Machine will insert a pattern or letter after the highlighted pattern or letter. Shift the cursor to highlight the pattern just before the desired position. To insert a pattern, select pattern number. To insert a letter, press the Letter button and select or edit letter as described on the previous page. a T DID 11 hB 80 7.0 12.0 E3 !S v 0 tam,! 0 Si A au a eio Deleting Pattern or Letter 1. Shift the cursor to the pattern or letter you want to delete. 2. Press the Delete button (d) quickly (less than 0.5 sec.). Machine will delete the pattern or letter and cursor will d 141.0 shift to next pattern or letter. (If it was last pattern or letter, cursor will shift to previous pattern or letter.) 3. If you want to delete all patterns and letters, press and hold the Delete button 0.5 sec. or shift the cursor to the top of sequence and press the Delete button. I) • 4 0 When deleting all patterns, a pop up will appear, press the "v" button. Machine will delete all selected patterns and letters. To cancel, press the "X" button. d G
-
 1
1 -
2
-
3
-
4
-
5
-
6
-
7
-
8
-
9
-
10
-
11
-
12
-
13
-
14
-
15
-
16
-
17
-
18
-
19
-
20
-
21
-
22
-
23
-
24
-
25
-
26
-
27
-
28
-
29
-
30
-
31
-
32
-
33
-
34
-
 35
35 -
 36
36 -
 37
37 -
 38
38 -
 39
39 -
 40
40 -
 41
41 -
 42
42 -
 43
43 -
 44
44 -
 45
45 -
46
-
47
-
48
-
49
-
50
-
51
-
52
-
53
-
54
-
55
-
56
-
57
-
58
-
59
-
60
-
61
-
62
-
63
-
64
-
65
-
66
-
67
-
68
-
69
-
70
-
71
-
72
-
73
-
74
-
75
-
76
-
77
-
78
-
79
-
80
-
81
-
82
-
83
-
84
-
85
-
86
-
87
-
88
-
89
-
90
-
91
-
92
-
93
-
94
-
95
-
96
-
97
-
98
-
99
-
100
-
101
-
102
-
103
-
104
-
105
-
106
-
107
-
108
-
109
-
110
-
111
-
112
-
113
-
114
-
115
-
116
-
117
-
118
-
119
-
120
-
121
-
122
-
123
-
124
-
125
-
126
-
127
-
128
-
129
-
130
-
131
-
132
-
133
-
134
-
135
-
136
-
137
-
138
-
139
-
140
 |
 |
