Singer C440 LEGACY Instruction Manual and Troubleshooting Guide - Page 17
Threading, Machine
 |
View all Singer C440 LEGACY manuals
Add to My Manuals
Save this manual to your list of manuals |
Page 17 highlights
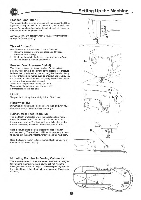
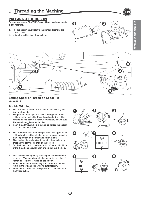
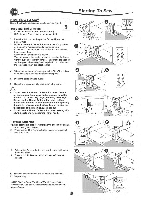
§llifffEMLilffEMZ3MMIA Threading the Machine PREPARING THE BOBBIN Be sure to use only SINGERS Class 15 bobbins (transparent) in this machine. 1. Pull the bobbin cover latch to the right and remove the bobbin cover. 2. Lift up the bobbin from the machine. 0 co eCO e ----1 t-) DI -1- 1 1 I I e „C....i.J......, e Setting Spool of Thread on Spool Pin See page 19. Bobbin Winding 1. Hold thread in both hands and hook thread to the guide from front opening. 2. Bring thread to the right and pass it through the thread guide from the back side. Pass thread under the bobbin winding tension disk in a clockwise direction, making sure it is placed snuggly under the disk. 3. Insert thread through hole in bobbin and place the bobbin on bobbin winder spindle. 4. Hold the end of the thread and push bobbin stopper to the right. When the bobbin winding screen appears, press the start/stop button on the screen to start winding. 5. After the bobbin winds a few turns, stop the machine by pressing the start/stop button on the screen. 6. Cut the thread next to the hole on top of the bobbin. None of the thread end should be left showing above the hole. 7. Start the machine again by pressing the start/stop button on screen. You can adjust winding speed by pressing "+" (faster) or "-" (slower) button on the screen. 8. When the bobbin is wound fully, the bobbin stopper will return to the left and stop winding automatically. 9. Remove the bobbin from the spindle and cut thread with the thread cutter. O CD 41, O 0 © o A3 El 11100 0 0 LiT 0 O CD .94 0
-
 1
1 -
2
-
3
-
4
-
5
-
6
-
7
-
8
-
9
-
10
-
11
-
 12
12 -
 13
13 -
 14
14 -
 15
15 -
 16
16 -
 17
17 -
 18
18 -
 19
19 -
 20
20 -
 21
21 -
 22
22 -
23
-
24
-
25
-
26
-
27
-
28
-
29
-
30
-
31
-
32
-
33
-
34
-
35
-
36
-
37
-
38
-
39
-
40
-
41
-
42
-
43
-
44
-
45
-
46
-
47
-
48
-
49
-
50
-
51
-
52
-
53
-
54
-
55
-
56
-
57
-
58
-
59
-
60
-
61
-
62
-
63
-
64
-
65
-
66
-
67
-
68
-
69
-
70
-
71
-
72
-
73
-
74
-
75
-
76
-
77
-
78
-
79
-
80
-
81
-
82
-
83
-
84
-
85
-
86
-
87
-
88
-
89
-
90
-
91
-
92
-
93
-
94
-
95
-
96
-
97
-
98
-
99
-
100
-
101
-
102
-
103
-
104
-
105
-
106
-
107
-
108
-
109
-
110
-
111
-
112
-
113
-
114
-
115
-
116
-
117
-
118
-
119
-
120
-
121
-
122
-
123
-
124
-
125
-
126
-
127
-
128
-
129
-
130
-
131
-
132
-
133
-
134
-
135
-
136
-
137
-
138
-
139
-
140
 |
 |
