Singer C440 LEGACY Instruction Manual and Troubleshooting Guide - Page 15
Sewing, Preparation
 |
View all Singer C440 LEGACY manuals
Add to My Manuals
Save this manual to your list of manuals |
Page 15 highlights
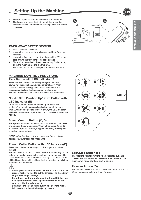
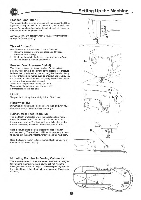
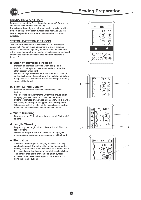
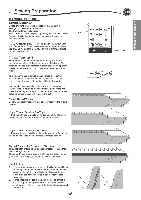
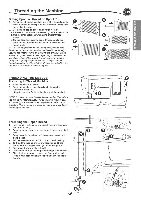
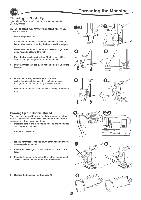
SETTING UP THE MACHINE Sewing Preparation MACHINE SETTINGS Setting Button (A) Before or during the sewing process, you can adjust the settings by pressing the Setting button. The Setting Screen will appear. This screen is scrolled by pressing the right side arrow buttons. Pressing the Setting button again, machine will return to previous screen. L. T4 . 3.2 B NOTE: All settings except for thread tension will remain until you change them. Thread tension will return to pre-set when you change the pattern. Default settings will differ depending on the stitch selected. 0 A Thread Tension (B) For the best stitch appearance and durability make sure the threads meet evenly between the two fabric layers. This machine sets the thread tension automatically when a pattern is selected. However, you can change the thread tension as follows. To increase the upper thread tension, press the + button. To decrease the upper thread tension, press the - button. If you change from pre-set, number will be highlighted. You can start sewing while in this mode and change tension while sewing. To return to previous screen, stop sewing and press the Setting button again. When another stitch pattern is selected, thread tension will return to pre-set. Preset Thread Tension Upper and bobbin thread will lock approximately in the middle of fabric. Upper Thread Tension Too Tight If the bobbin thread is visible on the top side of the fabric, the thread tension is too tight. Reduce the thread tension. 1144=844 Upper Thread Tension Too Loose If the upper thread is visible on the underside of the fabric, the thread tension is too loose. Increase the thread tension. H11-11-1 Thread Tension for Decorative Stitching Thread tension should be set to a slightly looser tension than that for straight stitch. The upper thread should appear slightly on the bottom side of your fabric, for example, when doing decorative sewing. Helpful Hints 1. If your sewing appears as shown in the illustration (stitches on the top side of the fabric are good, but the bottom side looks very loopy), it is most likely that the upper thread is not threaded correctly. Refer to page 19 for correct threading. 2. If after checking the top thread and the bobbin thread is still showing on the top side, check the bobbin to see if it is set correctly. Refer to page 18 for information on correct bobbin setting. •
-
 1
1 -
2
-
3
-
4
-
5
-
6
-
7
-
8
-
9
-
 10
10 -
 11
11 -
 12
12 -
 13
13 -
 14
14 -
 15
15 -
 16
16 -
 17
17 -
 18
18 -
 19
19 -
 20
20 -
21
-
22
-
23
-
24
-
25
-
26
-
27
-
28
-
29
-
30
-
31
-
32
-
33
-
34
-
35
-
36
-
37
-
38
-
39
-
40
-
41
-
42
-
43
-
44
-
45
-
46
-
47
-
48
-
49
-
50
-
51
-
52
-
53
-
54
-
55
-
56
-
57
-
58
-
59
-
60
-
61
-
62
-
63
-
64
-
65
-
66
-
67
-
68
-
69
-
70
-
71
-
72
-
73
-
74
-
75
-
76
-
77
-
78
-
79
-
80
-
81
-
82
-
83
-
84
-
85
-
86
-
87
-
88
-
89
-
90
-
91
-
92
-
93
-
94
-
95
-
96
-
97
-
98
-
99
-
100
-
101
-
102
-
103
-
104
-
105
-
106
-
107
-
108
-
109
-
110
-
111
-
112
-
113
-
114
-
115
-
116
-
117
-
118
-
119
-
120
-
121
-
122
-
123
-
124
-
125
-
126
-
127
-
128
-
129
-
130
-
131
-
132
-
133
-
134
-
135
-
136
-
137
-
138
-
139
-
140
 |
 |
