Brother International MFC-7050C Service Manual - Page 10
Installing, update, facsimile, equipment, Disconnecting, computer
 |
View all Brother International MFC-7050C manuals
Add to My Manuals
Save this manual to your list of manuals |
Page 10 highlights
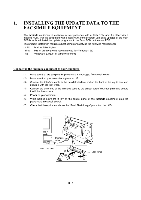
Installing the update data onto the flash ROM of the facsimile equipment During this procedure, do not disconnect the power cord or interface cable from the facsimile equipment. (1) Insert the floppy disk which stores the update data and transfer utility into the floppy disk drive of your computer. (Or, copy the update data and transfer utility onto the same directory of the hard disk.) (2) Click the Start button, point to Programs, and then click MS-DOS Prompt to open an MSDOS window. (3) Type the drive letter where the update data and transfer utility are located. If it is a floppy disk drive, type A:1 from the command line and press the ENTER key. (4) Check that your computer is connected with the facsimile equipment correctly. (5) To start the transfer utility transmitting the update data to the flash ROM of the facsimile equipment, type the following: PPP.EXE filename Then press the ENTER key. As the installation proceeds, the equipment shows the following messages on the LCD in order: "Receiving Image" "Erasing Flash" "Writing Flash" "Verifying Flash" Upon completion of the downloading, the equipment shows "Cycle Power Now." Disconnecting the facsimile equipment from your computer (1) Unplug the equipment's power cord from the wall socket. (2) After at least 5 seconds, disconnect the interface cable from the parallel interface port on the back of the equipment. (3) After at least 5 seconds, plug the equipment's power cord into a wall socket. II - 2
-
 1
1 -
2
-
3
-
4
-
 5
5 -
 6
6 -
 7
7 -
 8
8 -
 9
9 -
 10
10 -
 11
11 -
 12
12 -
 13
13 -
 14
14 -
 15
15 -
16
-
17
-
18
-
19
-
20
-
21
-
22
-
23
-
24
-
25
-
26
-
27
-
28
-
29
-
30
-
31
-
32
-
33
-
34
-
35
-
36
-
37
-
38
-
39
-
40
-
41
-
42
-
43
-
44
-
45
-
46
-
47
-
48
-
49
-
50
-
51
-
52
-
53
-
54
-
55
-
56
-
57
-
58
-
59
-
60
-
61
-
62
-
63
-
64
-
65
-
66
-
67
-
68
-
69
-
70
-
71
-
72
-
73
-
74
-
75
-
76
-
77
-
78
-
79
-
80
-
81
-
82
-
83
-
84
-
85
-
86
-
87
-
88
-
89
-
90
-
91
-
92
-
93
-
94
-
95
-
96
-
97
-
98
-
99
-
100
-
101
-
102
-
103
-
104
-
105
-
106
-
107
-
108
-
109
-
110
-
111
-
112
-
113
-
114
-
115
-
116
-
117
-
118
-
119
-
120
-
121
-
122
-
123
-
124
-
125
-
126
-
127
-
128
-
129
-
130
-
131
-
132
-
133
-
134
-
135
-
136
-
137
-
138
-
139
-
140
-
141
-
142
-
143
 |
 |