Epson 710C User Manual - Page 22
Video Menu (Video Image Source
 |
UPC - 010343821538
View all Epson 710C manuals
Add to My Manuals
Save this manual to your list of manuals |
Page 22 highlights
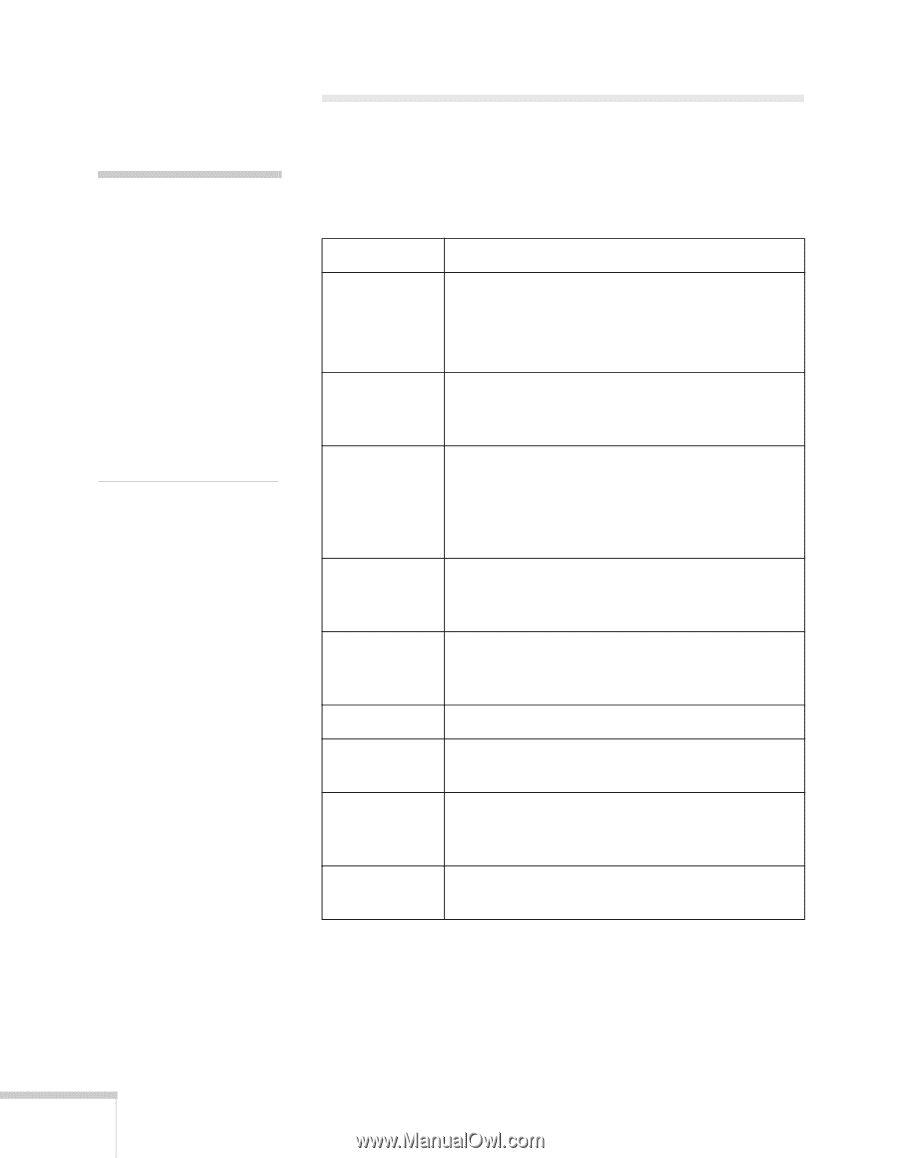
note The projector's image source must be set to Video, and the video source (such as a VCR or camcorder) must be connected and operating for you to access these menu options. For example, the projector must actually be projecting the image from your video tape if you're using a VCR. Video Menu (Video Image Source) The Video menu lets you make adjustments to the projected image. The following options are available when the image source is Video. Menu item Position Brightness Contrast Color Tint (NTSC only) Sharpness Gamma Mode Reset Description Use the Enter button to move the screen position in the corresponding direction. When you finish making adjustments, press the Esc button. Lightens or darkens the overall image. Increase brightness to lighten an image, or decrease it to darken the image. Adjusts the degree of difference between light and dark areas. Increase the contrast to make light areas lighter and dark areas darker. Decrease it to minimize the difference between the lightest and darkest areas of the image. Adjusts color density. Increase the setting for darker and more opaque colors. Decrease it for lighter and less opaque colors. Adjusts the red-green color balance of the screen. Increase tint to add more green, or decrease it to add more red. Adjusts the sharpness of the screen image. Adjusts the projected image for natural coloration. Specifies the image signal mode: Auto, NTSC, NTSC4.43, PAL, M-PAL, N-PAL, PAL 60, SECAM. Returns all menu items to their initial factory defaults. 22 Using the Projector Menus
-
 1
1 -
2
-
3
-
4
-
5
-
6
-
7
-
8
-
9
-
10
-
11
-
12
-
13
-
14
-
15
-
16
-
 17
17 -
 18
18 -
 19
19 -
 20
20 -
 21
21 -
 22
22 -
 23
23 -
 24
24 -
 25
25 -
 26
26 -
 27
27 -
28
-
29
-
30
-
31
-
32
-
33
-
34
-
35
-
36
-
37
-
38
-
39
-
40
-
41
-
42
-
43
-
44
-
45
-
46
-
47
-
48
-
49
-
50
-
51
-
52
-
53
-
54
-
55
-
56
-
57
-
58
-
59
-
60
-
61
-
62
-
63
-
64
-
65
-
66
-
67
-
68
-
69
-
70
-
71
-
72
-
73
-
74
-
75
-
76
-
77
-
78
-
79
-
80
-
81
-
82
-
83
-
84
-
85
-
86
-
87
-
88
-
89
-
90
-
91
-
92
-
93
-
94
-
95
-
96
-
97
-
98
-
99
-
100
-
101
-
102
-
103
-
104
-
105
-
106
-
107
-
108
-
109
-
110
-
111
-
112
-
113
-
114
-
115
-
116
-
117
-
118
-
119
-
120
-
121
-
122
-
123
-
124
 |
 |